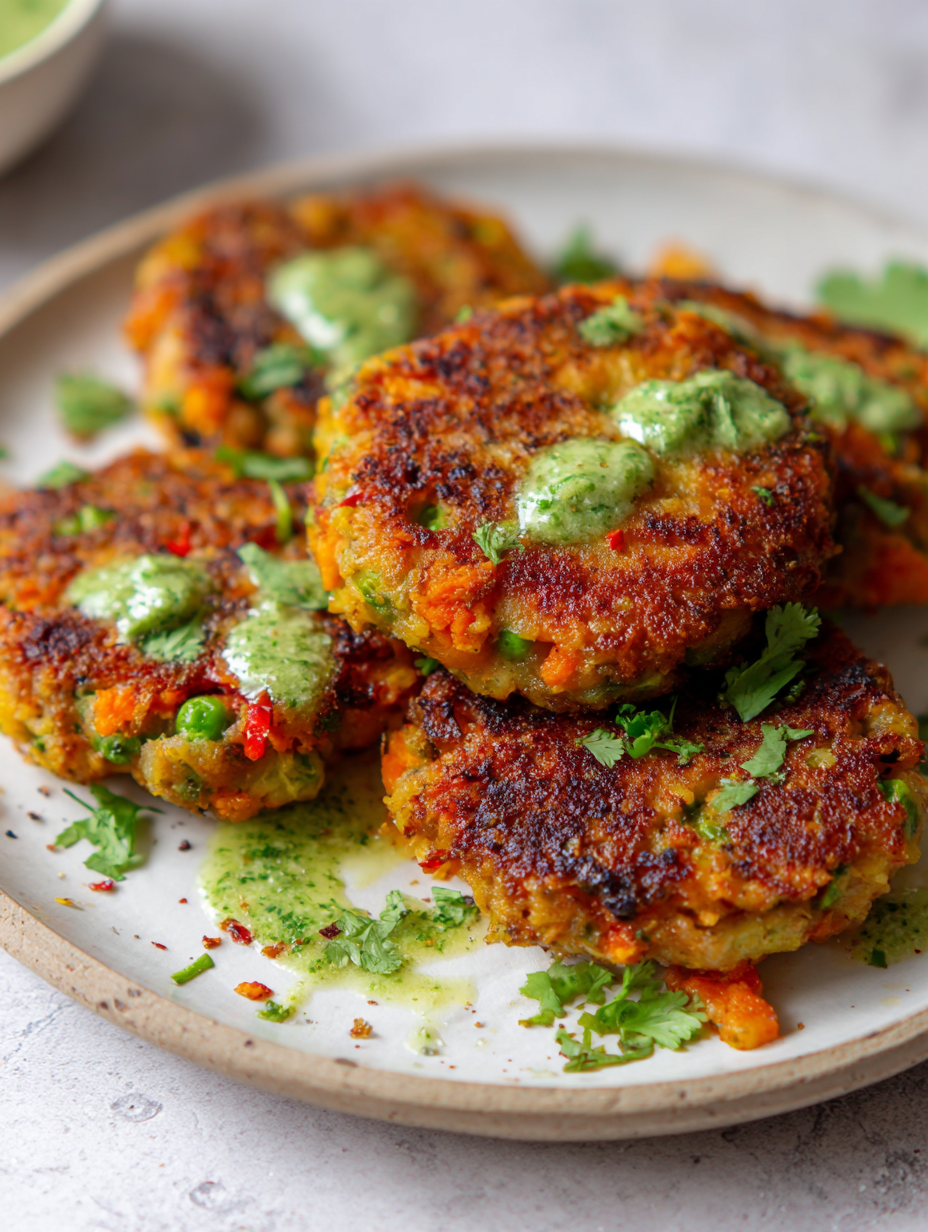
Making vegetable tikkis at home has always been about embracing the mess. The way the mashed veggies sometimes stick to your hands, the accidental pinch of spice that sparks a new flavor, or the slightly uneven shape that makes each tikki uniquely yours. It’s not about perfection here, just honest, spontaneous cooking that feels like a little kitchen rebellion.
I love how these tikkis turn out more rustic than polished, with crispy edges and soft, flavorful insides that echo the chaos of creating them. Each batch is a small adventure, a reminder that good food doesn’t need to be pretty—just tasty and made with a bit of love and a lot of improvisation. Sometimes, the best bites are the ones that look like they’ve been made with a little bit of chaos and a whole lot of heart.
Focusing on the imperfect, rustic charm of homemade vegetable tikkis that celebrate everyday kitchen chaos and the joy of spontaneous improvisation.
Celebrating Spontaneous Kitchen Chaos
- There’s a certain joy in tossing together leftover vegetables and watching them turn into crispy, golden bites that disappear fast.
- I remember the first time I nailed the perfect spice balance—made me feel like I’d finally cracked the secret code of Indian street snacks.
- Cooking these tikkis reminds me of lazy Sunday afternoons in my grandmother’s kitchen, where simple ingredients made magic happen without fuss.
- The smell of cumin and coriander wafting through the house always signals comfort, no matter how chaotic the day was.
The inspiration behind these tikkis
- Making vegetable tikkis at home started as a way to use up leftover veggies from my fridge. I loved the idea of transforming what seemed like everyday scraps into something crispy and satisfying, especially for quick snacks or a casual dinner. Over time, I realized that embracing the imperfect shapes and spontaneous spice adjustments brought more joy than trying to make them picture-perfect.
- One afternoon, I was experimenting with a mix of odds and ends—carrots, peas, and a dash of ginger—and somehow, it all came together into a batch of irresistibly crispy tikkis. That moment reminded me that cooking isn’t about perfection, but about trusting your instincts and enjoying the chaos. Now, these tikkis feel like a little celebration of kitchen improvisation, always a bit different but always delicious.
- heading
- story_type
Contextual origin, trivia, or history
- Vegetable tikkis have roots in Indian street food, where vendors served these crispy snacks as quick bites.
- The concept of turning leftover vegetables into flavorful patties is a practical tradition, born out of frugality and creativity.
- In some regions, these tikkis are infused with local spices, making each area’s version uniquely vibrant and slightly different.
- The rustic, imperfect shape of homemade tikkis reflects their humble origins—celebrating kitchen improvisation over perfection.
Ingredient breakdown
- Potatoes: I prefer starchy potatoes for a soft interior, but you can try sweet potatoes for a sweeter, denser bite.
- Mixed vegetables: I love a mix of peas, carrots, and corn for color and sweetness—skip or swap based on what’s in your fridge.
- Spices: Cumin and coriander are my go-tos, but a pinch of garam masala or chaat masala can add a smoky depth—adjust to taste.
- Binding agent: I use bread crumbs, but crushed oats or cooked rice work too—just make sure it holds the mixture together without making it greasy.
- Fresh herbs: Cilantro or mint brighten the tikkis, but dried herbs can work if you’re out—use sparingly for freshness.
- Oil: I opt for neutral oil like vegetable or sunflower for frying—if you want lighter tikkis, bake instead, but expect a different texture.
- Lemon juice: A splash right before serving lifts all the flavors—skip if you prefer milder, or add more for extra zing.
Spotlight on key ingredients
Potatoes:
- I prefer starchy potatoes for a soft interior, but you can try sweet potatoes for a sweeter, denser bite.
- Mixed vegetables: I love a mix of peas, carrots, and corn for color and sweetness—skip or swap based on what’s in your fridge.
- Spices: Cumin and coriander are my go-tos, but a pinch of garam masala or chaat masala can add a smoky depth—adjust to taste.
Fresh herbs and Oil:
- Fresh herbs: Cilantro or mint brighten the tikkis, but dried herbs can work if you’re out—use sparingly for freshness.
- Oil: I opt for neutral oil like vegetable or sunflower for frying—if you want lighter tikkis, bake instead, but expect a different texture.
Notes for ingredient swaps
- Dairy-Free: Use coconut yogurt or omit altogether. The texture won’t be as creamy, but the flavor stays balanced.
- Gluten-Free: Swap bread crumbs for crushed rice crackers or almond meal. Expect a nuttier taste and slightly denser tikkis.
- Vegan: Replace eggs with flaxseed meal mixed with water or use mashed chickpeas as a binder. It’ll be a bit heartier.
- Low-Sodium: Skip added salt, focus on fresh herbs and spices for flavor. The tikkis will be milder but still tasty.
- Sweet Corn: Use fresh or frozen sweet corn instead of peas or carrots for a burst of juicy sweetness and smoky aroma.
- Herbs: Substitute cilantro with parsley or basil if you prefer a different fresh note. Dried herbs work, but add less to avoid overpowering.
- Oil: Try sesame or ghee for a richer, more fragrant fry; expect a deeper flavor and slightly different crispness.
Equipment & Tools
- large mixing bowl: to combine and mix ingredients.
- potato masher or fork: to mash potatoes smoothly.
- sharp knife and chopping board: to prep vegetables and herbs.
- frying pan or skillet: to cook the tikkis evenly.
- spatula: to flip and remove tikkis from pan.
Step-by-step guide to vegetable tikkis
- Gather your equipment: a large mixing bowl for combining ingredients, a potato masher or fork for mashing, a sharp knife and chopping board for prep, a frying pan or skillet for cooking, and a spatula for flipping.
- Peel and grate 2 cups of mixed vegetables (carrots, zucchini, or spinach) into the bowl. Set aside.
- Boil 2 large potatoes until tender, about 15 minutes at 100°C/212°F. Drain and mash until smooth.
- Add the mashed potatoes to the vegetable bowl. Mix well.
- Stir in 1 teaspoon cumin, 1 teaspoon coriander, salt, and a pinch of chili powder. Adjust spice levels to taste.
- Incorporate 1/4 cup bread crumbs or crushed oats as a binder. Mix until the mixture feels cohesive but not sticky.
- Shape the mixture into small, rustic patties or rounds, about 2-3 inches wide. Don’t worry if they’re uneven.
- Heat 2-3 tablespoons of neutral oil in your pan over medium heat (about 160°C/320°F). When shimmering, add the tikkis.
- Cook for 3-4 minutes per side, until golden brown and crispy. Flip carefully and avoid overcrowding the pan.
- Check for doneness: the tikkis should be crispy on the outside, soft inside, and smell fragrant. If they’re sticking, turn the heat down slightly.
- If they’re burning too fast, lower the heat. If they’re pale, turn the heat up a bit. Adjust as needed.
- Remove from pan and drain on paper towels. Let rest for 2 minutes.
- Finish with a squeeze of lemon juice and chopped fresh herbs. Serve hot, with your favorite chutney or yogurt.
Let the cooked tikkis rest for a couple of minutes on paper towels to drain excess oil. Serve warm with a squeeze of lemon and fresh herbs for brightness.
How to Know It’s Done
- Outer crust is golden and crispy, interior is soft and cooked through.
- Vegetable mixture holds shape without falling apart during frying.
- A fragrant aroma of spices and fried veggies fills the air, with a slightly oozy feel when pressed.
Rustic Vegetable Tikkis
Ingredients
Equipment
Method
- Peel and boil the potatoes until tender, about 15 minutes. Drain and mash until smooth, then transfer to a large mixing bowl.
- Add the grated or finely chopped vegetables to the mashed potatoes. Mix well until combined.
- Sprinkle in cumin powder, coriander powder, salt, and chili powder. Stir to evenly distribute the spices.
- Incorporate the bread crumbs and chopped cilantro, mixing until the mixture holds together but isn’t overly sticky.
- Divide the mixture into equal portions and shape each into rustic, slightly uneven patties about 2-3 inches wide with your hands.
- Heat the neutral oil in a skillet over medium heat until shimmering and fragrant, about 2-3 minutes.
- Carefully place the tikkis in the hot oil, cooking in batches if needed to avoid overcrowding.
- Fry each side for 3-4 minutes until golden brown and crispy, flipping gently with a spatula.
- Once crispy and golden on both sides, remove the tikkis from the pan and drain on paper towels to remove excess oil.
- Finish by squeezing fresh lemon juice over the hot tikkis and sprinkling extra cilantro if desired. Serve immediately with chutney or yogurt.
Notes
Pro tips for perfect tikkis
- Bolded Mini-Head: Use a gentle hand when shaping tikkis to avoid over-compacting, which makes them dense.
- Bolded Mini-Head: Keep oil at a steady medium heat—too hot and they burn, too cool and they get greasy.
- Bolded Mini-Head: Add a pinch of salt to the vegetable mash—this helps break down cell walls and boosts flavor.
- Bolded Mini-Head: For extra crispiness, lightly spray or brush the tikkis with oil before frying or baking.
- Bolded Mini-Head: When flipping, do it carefully—if they crumble, let them rest a minute to firm up.
- Bolded Mini-Head: Use a spatula to gently press down on each tikki once in the pan for even crisp edges.
- Bolded Mini-Head: Rest cooked tikkis on paper towels for a minute—this drains excess oil and keeps them crispy.
Common mistakes and how to fix them
- FORGOT to adjust heat → the tikkis burn or stay raw inside. Lower heat and cook slow.
- DUMPED too much oil → soggy tikkis. Use just enough oil for crispness, drain excess.
- OVER-TORCHED the edges → bitter flavor. Turn down heat once golden edges appear.
- MISSED resting time → soggy texture. Rest on paper towels for 2 minutes to drain oil.
Quick fixes and pantry swaps
- When oil shimmers, splash a tiny drop of water—if it crackles, it’s ready to fry.
- If tikkis stick, patch with more oil or lower heat for gentler cooking.
- Splash a little lemon juice to brighten flavors if they taste flat or dull.
- When burnt edges appear, shield with a paper towel and reduce heat immediately.
- DUMPED too much oil? Rescue crispy edges by draining on paper towels, then reheat briefly.
Prep, store, and reheat tips
- Prepare the vegetable mixture a day in advance; store covered in the fridge for up to 24 hours. The flavors deepen overnight, and the mixture firms up slightly, making shaping easier.
- Cooked tikkis can be refrigerated for up to 2 days. Reheat in a hot skillet over medium heat until crispy, about 2-3 minutes per side, until fragrant and crackling.
- Freezing raw or cooked tikkis is an option—wrap tightly and freeze for up to a month. To reheat, bake at 180°C/356°F for 10-12 minutes or pan-fry until crispy.
- The flavors may mellow slightly after storage, so a squeeze of lemon or fresh herbs before serving brightens up the reheated tikkis. Expect a slightly softer texture after refrigeration.
Top questions about vegetable tikkis
1. Can I use sweet potatoes instead of regular potatoes?
Use potatoes with a firm texture; they mash easily and hold together well. Russet potatoes are ideal, but Yukon Gold works too.
2. Can I make these without potatoes?
Yes, but be aware sweet potatoes are moister and sweeter, so you might want to reduce other liquids or adjust spices.
3. My mixture is too sticky, how do I fix it?
Ensure your mixture is not too wet; if it feels sticky, add more breadcrumbs or oats to help shape the tikkis.
4. How do I know when the tikkis are cooked through?
Fry on medium heat, about 160°C/320°F, until the tikkis are golden and crispy on the outside. They should feel firm when pressed.
5. Can I bake these instead of frying?
Use a neutral oil like vegetable or sunflower. For a lighter version, bake at 180°C/356°F for 15-20 minutes, turning halfway.
6. Can I use dried herbs in this recipe?
Fresh herbs like cilantro or mint add brightness, but dried herbs can be used in a pinch—use less since they are more concentrated.
7. Should I add lemon juice during cooking or before serving?
Adding lemon juice just before serving lifts the flavors with a bright, zesty note. It’s best fresh and not cooked.
8. My tikkis are burning on the outside but raw inside. What do I do?
Cooking on too high heat might burn the outside before the inside cooks. Keep the temperature steady and cook slowly for even crispiness.
9. How long can I store cooked tikkis?
Store cooked tikkis in an airtight container in the fridge for up to 2 days. Reheat in a hot skillet for best crispiness.
10. Why are my tikkis soggy or unevenly cooked?
Overcrowding the pan causes uneven cooking. Fry in batches, giving each tikki space to crisp properly.
These vegetable tikkis are a reminder that imperfect, rustic food often tastes the best. They come together quickly, and the messy shapes add to their charm, making every batch a little different but always satisfying. In a season that celebrates fresh, simple ingredients, they feel like a perfect snack or light meal that keeps things honest in the kitchen.
Cooking them is about embracing the chaos — a little bit of spice, a dash of improvisation, and a crispy, golden bite at the end. They’re not just food; they’re a small act of kitchen rebellion, a way to reclaim the joy of spontaneous, honest cooking. Sometimes, the best moments happen when you let go of perfection and just cook with what’s at hand.

Welcome to Exploreing New Tastes. I’m really glad you found your way here. I’m a food blogger driven by curiosity more than perfection. I think about flavors constantly, how they change across cultures, how a small tweak can completely shift a dish, and how food tells stories long before anyone sits down to eat. This blog is where I document that curiosity, one recipe and one experience at a time.