Growing up, vegetable cutlets were the go-to snack after school, soft and crispy all at once, packed with familiar flavors that felt like a warm hug. Making them at home still brings back the chaos of my family’s kitchen—everyone pitching in, tasting the mixture, arguing about the perfect spice balance.
This recipe isn’t just about feeding hungry kids or quick bites. It’s about reclaiming a simple, honest comfort food that captures a moment of togetherness. It’s forgiving, adaptable, and a little messy—just like those afternoons of childhood, where the best memories were made around a plate of crispy, veggie-stuffed goodness.
Focusing on the nostalgic comfort of childhood, this recipe emphasizes how homemade vegetable cutlets can evoke memories of family kitchens, blending simple ingredients into a dish that’s both hearty and deeply personal.
Rediscovering Childhood Comfort
- Making these takes me back to my grandma’s busy kitchen, where the smell of cumin and fresh veggies filled the air.
- I love how versatile this recipe is—sometimes I throw in a handful of grated cheese or a dash of chili for a twist.
- There’s a certain pride in shaping each cutlet by hand, feeling the mixture firm up under my fingertips.
- These remind me that simple ingredients, cooked with care, create the most satisfying, nostalgic bites.
- Nothing beats the joy of crispy edges crackling in hot oil, a small reminder of childhood afternoons.
The story behind this recipe
- This recipe came from a messy, lively kitchen in my youth, where my mother would toss together whatever vegetables were on hand, mash them up, and fry them until crispy. It was our way of turning odds and ends into something satisfying and warm. Over years, I tweaked her method, adding spices and adjusting textures, but that nostalgic flavor remains the heart of it.
- Making vegetable cutlets is like capturing a slice of childhood chaos—messy, spontaneous, and deeply comforting. It’s a dish that feels like a warm hug from a busy kitchen, filled with the aroma of cumin, coriander, and fried veggies. Each batch feels like a little act of love, imperfect but honest.
- heading: ‘The story behind this recipe’
Historical & Cultural Roots
- Vegetable cutlets have roots in street food stalls across India, where they are a popular snack for their affordability and quick prep.
- The idea of turning leftover vegetables into crispy patties dates back to resourceful home cooks who wanted to minimize waste.
- In many cultures, similar recipes emerged as way to incorporate more vegetables into daily meals, especially during times of scarcity.
- The crispy exterior and savory interior of these cutlets make them a beloved comfort food, often linked to festive gatherings and family feasts.
- Modern twists, like adding cheese or herbs, have kept this humble dish relevant, blending tradition with personal flair.
Ingredient breakdown
- Carrots: I prefer grated carrots for a touch of sweetness and color; they add a subtle crunch. Swap with zucchini if you want a milder flavor and more moisture.
- Potatoes: I use boiled, mashed potatoes for a fluffy base; they help bind everything together. Sweet potatoes work well too, giving a slightly sweeter profile.
- Onions: Finely chopped onions bring a savory depth and a slight zing. If you’re sensitive to raw onion sharpness, sauté them briefly before mixing.
- Spices: I keep cumin and coriander in my mix—they evoke that nostalgic aroma. Feel free to add a pinch of garam masala or chili powder for heat or warmth.
- Breadcrumbs: I toast mine slightly for extra crunch, but panko can give a lighter, crispier exterior. Use regular breadcrumbs if that’s what you have.
- Binding agent: I use a beaten egg to hold everything together, but a flaxseed slurry works for vegan tweaks—just mix 1 tbsp ground flax with 3 tbsp water until gelled.
- Oil: I fry in vegetable or sunflower oil, which offers a neutral flavor and high smoke point. For a healthier take, bake or pan-fry with a minimal splash of oil.
Spotlight on key ingredients
Carrots:
- I prefer grated carrots for a touch of sweetness and color; they add a subtle crunch. Swap with zucchini if you want a milder flavor and more moisture.
- Potatoes: I use boiled, mashed potatoes for a fluffy base; they help bind everything together. Sweet potatoes work well too, giving a slightly sweeter profile.
- Onions: Finely chopped onions bring a savory depth and a slight zing. If you’re sensitive to raw onion sharpness, sauté them briefly before mixing.
Potatoes:
- I use boiled, mashed potatoes for a fluffy base; they help bind everything together. Sweet potatoes work well too, giving a slightly sweeter profile.
- Onions: Finely chopped onions bring a savory depth and a slight zing. If you’re sensitive to raw onion sharpness, sauté them briefly before mixing.
Notes for ingredient swaps
- Vegetables: I love using grated carrots or zucchini—both add moisture and color. Swap with sweet potatoes for a sweeter, creamier bite.
- Binders: I typically use eggs for stability, but flaxseed or chia seeds mixed with water make good vegan replacements—just expect a slightly denser texture.
- Breadcrumbs: Toasted panko give extra crunch, but regular or gluten-free breadcrumbs work fine if that’s what you have on hand.
- Oil: Vegetable oil is my go-to for frying—neutral and high smoke point. For a healthier version, try baking or pan-frying with a light spray of oil.
- Spices: Cumin and coriander are staples, but add a pinch of garam masala or smoked paprika for a different aromatic profile.
- Herbs: Fresh cilantro or parsley brighten up the flavor—dried herbs can be used, but they won’t have the same vibrancy.
- Salt: I prefer sea salt for a clean, subtle saltiness; adjust to taste, especially if your ingredients are salty already.
Equipment & Tools
- Large mixing bowl: Combine and mix all ingredients thoroughly.
- Grater: Shred carrots finely for even texture.
- Saucepan or large skillet: Fry the cutlets evenly with adequate oil.
- Spatula: Flip and handle cutlets gently during frying.
- Parchment paper: Prevent sticking when shaping and resting cutlets.
- Thermometer (optional): Check oil temperature to maintain even frying.
Step-by-step guide to vegetable cutlets
- Gather your ingredients: grated carrots, boiled mashed potatoes, finely chopped onions, spices, breadcrumbs, and an egg or flaxseed slurry. Keep everything within arm’s reach on your countertop.
- In a large mixing bowl, combine the grated carrots, mashed potatoes, onions, and spices. Mix well until the mixture feels cohesive and fragrant—about 2 minutes. If it feels too loose, sprinkle in a little more breadcrumbs.
- Add the beaten egg (or flaxseed slurry) to the mixture. Stir thoroughly until everything is evenly coated and sticky enough to hold a shape—about 1 minute.
- Shape the mixture into small, flat patties, about 1/2 inch thick. Use damp hands to prevent sticking. Place each on a tray lined with parchment paper as you go.
- Heat a generous splash of vegetable oil in a non-stick skillet over medium heat—about 160°C / 320°F. To test, flick a tiny bit of batter into the oil; it should crackle immediately.
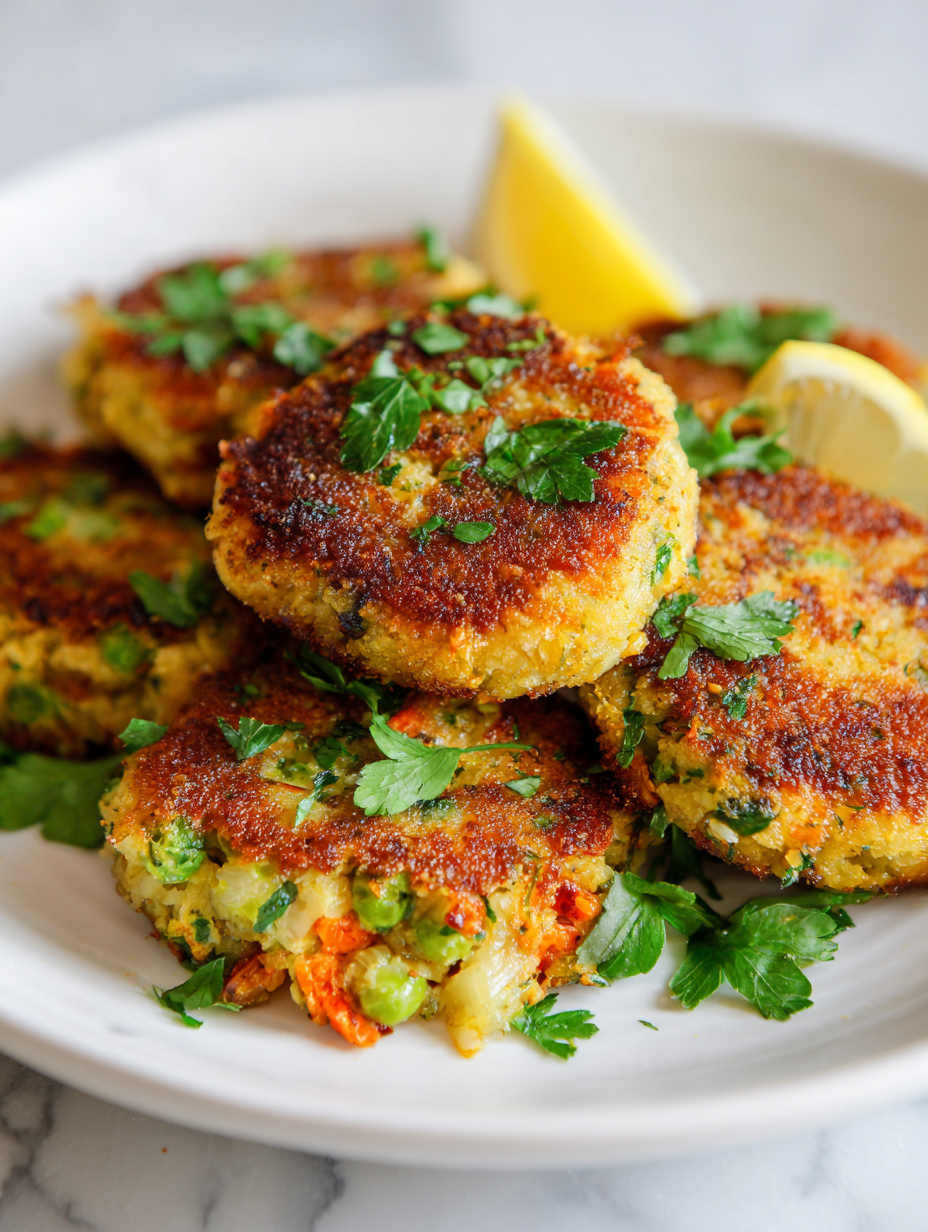
- Fry the cutlets in batches, about 4-5 at a time, for 3-4 minutes per side. They should turn golden brown, with crispy edges and a fragrant aroma. Flip carefully to avoid breaking them.
- Once golden, transfer the cutlets to a paper towel-lined plate to drain excess oil. Keep the heat moderate to prevent burning—adjust if they brown too quickly.
- Allow the cutlets to rest for 2-3 minutes. This helps them firm up and makes flipping easier. Serve hot with your favorite chutney or yogurt dip.
- For the final touch, check that the cutlet is firm and crispy on the outside, with a soft, cooked interior. They should hold their shape when gently pressed.
Let the cutlets rest on paper towels for a minute to drain excess oil. Serve hot, ideally with a tangy chutney or chilled yogurt. For presentation, arrange on a platter with fresh herbs or lemon wedges for extra brightness.
How to Know It’s Done
- Golden brown exterior with crispy edges
- Mixture holds shape when formed into patties
- Internal texture is soft but cooked through (probe at 75°C / 165°F)
Vegetable Cutlets
Ingredients
Equipment
Method
- Gather all your ingredients: grated carrots, mashed potatoes, chopped onions, spices, breadcrumbs, and an egg. Place everything within easy reach on your countertop.
- In a large mixing bowl, combine the grated carrots, mashed potatoes, chopped onions, cumin, coriander, optional garam masala, chili powder, and a pinch of salt. Mix thoroughly until the mixture is fragrant and well combined, about 2 minutes. It should feel cohesive and slightly sticky.
- Add the beaten egg (or flaxseed slurry) and half of the breadcrumbs to the mixture. Stir until everything is evenly coated and the mixture holds together when pressed—this takes about 1 minute.
- Divide the mixture into small portions and shape each into flat, round patties about half an inch thick. Keep your hands damp to prevent sticking, and place the shaped cutlets on a parchment-lined tray.
- Heat vegetable oil in a skillet over medium heat until shimmering and hot—about 160°C or 320°F. To test, flick a tiny bit of batter into the oil; it should crackle immediately.
- Carefully place a few cutlets into the hot oil, being careful not to overcrowd the pan. Fry each side for 3-4 minutes, until golden brown and crispy around the edges, with a fragrant aroma filling the air.
- Use a spatula to flip the cutlets gently, ensuring they brown evenly on both sides. Once done, transfer them to a paper towel-lined plate to drain excess oil.
- Repeat the frying process with remaining cutlets, maintaining a steady heat. Rest the cooked cutlets for a couple of minutes to help them set and to keep their shape.
- Serve the vegetable cutlets hot, accompanied by chutney or yogurt. Enjoy the crispy exterior paired with the soft, flavorful interior for a nostalgic, comforting bite.
Tips for perfect vegetable cutlets
- Bolded mini-head: Use a gentle touch when shaping patties to keep them intact during frying.
- Bolded mini-head: Keep oil at a consistent medium temperature—test with a small batter piece for shimmer and crackle.
- Bolded mini-head: When frying, don’t overcrowd the pan to prevent sogginess and uneven browning.
- Bolded mini-head: For extra crispness, lightly coat the cutlets in seasoned breadcrumbs before frying.
- Bolded mini-head: Drain fried cutlets on paper towels immediately to keep them crispy and prevent greasiness.
- Bolded mini-head: Rest cutlets for a couple of minutes after frying—this helps them set and keeps the shape.
- Bolded mini-head: Add a splash of lemon juice or a pinch of chili powder to the mixture for an unexpected flavor boost.
Common mistakes and how to fix them
- FORGOT to drain excess water from vegetables → Squeeze out moisture for crispier cutlets.
- DUMPED cold oil into hot pan → Use medium heat; oil should shimmer but not smoke.
- OVER-TORCHED the first batch → Lower heat if edges turn dark quickly, cook until golden.
- MISSED to season mixture thoroughly → Taste and adjust salt/spices before shaping.
Quick fixes and pantry swaps
- When mixture feels too loose, add a sprinkle of breadcrumbs to firm it up.
- Splash a few drops of water into oil if it starts smoking; lower heat immediately.
- DUMPED cold oil into hot pan? Let it cool slightly before frying again to prevent splatters.
- FORGOT to drain excess moisture? Squeeze out vegetables to keep cutlets crispy.
- Over-torched your first batch? Lower the heat and cook longer for even golden color.
Prep, store, and reheat tips
- Prepare the vegetable mixture ahead by grating and mixing the ingredients. Keeps well in the fridge for up to 24 hours; the flavors meld and intensify, making the final fry more aromatic.
- Shape the cutlets and store them on a plate covered with plastic wrap. They can be refrigerated for up to 2 days or frozen for up to 1 month. Frozen cutlets should be thawed in the fridge before frying for even cooking.
- Reheat in a hot skillet with a little oil for 3-4 minutes per side until crispy and heated through. The exterior should crackle gently, and the smell will be irresistibly savory.
- Cooked cutlets taste best fresh, but you can reheat leftovers in a toaster oven or air fryer to restore crispness. Avoid microwaving to keep the texture firm and crunchy.
- The flavors deepen after resting, so consider making the mixture a few hours in advance. Just give it a quick stir before shaping to redistribute the moisture and spices.
Top questions about vegetable cutlets
1. Can I use frozen vegetables?
Use fresh, firm vegetables like carrots and potatoes for best texture. Cooked, cooled, and grated, they give the cutlets a satisfying bite.
2. Can I prepare the mixture ahead of time?
Yes, but thaw and drain excess moisture thoroughly to prevent sogginess and ensure crispness when frying.
3. How long can I store uncooked cutlets?
Absolutely. You can make the mixture a few hours or even a day in advance, then shape and fry just before serving.
4. What’s the best way to reheat leftovers?
Store shaped but uncooked cutlets in an airtight container in the fridge for up to 24 hours or freeze for longer.
5. Can I bake these instead of frying?
Reheat in a hot skillet with a splash of oil for 3-4 minutes each side, until crispy and heated through.
6. How do I know when they’re cooked?
Yes, bake at 200°C / 400°F for about 20 minutes, flipping halfway, until golden and crispy.
7. What if they fall apart while frying?
Look for a golden-brown exterior with crispy edges. The inside should be soft, cooked through, and fragrant.
8. Can I make these vegan?
Ensure your mixture is well combined and firm. Chill briefly if too soft, and handle gently when shaping.
9. What oil is best for frying?
Yes, substitute the egg with a flaxseed or chia seed slurry for binding. The texture will be slightly denser.
10. Any tips for extra crunch?
Use neutral oils like vegetable or sunflower oil for even frying and crisp results without overpowering flavor.
These vegetable cutlets are a reminder that simple, humble ingredients can come together into something truly satisfying. Making them brings a little chaos and a lot of nostalgia, especially when the kitchen fills with that warm, toasty smell.
Whenever I need a quick, honest bite that feels like a hug from childhood, these cutlets are my go-to. They’re imperfect, messy, but always comforting—just like those busy afternoons in a bustling family kitchen.

Welcome to Exploreing New Tastes. I’m really glad you found your way here. I’m a food blogger driven by curiosity more than perfection. I think about flavors constantly, how they change across cultures, how a small tweak can completely shift a dish, and how food tells stories long before anyone sits down to eat. This blog is where I document that curiosity, one recipe and one experience at a time.