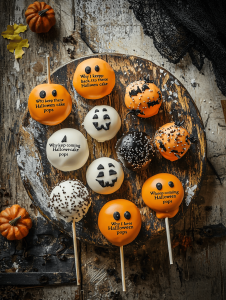
This Halloween, I’m ditching the usual ghostly cookies and opting for something handheld, fun, and just a little bit spooky. Cake pops are perfect for that—they’re versatile, playful, and easy to customize with colors and surprises inside. Plus, they make a mess that’s totally worth it.
Why I keep coming back to these Halloween cake pops
They’re endlessly customizable, and each batch feels like a little ritual. I love the chaos of melting chocolate, the anticipation of dipping, and the surprise of what’s inside each one. Plus, they’re a hit at parties, sparking smiles and conversation. This recipe is my fallback when I need a sweet project that’s both fun and slightly unpredictable.
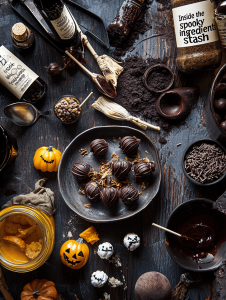
Inside the spooky ingredients stash
- Cake crumbs — I use day-old sponge, but crushed cookies work too. It’s the base that holds everything together.: Crumbs form the core and need to be moist enough to roll into balls but not sticky.
- Chocolate — Dark, milk, or white, melted smooth. It’s the magic shell and glue.: Silky, melts easily, and sets firm with a shiny finish.
- Surprise fillings — Mini candies, flavored syrups, or even a dollop of jam. Keep it fun and unexpected.: Adds a hidden burst of flavor or texture inside.
- Decorations — Sprinkles, edible glitter, tiny candies. Make it festive and spooky.: Visual appeal and extra crunch or shimmer.
- Cake pop sticks — Wooden or paper, sturdy enough to hold the weight.: Transforms treats into handheld moments of joy.
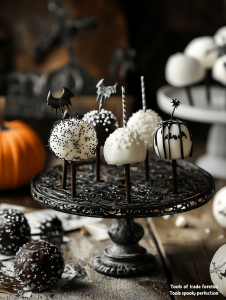
Tools of the trade for spooky perfection
- Double boiler or microwave: Gently melts chocolate without scorching.
- Spoons or piping bag: Doles out chocolate precisely and neatly.
- Cake pop sticks: Turns each treat into a handheld bundle of fun.
- Parchment paper: Prevents sticking and keeps pops neat.
- Cooling rack: Allows excess chocolate to drip off and cool evenly.
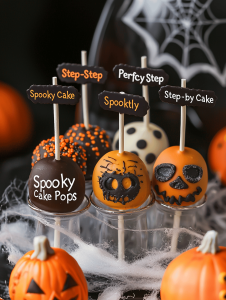
Step-by-Step for Perfectly Spooky Cake Pops
Step 1: Start by melting your chocolate in a heatproof bowl over a double boiler or in short bursts in the microwave, stirring between each. Aim for smooth, glossy consistency—if it’s dull or grainy, keep warming gently.
Step 2: Use a small spoon or piping bag to dollop a bit of chocolate into each cake pop cavity, then add a hidden surprise like a mini candy or a splash of flavored syrup before sealing with more chocolate.
Step 3: Insert a stick quickly, twisting slightly to secure, and gently tap off excess chocolate. Place on parchment to set in the fridge for about 30 minutes.
Step 4: Once firm, dip each pop into the remaining melted chocolate, swirling to coat evenly. Add sprinkles or edible glitter while still wet for extra magic.
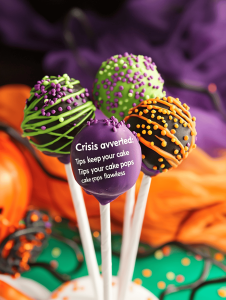
Crisis averted: Tips to keep your cake pops flawless
- Chocolate should be smooth and shiny, not dull or grainy.
- Cake balls must be cold enough to hold shape, but not frozen hard.
- Sticks should be inserted at a slight angle for stability.
- Sprinkles or decorations should be added while the coating is still damp to stick well.
Common Halloween cake pop pitfalls and how to dodge them
- Chocolate seized or cooled too quickly.? CHOCOLATE IS DULL OR GRAINY — Keep chocolate warm but not hot, stir constantly, and use fresh chocolate if needed.
- Not chilling enough before coating.? CAKE BALLS ARE TOO SOFT — Chill until firm, then handle gently to prevent cracking.
- Inserting sticks into warm or soft cake.? STICKS FALL OUT — Insert at a slight angle, and dip into chocolate to secure.
- Decorating too late.? DECORATIONS FALL OFF — Add sprinkles immediately after dipping, while coating is still wet.

Halloween Cake Pops
Ingredients
Equipment
Method
- Place the cake crumbs in a large bowl and stir in the frosting until the mixture is moist, crumbly but holds together when pressed.
- Use your hands or a scoop to shape the mixture into small, uniform balls, about 1 inch in diameter, and place them on a parchment-lined tray.
- Refrigerate the balls for about 15-20 minutes until they are firm and chilled, which helps them hold their shape during dipping.
- Meanwhile, melt the chocolate in a microwave in short bursts, stirring between each until smooth and glossy, or use a double boiler for gentle melting.
- Insert a cake pop stick into each chilled ball at a slight angle, then dip the tip into the melted chocolate to seal it in place.
- Gently dip each cake ball into the melted chocolate, swirling or tapping off excess, then place on a parchment-lined tray or cooling rack.

- While the chocolate is still wet, decorate the pops with sprinkles, edible glitter, or tiny candies for a festive, spooky look.
- Allow the coated cake pops to set at room temperature or in the refrigerator for about 30 minutes until the chocolate is firm and shiny.
- Once set, carefully remove the cake pops from the rack and serve them on a platter for a fun Halloween treat.
Notes

Welcome to Exploreing New Tastes. I’m really glad you found your way here. I’m a food blogger driven by curiosity more than perfection. I think about flavors constantly, how they change across cultures, how a small tweak can completely shift a dish, and how food tells stories long before anyone sits down to eat. This blog is where I document that curiosity, one recipe and one experience at a time.