There’s something about roasted garlic that turns the humble chickpea into a completely different snack. It’s that slow, smoky sweetness from garlic that caramelizes as it roasts, infusing every bite with a depth of flavor I didn’t know I needed. I’ve always loved chickpeas, but roasting them with garlic made me see them in a new light—more like a treat than just a pantry staple.
This recipe isn’t just about making a tasty snack; it’s about appreciating the simple magic of roasting. The garlic transforms from pungent to tender and sweet, coating each crunchy chickpea in a luscious, savory glaze. It’s perfect for those times when you want something satisfying but not heavy—just a little bit of joy in every handful.
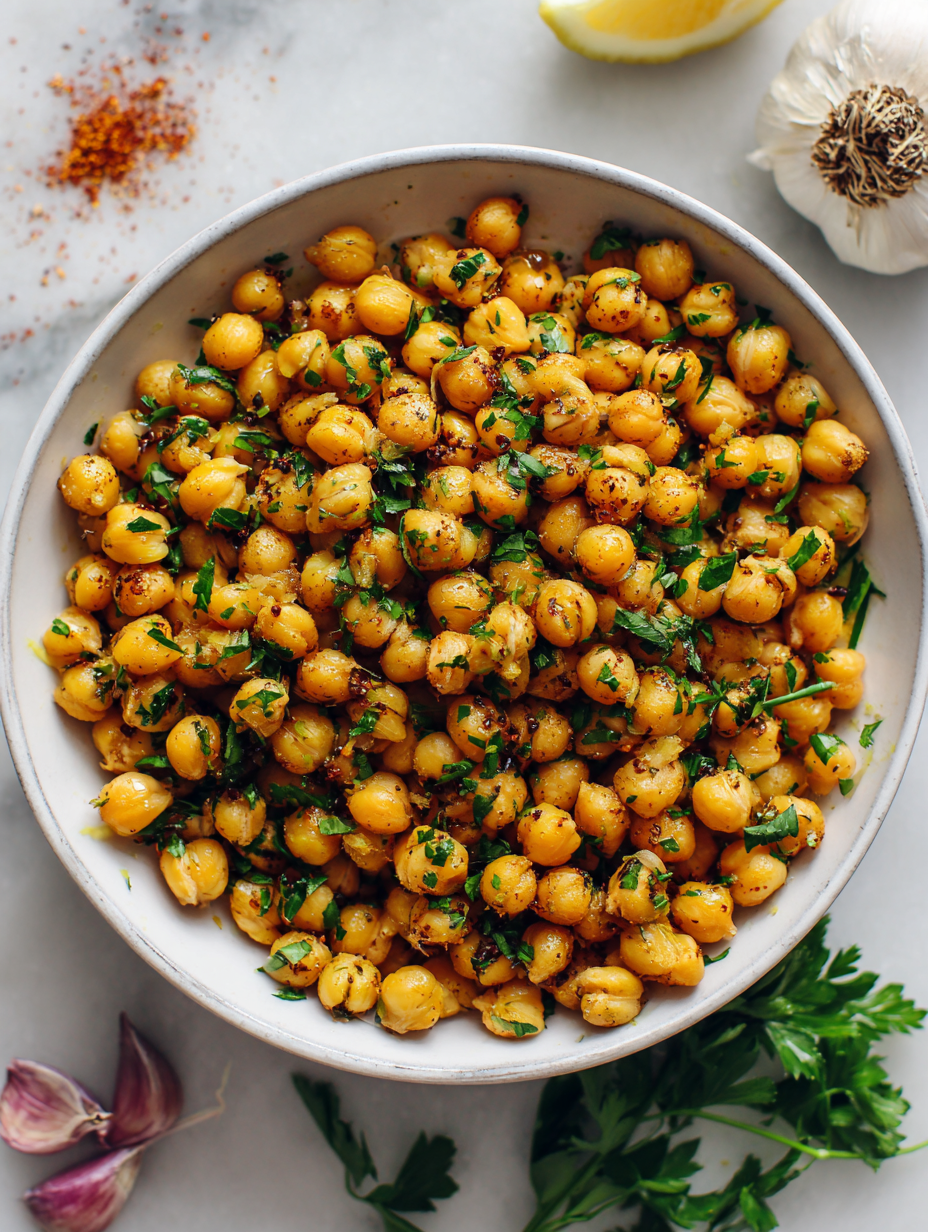
Focusing on the transformative power of roasted garlic to elevate humble chickpeas into a deeply savory, almost caramelized snack, revealing how roasting garlic unlocks a new dimension of flavor that makes everyday pantry staples feel special.
The story behind this recipe
- I first made this recipe on a rainy afternoon when I was craving something warm and satisfying but didn’t want to fuss with complicated ingredients. Roasting garlic and chickpeas together felt like a small act of comfort, a way to bring a little warmth to an otherwise dull day. It’s become my go-to snack when I need something quick, savory, and deeply flavorful.
- There’s a memory of experimenting in my tiny kitchen, trying to coax more flavor out of everyday staples. The moment I pulled that tray from the oven and smelled the smoky garlic mingling with toasted chickpeas—something shifted. It was like discovering a secret that made even the simplest ingredients feel special, almost nostalgic in its simplicity.
- I love how this dish can be a quick snack or a side for a bigger meal. It’s a reminder that sometimes, the smallest changes—like roasting garlic—can turn ordinary ingredients into something memorable.
Ingredient breakdown
- Garlic: I use a whole head, smashed and roasted until it’s gooey and golden, releasing a smoky aroma. Swap for shallots if you prefer a milder sweetness.
- Chickpeas: Canned and drained, I pat them dry to get that crispy texture. Frozen roasted chickpeas can work, just make sure they’re thoroughly thawed and patted dry.
- Olive oil: I toss everything with a generous drizzle to ensure even roasting and a rich, fruity flavor. Avocado oil can be a lighter alternative, with a subtler taste.
- Salt: I sprinkle liberally—think flaky sea salt—adding to the caramelized garlic for a savory punch. Kosher salt gives a cleaner, less bitter finish.
- Optional spices: A pinch of smoked paprika or cumin adds depth, but I keep it simple to highlight the garlic’s sweetness. Feel free to experiment with chili powder for a kick.
- Lemon juice: A squeeze at the end brightens the dish, balancing the roasted richness. Lime juice works beautifully too, if that’s what you have.
- Fresh herbs: Chopped parsley or cilantro stirred in just before serving brings a fresh, herbal note that cuts through the richness and adds color.
Spotlight on key ingredients
Garlic:
- I use a whole head, smashed and roasted until it’s gooey and golden, releasing a smoky aroma. Swap for shallots if you prefer a milder sweetness.
- Chickpeas: Canned and drained, I pat them thoroughly dry to get that crispy texture. Frozen roasted chickpeas can be a good alternative, just ensure they’re fully thawed and patted dry.
Olive oil & Salt:
- Olive oil: I toss everything with a generous drizzle to ensure even roasting and a rich, fruity flavor. Avocado oil can be an lighter alternative, with a subtler taste.
- Salt: I sprinkle liberally—think flaky sea salt—adding to the caramelized garlic for a savory punch. Kosher salt gives a cleaner, less bitter finish.
Notes for ingredient swaps
- Garlic: I use a whole head, smashed and roasted until it’s gooey and golden, releasing a smoky aroma. Swap for shallots if you prefer a milder sweetness.
- Chickpeas: Canned and drained, I pat them dry to get that crispy texture. Frozen roasted chickpeas can work, just make sure they’re thoroughly thawed and patted dry.
- Olive oil: I toss everything with a generous drizzle to ensure even roasting and a rich, fruity flavor. Avocado oil can be a lighter alternative, with a subtler taste.
- Salt: I sprinkle liberally—think flaky sea salt—adding to the caramelized garlic for a savory punch. Kosher salt gives a cleaner, less bitter finish.
- Optional spices: A pinch of smoked paprika or cumin adds depth, but I keep it simple to highlight the garlic’s sweetness. Feel free to experiment with chili powder for a kick.
- Lemon juice: A squeeze at the end brightens the dish, balancing the roasted richness. Lime juice works beautifully too, if that’s what you have.
- Fresh herbs: Chopped parsley or cilantro stirred in just before serving brings a fresh, herbal note that cuts through the richness and adds color.
Equipment & Tools
- Baking sheet: Roast garlic evenly in the oven.
- Knife and small bowl: Prepare and mash roasted garlic.
- Foil or ovenproof dish: Contain garlic for roasting.
- Colander or sieve: Drain and rinse chickpeas.
- Clean towel or paper towels: Dry chickpeas thoroughly.
- Large skillet: Cook chickpeas until crispy and flavored.
Step-by-step guide to roasting garlic chickpeas
- Preheat your oven to 200°C (400°F). Gather a baking sheet, a knife, and a small bowl. Peel and smash the garlic cloves from one head, keeping them intact for roasting.
- Place the garlic cloves on a piece of foil or in a small ovenproof dish. Drizzle with 1 tablespoon olive oil. Wrap or cover loosely. Roast in the oven for 30-35 minutes until soft, fragrant, and golden.
- While garlic roasts, drain and rinse 1 can (15 oz) of chickpeas. Pat them thoroughly dry with a clean towel or paper towels to remove excess moisture. This helps them get crispy.
- Once garlic is done, carefully remove from oven. Let it cool slightly until you can handle it. Squeeze the roasted garlic out of their skins into a small bowl and mash into a paste.
- Heat a large skillet over medium heat (about 180°C/350°F). Add 1-2 tablespoons olive oil. Once shimmering, add the chickpeas. Toss to coat evenly and cook for 8-10 minutes, stirring occasionally.
- Add the roasted garlic paste to the chickpeas. Stir well to distribute. Continue cooking for another 5 minutes until the chickpeas are golden and slightly crispy. If they start to burn, lower the heat.
- Taste and adjust seasoning with salt. Optional: sprinkle with smoked paprika or cumin for extra depth. Finish with a squeeze of lemon juice for brightness. Toss well.
- Remove from heat and transfer to a serving bowl. Let rest for 2 minutes. Serve warm or at room temperature. Enjoy the smoky, savory crunch with a sprinkle of chopped herbs if desired.
Let the chickpeas rest for 2 minutes after cooking. Serve warm or at room temperature, garnished with herbs if desired. Toss gently before serving to redistribute flavors.
How to Know It’s Done
- Garlic is soft, fragrant, and golden when roasted.
- Chickpeas are crispy on the outside, tender inside, with a golden hue.
- A balanced, smoky garlic flavor coats the chickpeas without burnt bits.
Roasted Garlic Chickpeas
Ingredients
Equipment
Method
- Preheat your oven to 200°C (400°F). Peel and smash the garlic cloves from the whole head, keeping them intact for roasting.
- Place the garlic cloves on a piece of foil or in an ovenproof dish. Drizzle with 1 tablespoon of olive oil. Wrap loosely or cover and roast in the oven for 30-35 minutes until soft, fragrant, and golden brown.
- While the garlic roasts, drain and rinse the chickpeas thoroughly. Pat them completely dry with a clean towel or paper towels to remove excess moisture, which helps achieve a crispy texture.
- Once the garlic is roasted and cool enough to handle, squeeze the softened, golden garlic out of its skins into a small bowl. Mash it into a paste with a fork or the back of a spoon.
- Heat a large skillet over medium heat and add 2 tablespoons of olive oil. Once shimmering, add the dried chickpeas in an even layer and cook for 8-10 minutes, stirring occasionally, until they become golden and slightly crispy.
- Add the mashed roasted garlic to the skillet with chickpeas. Stir well to coat all the chickpeas evenly. Continue cooking for another 5 minutes until the garlic is fragrant and the chickpeas are crisp and golden.
- Season with salt and, if using, sprinkle with optional spices like smoked paprika or cumin. Squeeze fresh lemon juice over the mixture and toss to combine for a bright, savory finish.
- Remove the skillet from heat and transfer the roasted garlic chickpeas to a serving bowl. Garnish with chopped herbs if desired. Serve warm or at room temperature for a crunchy, smoky snack.
Tips & Tricks for Perfect Roasted Chickpeas
- Bolded mini-head: Use a small, sharp knife to smash garlic cloves—less mess, more control.
- Bolded mini-head: Roast garlic until deeply golden and fragrant—this unlocks sweetness and smoky depth.
- Bolded mini-head: Pat chickpeas dry thoroughly—moisture is the enemy of crispness.
- Bolded mini-head: Toss chickpeas in oil while hot—helps them absorb flavor and crisp evenly.
- Bolded mini-head: Keep an eye on chickpeas during roasting—stir or shake the pan to prevent burning.
- Bolded mini-head: Add lemon juice at the end—brightens the smoky, savory flavor with a zing.
- Bolded mini-head: Serve chickpeas slightly cooled—preserves crunch and intensifies flavor as they rest.
Common mistakes and how to fix them
- FORGOT to check garlic for burn marks → Use foil to protect and prevent burnt spots.
- DUMPED the roasted garlic too early → Wait until it’s soft, fragrant, and golden before handling.
- OVER-TORCHED the chickpeas → Stir frequently and lower heat if they start to burn.
- MISSED drying chickpeas thoroughly → Pat dry completely for maximum crunch.
Quick fixes and pantry swaps
- When chickpeas are soggy → Splash them with a little oil and roast again for crunch.
- If garlic is bitter → Patch with a drizzle of honey to mellow the sharpness.
- When garlic doesn’t soften → Cover with foil and roast longer, checking every 5 minutes.
- Dumped too much salt → Rinse chickpeas quickly and start seasoning anew.
- Over-torched chickpeas → Shield from direct heat and stir to prevent burning, then lower oven temp.
Prep, store, and reheat tips
- Prep the garlic and chickpeas ahead by roasting the garlic until soft and fragrant; cool completely before storing. Keeps for up to 3 days in an airtight container in the fridge.
- Store roasted chickpeas in an airtight container at room temperature for up to 2 days. Reheat in a 180°C (350°F) oven for 5-7 minutes until crispy and warmed through, with a crackling sound and nutty aroma.
- For longer storage, freeze roasted chickpeas in a sealed bag for up to a month. Reheat directly from freezer in the oven, checking for crispness and aroma renewal.
- Reheating may soften the chickpeas slightly; crisp them up again in the oven or toaster oven. Expect a slight aroma of toasted garlic and a satisfying crunch if properly reheated.
- Flavors deepen after a day or two, so consider adding a squeeze of lemon or fresh herbs after reheating to refresh the taste.
Top questions about roasted garlic chickpeas
1. Can I use canned chickpeas?
Yes, using canned chickpeas works well, just dry them thoroughly to get crispy results.
2. How do I know when garlic is roasted perfectly?
Roast garlic until soft, golden, and fragrant—about 30-35 minutes at 200°C (400°F). It should be gooey and smoky.
3. Can I add other spices or herbs?
Yes, adding spices like smoked paprika or cumin enhances flavor, but keep it simple if you want pure garlic sweetness.
4. How do I reheat roasted chickpeas?
Reheat in a 180°C (350°F) oven for 5-7 minutes until crispy and aromatic. Expect a crackling sound and warm smell.
5. How long do roasted garlic chickpeas last?
Store in an airtight container for up to 3 days in the fridge. Reheat in the oven for best crunch.
6. What oil should I use?
Using a good quality olive oil adds depth, but avocado oil is a lighter alternative with a subtler flavor.
7. How do I get crispy chickpeas?
Dry chickpeas thoroughly before roasting to ensure maximum crunch and prevent sogginess.
8. Should I add acid at the end?
Add lemon or lime juice at the end to brighten the smoky, savory flavors and balance richness.
9. Can I freeze leftovers?
Yes, you can freeze roasted chickpeas for up to a month. Reheat in the oven for best texture.
10. Any tips for preparing garlic?
Use a sharp knife to smash garlic cloves for easy, controlled roasting without mess.
This roasted garlic chickpeas recipe feels like a quiet rebellion against bland snacks. The smoky sweetness of garlic paired with crispy chickpeas is a small way to elevate your everyday. It’s simple, honest, and deeply satisfying in a way that keeps me coming back.
Whenever I make these, I remember that sometimes, the best flavors come from patience and a little bit of roasting. No fancy ingredients, just honest techniques that turn humble pantry staples into something worth savoring. It’s perfect for right now—whether you need a quick snack or a crunchy side.

Welcome to Exploreing New Tastes. I’m really glad you found your way here. I’m a food blogger driven by curiosity more than perfection. I think about flavors constantly, how they change across cultures, how a small tweak can completely shift a dish, and how food tells stories long before anyone sits down to eat. This blog is where I document that curiosity, one recipe and one experience at a time.