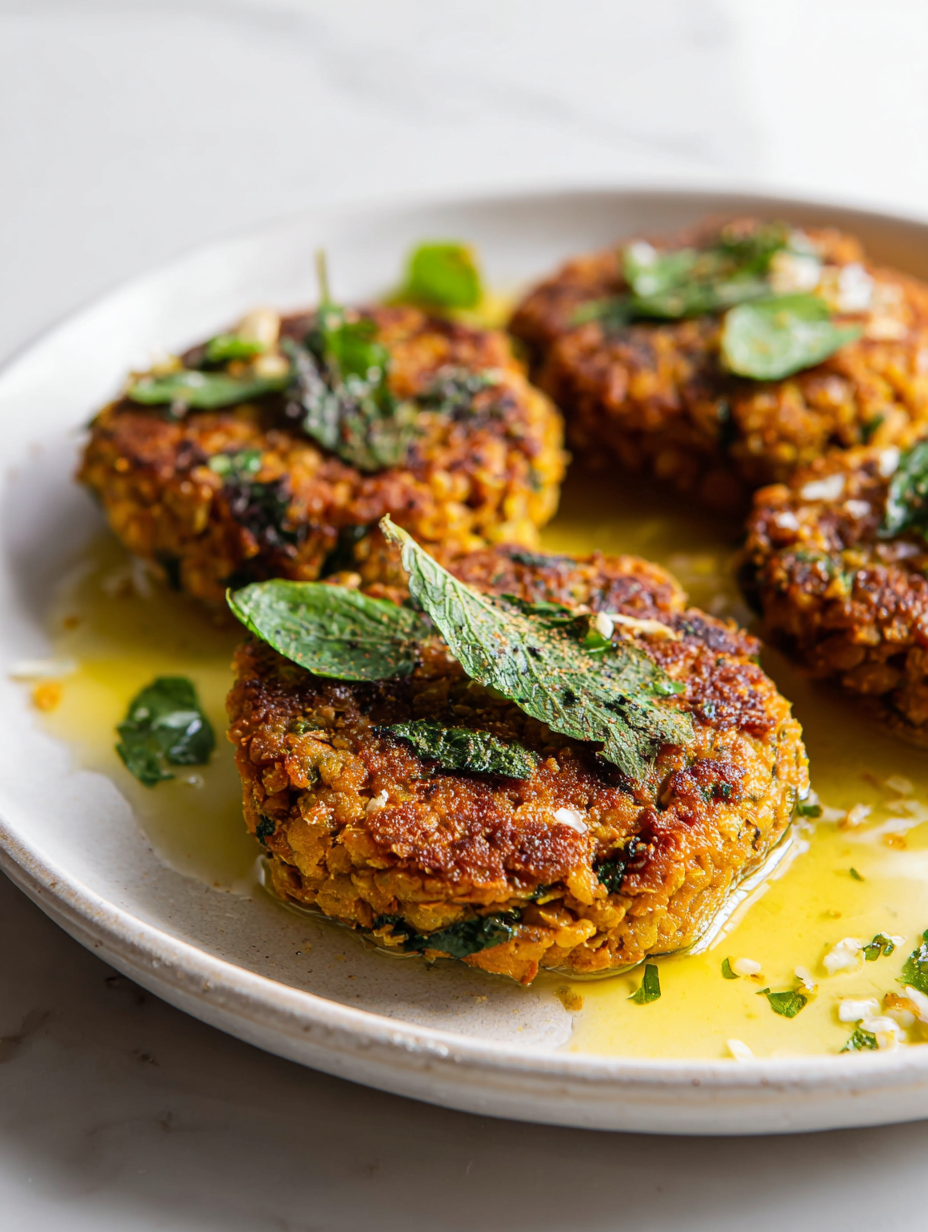
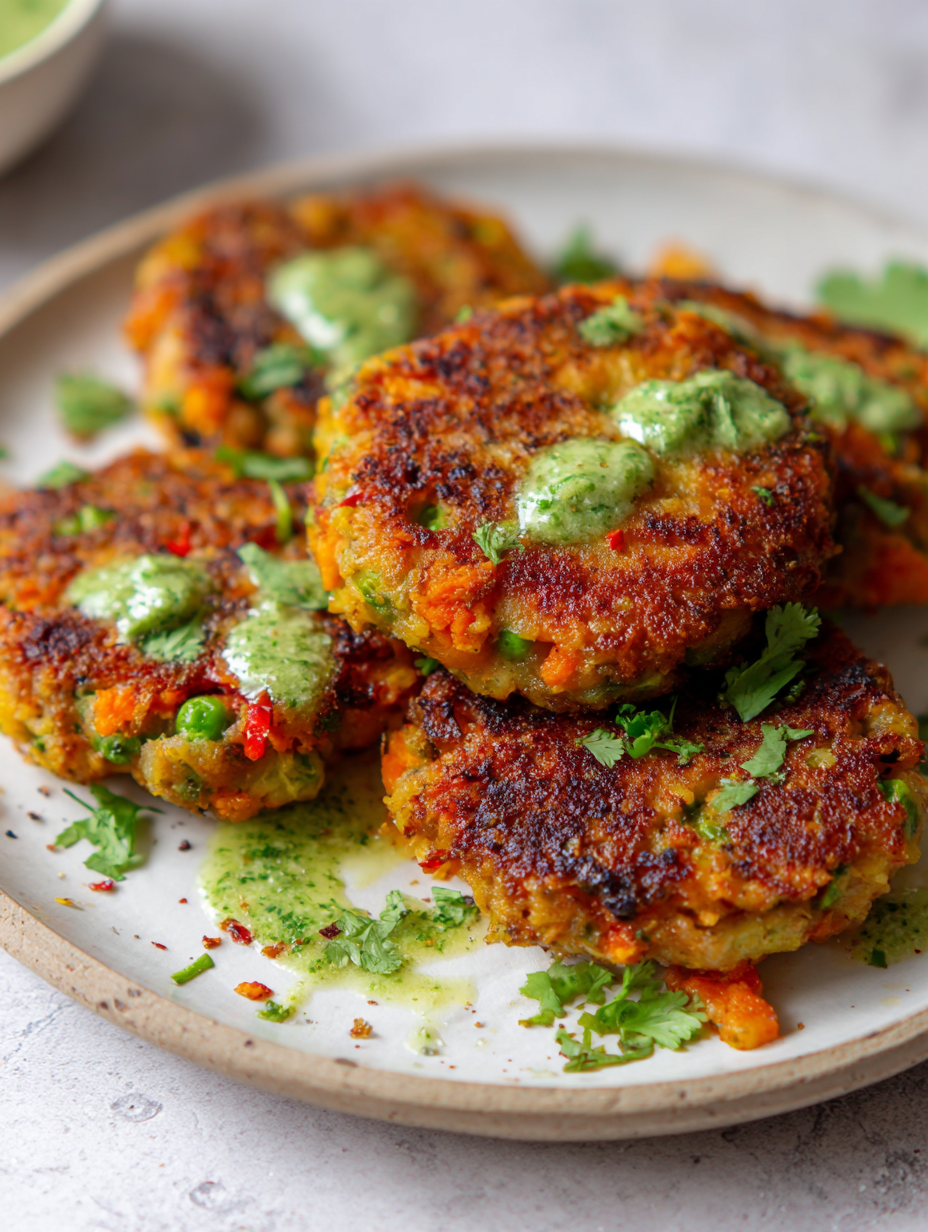
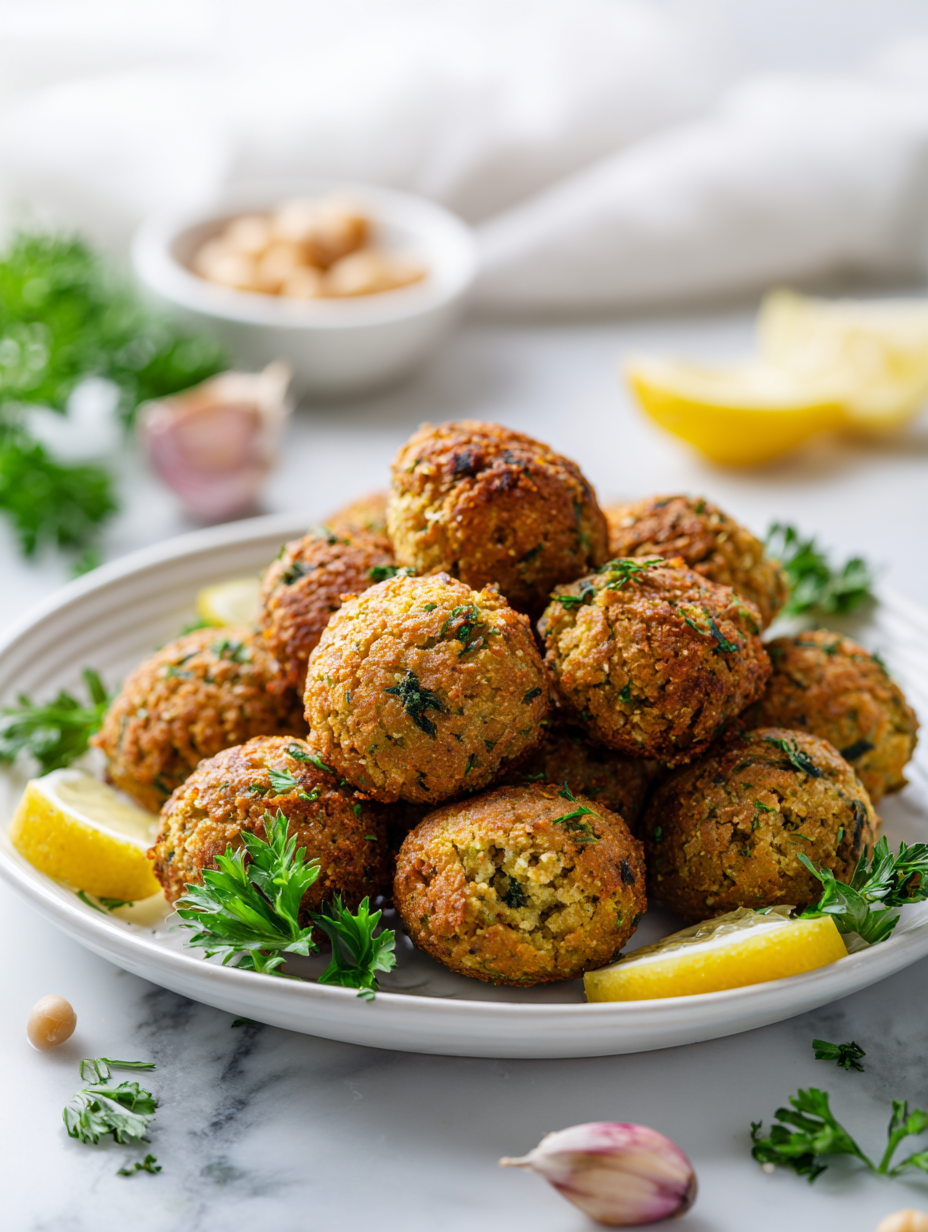
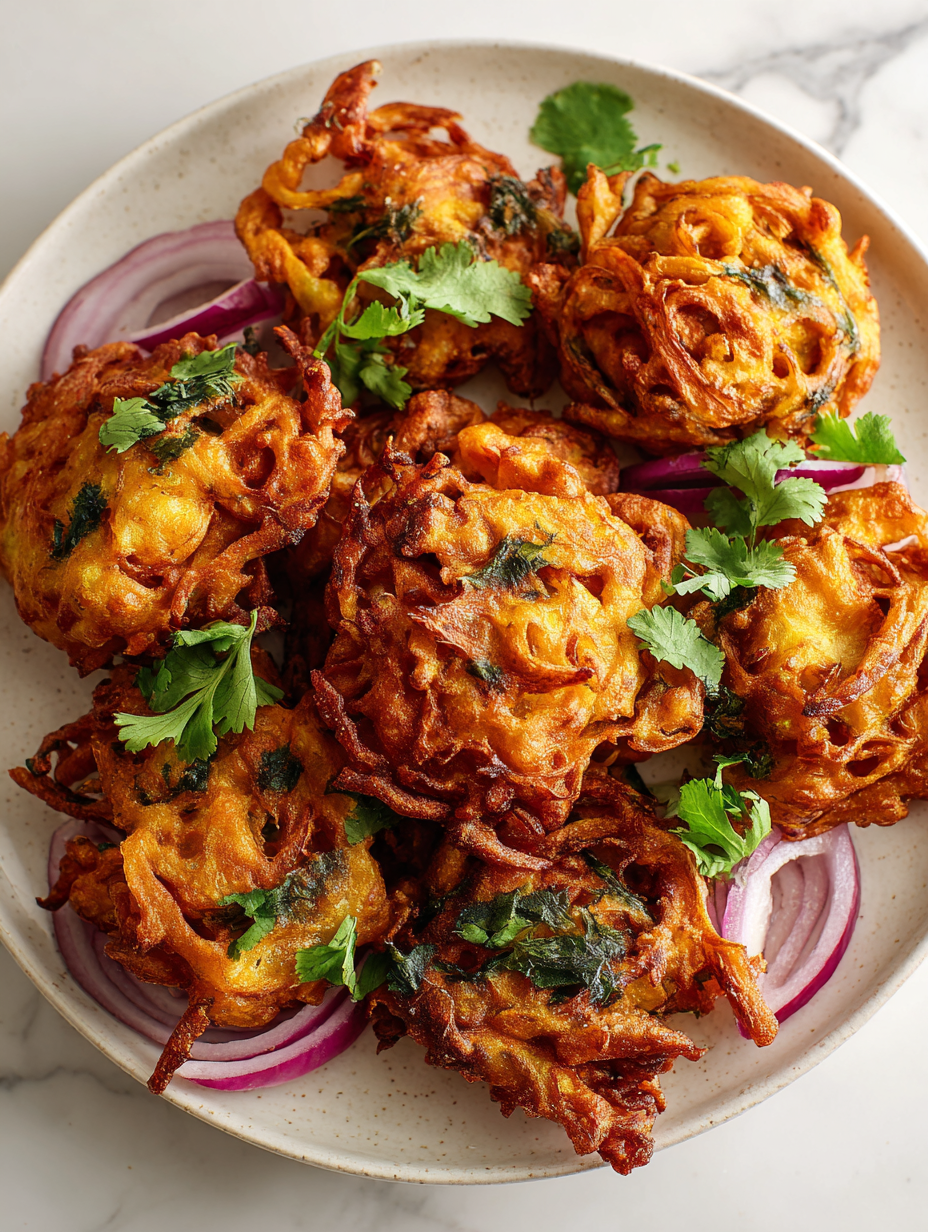
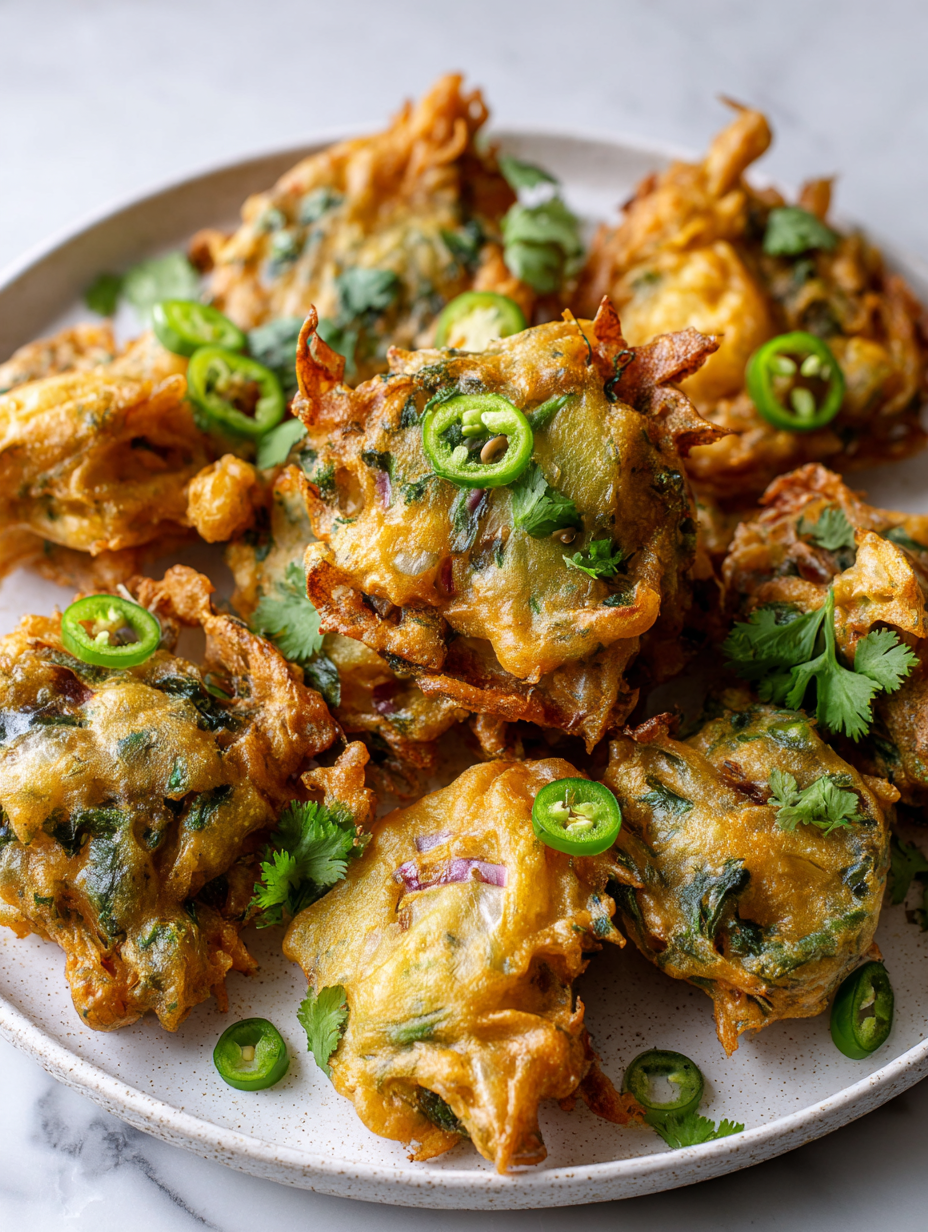
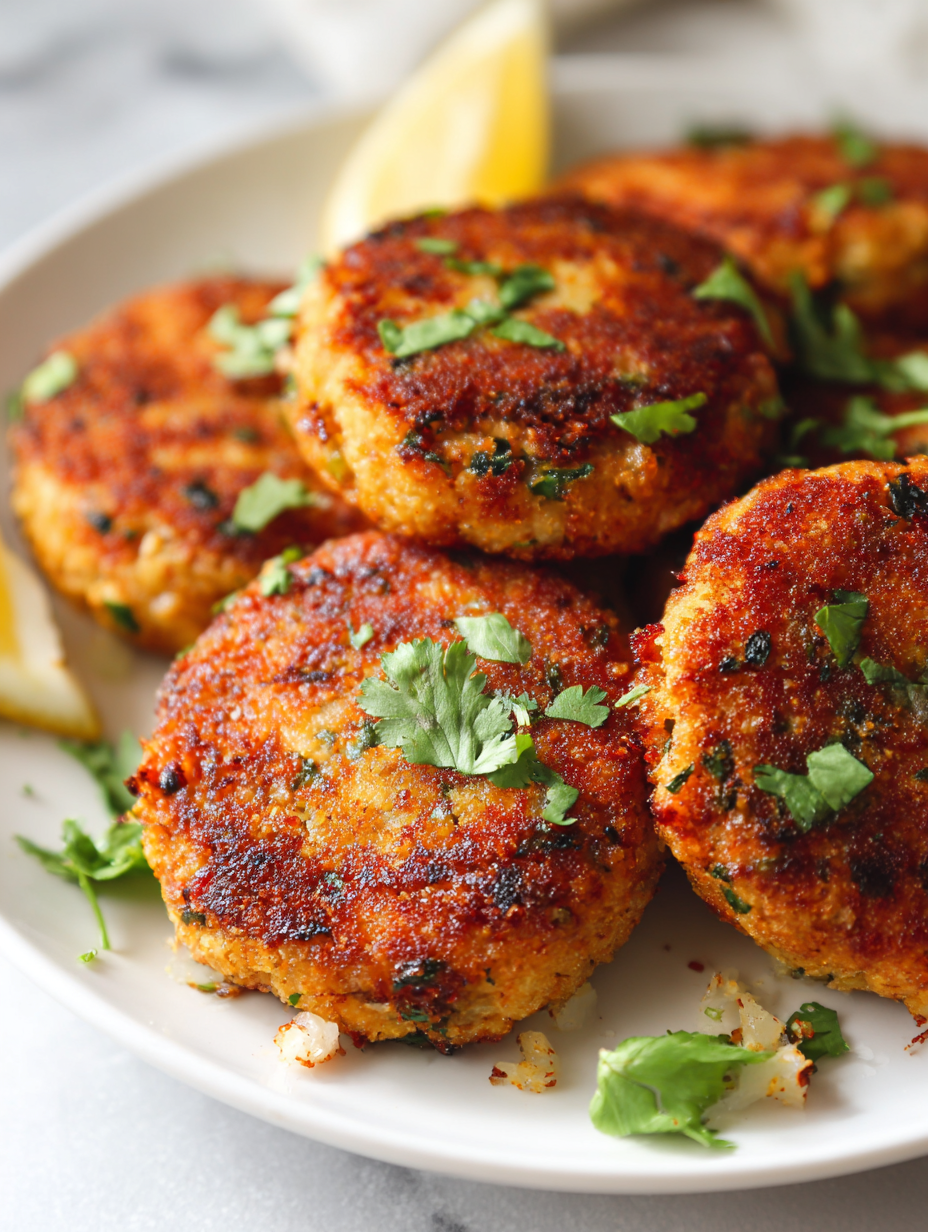
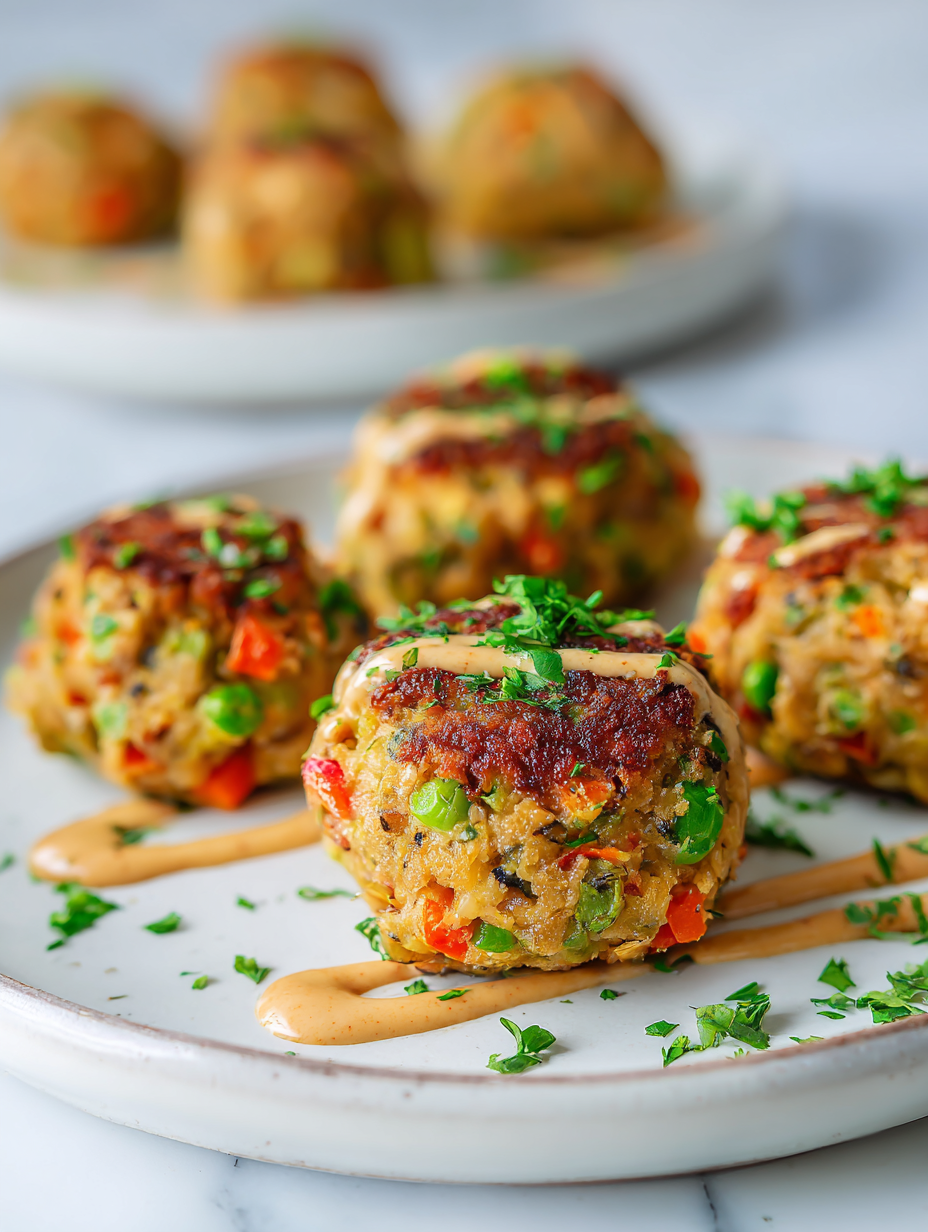
Blog

  • A Secret Ingredient for the Perfect Peach Crisp

    A Secret Ingredient for the Perfect Peach Crisp

    Imagine biting into a warm peach crisp that’s bursting with juicy flavor, topped with a streusel that crackles softly with each forkful. But what if there’s more to this classic dessert than just ripe peaches and crispy topping? Today, I’ll share a twist that adds a surprising depth of flavor, making each bite unforgettable.

    This recipe is not just about sweetness; it’s about balancing textures and enhancing the natural aroma of summer peaches. The secret ingredient I use elevates this humble dessert into something special, perfect for those who crave a touch of sophistication in their comfort food. Let’s dive into how you can transform your usual peach crisp with just a little extra magic.

    Gourmet Peach Crisp with Secret Ingredient

    This peach crisp combines tender, ripe peaches baked under a crunchy streusel topping. The dish features a balance of juicy fruit and crisp texture, with a subtle flavor enhancement from a secret ingredient that elevates the classic dessert. The final presentation showcases a bubbling, golden-brown topping with vibrant fruit beneath.
    Prep Time 15 minutes
    Cook Time 40 minutes
    Total Time 55 minutes
    Servings: 6
    Course: Main Course
    Cuisine: American
    Calories: 230

    Ingredients
      

    • 5 cups ripe peaches, sliced about 4-5 large peaches
    • 1/2 cup granulated sugar
    • 1/4 cup all-purpose flour
    • 1/2 teaspoon ground cinnamon
    • 1 tablespoon butter unsalted butter, cold cut into small pieces
    • 1 cup old-fashioned rolled oats rolled oats
    • 1/2 cup light brown sugar
    • 1/4 teaspoon salt
    • 1 teaspoon vanilla extract vanilla extract
    • 1 teaspoon lemon juice fresh lemon juice
    • 1 teaspoon olive oil or neutral oil oil for greasing
    • 1/2 teaspoon ground ginger ground ginger optional, for depth

    Equipment

    • Mixing bowls
    • Baking dish
    • Pastry cutter or fork
    • Measuring cups and spoons
    • Oven

    Method
     

    1. Preheat your oven to 375°F (190°C). Grease a baking dish with oil to prevent sticking.
    2. In a large mixing bowl, combine the sliced peaches with lemon juice, vanilla extract, and a pinch of ground ginger. Toss until the peaches are evenly coated and set aside to macerate slightly.
    3. In a separate bowl, whisk together the flour, sugar, cinnamon, and salt. Add the cold butter pieces and use a pastry cutter or fork to cut the butter into the mixture until it resembles coarse crumbs.
    4. Add the oats, brown sugar, vanilla, and ground ginger to the streusel mixture. Toss gently to combine, ensuring the oats are evenly distributed.
    5. Spread the peach mixture evenly in the prepared baking dish, creating a generous layer of juicy fruit.
    6. Sprinkle the streusel mixture evenly over the peaches, covering the surface completely for a uniform golden crust when baked.
    7. Place the baking dish into the oven and bake for about 40 minutes, or until the topping is golden brown and the fruit is bubbling around the edges.
    8. Remove the peach crisp from the oven and let it cool for a few minutes. This helps the juices settle and the topping to firm up slightly.
    9. Scoop the warm peach crisp into bowls, revealing the juicy fruit beneath the crispy topping and enjoy while still warm.
    This peach crisp is a reminder of lazy summer afternoons and family gatherings. It’s simple, yet it celebrates the fleeting sweetness of ripe peaches at their peak.

    No matter the occasion, this dessert brings a warm, welcoming aroma into the kitchen, stirring memories and creating new ones. Enjoy every spoonful, knowing you’ve made something truly delightful with just a handful of ingredients.

  • Cozy Fall Turkey Chili with Sweet Potatoes: A Secrets-Only You Know

    Cozy Fall Turkey Chili with Sweet Potatoes: A Secrets-Only You Know

    As the leaves turn and the air gets crisper, I find myself craving a chili that’s more than just comfort—it’s a secret weapon against chilly evenings. This Turkey Chili with Sweet Potatoes isn’t just about warmth; it’s about layering flavors you won’t find easily in restaurant bowls. Each simmer brings a fragrant mix of spiced turkey, hearty sweet potatoes, and a touch of smoky chipotle that feels like a cozy whisper.

    This recipe is my personal vault of flavor secrets, crafted to surprise even the most seasoned chili lovers. The sweet potatoes melt into the rich tomato base, balancing the savory turkey with a subtle sweetness. It’s simple enough for a weeknight but special enough to make you feel like you’re delivering a secret family recipe.

    Turkey Chili with Sweet Potatoes

    This turkey chili combines lean ground turkey with tender sweet potatoes, simmered in a flavorful tomato base infused with smoky chipotle peppers. The dish develops a thick, hearty texture with softened vegetables and a rich, spicy aroma, providing a comforting yet sophisticated bowl of chili.
    Prep Time 15 minutes
    Cook Time 40 minutes
    Total Time 55 minutes
    Servings: 6
    Course: Main Course
    Cuisine: American
    Calories: 310

    Ingredients
      

    • 1 tablespoon olive oil for sautéing
    • 1 medium yellow onion diced
    • 3 cloves garlic minced
    • 1 pound ground turkey lean
    • 2 medium sweet potatoes peeled and diced
    • 1 can (14 oz) diced tomatoes with juice
    • 1 can (15 oz) kidney beans drained and rinsed
    • 1 tablespoon chipotle peppers in adobo finely chopped
    • 1 teaspoon ground cumin
    • 1 teaspoon smoked paprika
    • to taste Salt and pepper

    Equipment

    • Large pot or Dutch oven
    • Sharp knife
    • Cutting board
    • Wooden spoon or spatula

    Method
     

    1. Heat olive oil in a large pot over medium heat. Add diced onion and cook, stirring occasionally, until translucent and fragrant, about 5 minutes.
    2. Add the minced garlic and cook for another minute, until you smell the fragrant aroma and the garlic is slightly golden.
    3. Increase the heat to medium-high and add the ground turkey. Break it apart with your spoon or spatula, cooking until it’s no longer pink and starts to brown, about 5-7 minutes.
    4. Stir in the diced sweet potatoes, cooking for 2-3 minutes to begin softening them and coating with the savory aroma of the turkey and spices.
    5. Add the diced tomatoes with their juice, kidney beans, chopped chipotle peppers, cumin, and smoked paprika. Stir well to combine all the flavors evenly.
    6. Bring the chili to a gentle simmer, then reduce the heat to low. Cover the pot and let it cook for about 25-30 minutes, stirring occasionally, until the sweet potatoes are tender and the flavors meld together.
    7. Uncover the pot and taste the chili, adjusting the seasoning with salt and pepper as needed. Continue simmering uncovered for another 5 minutes to thicken slightly.
    8. Turn off the heat and let the chili rest for a few minutes; it will thicken further and develop richer flavors.
    9. Serve the hearty turkey and sweet potato chili hot, garnished with your favorite toppings if desired.
    In the end, this chili is more than just a meal—it’s a little ritual that celebrates the shift of seasons. The mix of smoky, sweet, and spicy flavors offers a warm reminder that good food has a way of connecting us to simpler, slower moments.

    As leftovers, it tastes even better, each spoonful echoing the comfort of fall evenings and crackling fires. Sometimes, the best secrets are found in the quiet moments around your dinner table, sharing a bowl of something homemade and heartfelt.

  • Ginger-Kissed Butternut Bliss: A Cozy Soup Journey

    Ginger-Kissed Butternut Bliss: A Cozy Soup Journey

    WHY I LOVE THIS RECIPE?

    • Pure joy in a bowl—delighting my senses with every sip and swirl.
    • Reminds me of harvest festivals, childhood comfort foods, all bundled in a smooth texture.
    • Craves my pride—knowing I created a hearty, elegant dish from simple ingredients.
    • Joyful chaos—perfect for improvised spice adjustments or unexpected pantry finds.
    • Relief from winter blues, thanks to its warming boldness and vibrant color.

    AVOID MY DISASTER (You’re Welcome)

    • FORGOT to peel the squash—ended up with a tough, fibrous mess. Peeling first is lifesaving.
    • DUMPED too much ginger—made it fiery and overpowering. Start small and adjust.
    • OVER-TORCHED the garlic while roasting—bitter and ruined aroma. Keep an eye, stir often.
    • SKIPPED blending—resulted in lumpy soup. Use a good immersion blender for smoothness.

    QUICK FIXES THAT SAVE YOUR DAY

    • When soup is too thick—splash in some vegetable broth, shimmer of promise.
    • Patch over bitterness—stir in a splash of coconut milk for creaminess.
    • Shield against raw ginger—cook it longer or blend thoroughly for mellow heat.
    • When flavor is muted—improvise with a dash of lemon juice or a pinch of salt.
    • For a quick rescue—add a pinch of sugar to balance intense spices, aroma will lift.

    Roasted Butternut Squash Soup

    This soup involves roasting cubed butternut squash until tender, then blending it into a smooth, velvety puree. It features a rich, warming flavor with a creamy texture and vibrant orange color, perfect for comforting meals.
    Prep Time 15 minutes
    Cook Time 40 minutes
    Total Time 55 minutes
    Servings: 4
    Course: Main Course
    Cuisine: Comfort Food
    Calories: 180

    Ingredients
      

    • 1 pound butternut squash peeled, seeded, and cubed
    • 2 tablespoons olive oil for roasting
    • 1 small onion diced
    • 2 cloves garlic minced
    • 4 cups vegetable broth or chicken broth
    • 1/2 cup coconut milk for creaminess, optional
    • to taste salt and pepper adjust to preference

    Equipment

    • Chef’s knife
    • Baking sheet
    • High-Speed Blender

    Method
     

    1. Preheat your oven to 400°F (200°C) and line a baking sheet with parchment paper. Place the cubed butternut squash on the sheet, drizzle with olive oil, and toss to coat evenly.
    2. Roast the squash in the oven for about 25-30 minutes, or until it’s tender and lightly caramelized in spots. The edges should be golden and fragrant.
    3. While the squash roasts, heat a tablespoon of olive oil in a large pot over medium heat. Add the diced onion and cook, stirring occasionally, until it’s translucent and soft, about 5 minutes.
    4. Add the minced garlic to the onion and cook for another minute until fragrant. Be careful not to let the garlic burn.
    5. Transfer the roasted squash into the pot, then pour in the vegetable broth. Bring the mixture to a gentle simmer, allowing the flavors to meld for about 10 minutes.
    6. Use an immersion blender or transfer the soup carefully to a high-speed blender. Blend until smooth and creamy, about 1-2 minutes, stopping to scrape down the sides as needed.
    7. Stir in the coconut milk to add richness, then season with salt and pepper to taste. Blend again briefly to combine everything well.
    8. Taste the soup and adjust seasoning if necessary—add more salt, pepper, or a squeeze of lemon if you like a bright contrast.
    9. Pour the hot soup into bowls and garnish with a drizzle of olive oil, a sprinkle of herbs, or toasted bread on the side for an inviting presentation.

    This soup feels like a warm hug on a cool evening, a celebratory toast to the season. It’s surprisingly simple to make, yet richly satisfying. I often find myself scooping seconds just to savor that lingering ginger finish.

    With its vibrant color and bold flavors, this recipe is perfect for festive gatherings or quiet nights in. It reminds me to cherish these little moments of comfort and creativity in the kitchen. Winter might be long, but this soup makes every chilly day worth the effort.

  • The Cozy Charm of a Fall Frittata: A Unexpected Twist

    The Cozy Charm of a Fall Frittata: A Unexpected Twist

    As the leaves turn fiery shades and the air gains a crisp edge, I find myself craving more than just pumpkin spice lattes. I want something that celebrates seasonal bounty but also sparks a little chaos in the kitchen. Enter the fall-inspired frittata—easy, adaptable, and packed with unexpected flavors like crispy sage and sweet butternut squash.

    This dish is a playful canvas; you can toss in whatever root vegetables or leftover cheeses you have. It’s perfect for lazy weekend mornings or a quick weekday supper that feels indulgent without the fuss. Plus, the aroma of herbs sizzling and eggs baking fills the house with a warm, autumnal glow.

    Fall-Inspired Butternut Squash and Sage Frittata

    This frittata features whisked eggs baked with tender roasted butternut squash, crispy sage, and melty cheese, resulting in a golden-brown dish with a fluffy interior and slightly crisp edges. It is cooked using baking and stovetop methods, offering a colorful and hearty presentation perfect for autumn mornings or quick dinners.
    Prep Time 10 minutes
    Cook Time 20 minutes
    Total Time 30 minutes
    Servings: 4
    Course: Main Course
    Cuisine: American
    Calories: 320

    Ingredients
      

    • 1 small butternut squash peeled and cubed
    • 2 tablespoons olive oil for roasting and sautéing
    • 8 large eggs beaten
    • 0.5 cup shredded cheese such as Gruyère or cheddar
    • 8 leaves fresh sage roughly chopped
    • to taste salt and pepper

    Equipment

    • Baking sheet
    • Skillet or oven-safe frying pan
    • Mixing bowl
    • Whisk
    • Rubber spatula

    Method
     

    1. Preheat your oven to 400°F (200°C). Spread the cubed butternut squash on a baking sheet, drizzle with one tablespoon of olive oil, and roast until tender and lightly caramelized, about 20 minutes.
    2. While the squash roasts, whisk the eggs in a large mixing bowl until smooth and slightly frothy. Stir in the shredded cheese, chopped sage, salt, and pepper to taste. This creates a flavorful egg mixture with a creamy consistency.
    3. Place a skillet or oven-safe pan on the stovetop over medium heat. Add the remaining tablespoon of olive oil and let it warm up until shimmering. Sauté the chopped sage until crispy and fragrant, about 1 minute, which will fill your kitchen with an inviting aroma.
    4. Add the roasted butternut squash to the skillet, spreading it out evenly. Let it cook for a minute, allowing the edges to brown slightly and develop a toasty flavor.
    5. Pour the egg mixture evenly over the squash in the skillet. Use a spatula to gently distribute any ingredients and make sure the eggs settle into the pan’s edges. Allow the mixture to cook untouched for a couple of minutes until the edges begin to set and bubble.
    6. Transfer the skillet to the preheated oven and bake until the frittata is puffed, golden, and fully cooked through, about 12–15 minutes. You’ll see it rise slightly, with a firm but tender surface.
    7. Remove the skillet from the oven and let the frittata rest for a few minutes. Slice into wedges, revealing the fluffy interior layered with tender squash and melted cheese.

    Notes

    Feel free to add leftover cooked vegetables or swap the cheese for a sharper variety. Serve with a simple greens salad for a complete meal.
    This frittata isn’t just a meal, it’s a little autumn adventure on a plate. It captures the fleeting greatness of fall with its cozy ingredients and simple elegance. Every bite reminds me that comfort can be effortless and delicious.

    Now that you’ve got the blueprint, I hope you’ll make it your own—adding those quirky bits of local cheese or a dash of hot sauce. It’s a recipe that feels like a hug from someone you love, wrapped in the colors and flavors of the season.

  • The Art of the Chill: Crafting Flawless Vodka Slushies Under 10 Minutes

    The Art of the Chill: Crafting Flawless Vodka Slushies Under 10 Minutes

    Imagine the icy rush of a frozen drink that effortlessly balances sharp vodka notes with the sweet chill of fruit. Theres something addictive about blending spirits into a frosty, portable treat that refreshes on a sweltering day or during a cozy night in. This recipe isnt just about slushies; its about transforming simple ingredients into an experience worth savoring.

    Im obsessed with how versatile vodka slushies are, almost like a blank canvas waiting for your favorite flavors. No complicated equipment needed—just a quick whirl in the blender, and you get a cocktail that makes your backyard feel like an island escape. Its the perfect solution for spontaneous parties or those lazy weekends.

    Today, I want to share my take on creating a vodka slushie that isnt only flavorful but also incredibly forgiving. Whether youre looking for a nostalgic twist or something truly unique, this recipe will serve as your go-to. Cheers to easy, chilled chaos that tastes like summer in every sip.

    Vodka Fruit Slushie

    This vodka slushie is a frozen beverage that combines vodka with fruit, blended into a smooth and icy consistency. The mixture results in a refreshing, semi-frozen drink with a vibrant color and a slightly granular texture from the crushed ice, perfect for hot days or casual gatherings.
    Prep Time 5 minutes
    Total Time 5 minutes
    Servings: 2
    Course: Main Course
    Cuisine: Fusion
    Calories: 200

    Ingredients
      

    • 1 cup frozen mixed fruit such as berries, mango, or peach
    • 1.5 cups vodka chilled
    • 0.5 cup fruit juice to help blend smoothly
    • 1 cup crushed ice or ice cubes blitzed small

    Equipment

    • Blender
    • Measuring cups and spoons

    Method
     

    1. Add the frozen mixed fruit, vodka, and fruit juice into your blender.
    2. Blend on high until the mixture is smooth and uniformly icy, with no large chunks remaining.
    3. Pour in the crushed ice and pulse a few times to incorporate it evenly into the mixture, creating a thick, slushy texture.
    4. Blend again until the slushie is frosty and scoopable, with a slightly granular consistency from the crushed ice.
    5. Taste the mixture and adjust by adding a splash more vodka or fruit juice if desired.
    6. Pour the slushie into chilled glasses and garnish with fresh fruit or a small sprig of mint for added visual appeal.

    Notes

    You can customize this slushie with different fruits or flavored vodkas for variation.
    As the sun dips lower, these vodka slushies become even more tempting—all that icy sweetness, ready to cool you down. Theyre perfect for friends gathering, picnics, or a quiet evening with just yourself. And once you master this simple recipe, you might find yourself experimenting with endless flavor combos.

    This frozen adventure isnt just a trend; its a way to make the ordinary extraordinary. Grab your blender and some fruit, and let the frost do the rest. Summer might be fleeting, but those chilled moments last forever.

  • Chill Out with a Spiced Rum Slushie: The Unexpected Twist

    Chill Out with a Spiced Rum Slushie: The Unexpected Twist

    Rum slushies are often associated with tropical getaways and summer pool parties. But what if we gave this icy treat a daring twist with a hint of spice and a touch of nostalgia? I recently experimented with blending aromatic spices into my favorite rum slushie, creating a drink that transports you straight to a seaside carnival without leaving your porch.

    This recipe combines the cold, creamy texture of a traditional slushie with the complex warmth of spiced rum. It’s perfect for those days when the heat makes you crave something cool but crave-worthy with a little kick. Plus, the process is refreshingly simple, perfect for spontaneous gatherings or solo bliss.

    Spiced Rum Slushie

    A frozen, icy beverage that combines smooth spiced rum with sweet syrup and ice, resulting in a creamy, slushy texture. The addition of aromatic spices gives it a warm, complex flavor profile, making it a refreshing yet flavorful drink. The final appearance features a vibrant, frozen mixture served in a glass with a garnish.
    Prep Time 10 minutes
    Total Time 10 minutes
    Servings: 2
    Course: Main Course
    Cuisine: Tropical
    Calories: 150

    Ingredients
      

    • 1 oz spiced rum preferably a warming variety like cinnamon or vanilla spice
    • 2 tsp simple syrup adjust to taste
    • 2 cups ice cubes crushed ice works well
    • 1/4 tsp cinnamon optional, for extra warmth
    • 1 drop vanilla extract optional, for enhanced aroma

    Equipment

    • Blender
    • Measuring cups and spoons

    Method
     

    1. Add the spiced rum, simple syrup, cinnamon, vanilla extract, and ice cubes into a blender.
    2. Blend on high until the mixture is smooth and icy, with a thick, slushy consistency that’s slightly frothy on top.
    3. Stop blending and check the texture; it should be cold, creamy, and scoopable.
    4. Pour the frozen slushie into chilled glasses, allowing it to mound slightly over the rim.
    5. Garnish with a sprinkle of cinnamon or a slice of citrus if desired, and serve immediately.

    Notes

    For a smoother texture, you can pre-freeze the glasses or chill the ingredients beforehand.

    Enjoying a homemade rum slushie feels like a small celebration of summer’s fleeting magic. It’s a reminder that sometimes, simple ingredients—rum, fruit, a sprinkle of spice—combine to craft a moment of joy. This drink isn’t just a refreshment; it’s an escape in a glass, ideal when the weather is sizzling or when you need a nostalgic pick-me-up.

    So, next time you want a drink that’s both cool and comfortingly complex, whip up this rum slushie. It’s a perfect way to unwind, reminisce, and embrace the fleeting buzz of warm days. Cheers to simple pleasures, chilled and spiced just right.

  • Spooky-Stylish Halloween Eyeball Pasta with Meatball ‘Eyeballs’

    Spooky-Stylish Halloween Eyeball Pasta with Meatball ‘Eyeballs’

    The thrill of Halloween isn’t just about costumes and candy; it’s about transforming your dinner into a captivating spectacle. This Eyeball Pasta turns an ordinary meal into a haunting masterpiece, perfect for adding a splash of fun to your spooky night. The sight of juicy meatballs with sinister, bloodshot eyes is enough to make your guests giggle and shudder in delight.

    Imagine a bubbling pot of crimson tomato sauce, swirling with eerie pasta shapes. The eerie, fatty scent of garlic and herbs fills the kitchen, teasing eager diners. Each bite combines comforting familiarity with a alarming visual twist, making it a memorable centerpiece for any Halloween feast.

    ## WHY I LOVE THIS RECIPE?
    – The grotesque yet adorable meatball eyeballs make me laugh every time I prepare them.
    – It’s a creative way to turn a simple family dinner into a spooky celebration.
    – The vibrant colors and textures are so visually engaging that dinner becomes a mini show.
    – Plus, it’s a fantastic project for kids to help with, blending chaos and joy.

    ## AVOID MY DISASTER (You’re Welcome)
    – FORGOT to blanch the grape olives, they sank and looked less spooky; I fixed it with a quick pickle.
    – DUMPED too much sauce on the eyeballs, causing the eyes to look droopy; I scooped some off swiftly.
    – OVER-TORCHED the meatballs initially, they became too dense, so I added more breadcrumbs and baked again.
    – MISSED boiling the pasta well, it was sticky; a quick rinse and stir fixed this.

    ## QUICK FIXES THAT SAVE YOUR DAY
    – When sauce is too thick, splash in a bit of pasta water to thin it out.
    – If meatballs fall apart, patch with a dab of beaten egg mixed with breadcrumbs.
    – Forgot to prepare the eye detail? Shield with a tiny dollop of black olives or peppercorns.
    – When pasta sticks, soak for a minute, then stir vigorously.
    – When you smell burning garlic, immediately remove from heat, let cool, then add fresh herbs.

    Choosing this quirky recipe right now is perfect for embracing the whimsical spirit of Halloween. The playful chaos of creating edible eyeballs will spark joy and turn dinner into an interactive event everyone remembers. Plus, it’s a great way to celebrate the season with a side of gross-out giggles.

    This comforting, visually outrageous dish captures the essence of October fun. It’s a reminder that food can be both a feast for the senses and a canvas for creativity. So, gather your ingredients and enjoy a spooky, sensational meal that’s as charming as it is chilling.

    Eyeball Pasta

    Eyeball Pasta features cooked pasta combined with a rich tomato sauce, topped with meatballs crafted to resemble unsettling eyeballs. The meatballs are decorated with black olive or peppercorn pupils to create a creepy, bloodshot effect, and the dish offers a combination of comforting pasta textures with a spooky visual twist.
    Prep Time 20 minutes
    Cook Time 30 minutes
    Total Time 50 minutes
    Servings: 4
    Course: Main Course
    Cuisine: American
    Calories: 550

    Ingredients
      

    • 400 g dry pasta (like spaghetti or fusilli) uncooked
    • 1 tbsp olive oil for cooking sauce and meatballs
    • 3 cloves garlic minced
    • 800 g crushed tomatoes for sauce
    • 1 tsp dried basil optional, for flavor
    • 250 g ground beef for meatballs
    • 0.5 cup breadcrumbs to bind meatballs
    • 1 egg beaten
    • 1 small black olive or peppercorns for pupils
    • to taste salt and pepper for seasoning

    Equipment

    • Large pot
    • Skillet or Saucepan
    • Mixing bowl
    • Baking sheet
    • Small Spoon or Cookie Scoop

    Method
     

    1. Cook the pasta in a large pot of boiling salted water until al dente, then drain and set aside.
    2. In a skillet, heat olive oil over medium heat, then sauté minced garlic until fragrant and slightly golden, about 30 seconds to 1 minute.
    3. Add crushed tomatoes to the skillet, stir in dried basil if using, and simmer gently for about 10 minutes until the sauce thickens slightly.
    4. While the sauce cooks, combine ground beef, breadcrumbs, beaten egg, salt, and pepper in a mixing bowl. Mix gently until just combined.
    5. Shape the meat mixture into small round balls, about 1 inch in diameter, then place them on a baking sheet lined with parchment paper.
    6. Bake the meatballs in a preheated oven at 375°F (190°C) for about 15-20 minutes until cooked through and slightly browned.
    7. Once baked, gently press a black olive or peppercorn into the center of each meatball to resemble an eyeball pupil.
    8. Add the cooked meatballs to the simmering tomato sauce, gently stirring to coat them thoroughly and heat through for about 5 minutes.
    9. Plate the hot pasta and top generously with the spooky meatballs, ensuring the eyeballs are visible and prominent.
    10. Serve immediately, allowing everyone to marvel at the creepy, delicious eyeballs before digging in.
    With a little planning and a playful spirit, this Halloween Eyeball Pasta can become your signature spooky dish. It’s all about the joy of transforming simple ingredients into something unexpectedly delightful and slightly creepy.

    Enjoy the process and don’t shy away from making it your own. The messiest, most fun moments often turn into the best memories around the dinner table during this haunting season.

  • Spooky Chic: Crafting the Perfect Halloween Spider Web Cake

    Spooky Chic: Crafting the Perfect Halloween Spider Web Cake

    Ever wondered how to turn a simple cake into a haunting masterpiece that captivates both the eyes and the taste buds? This Halloween, elevate your dessert game by creating a Spider Web Cake that looks as if it’s spun straight out of a midnight web. The secret lies in a delicate sugar glaze and a dash of eerie elegance.

    This recipe is not just about the spooky design; it’s about embracing the chaos of decorating and turning it into a celebration of creativity. When you slice into it, the web reveals a moist, flavorful cake that balances sweetness with just a hint of vanilla or chocolate. It’s the centerpiece that will have guests talking long after the last candle flickers out.

    Spider Web Halloween Cake

    This Spider Web Cake features a moist, flavorful cake topped with a glossy sugar glaze and artistic web decoration. The cake’s appearance mimics a midnight web with a shiny, delicate sugar design, while the moist interior offers a balanced sweetness with hints of vanilla or chocolate.
    Prep Time 30 minutes
    Cook Time 35 minutes
    Total Time 1 hour 5 minutes
    Servings: 8
    Course: Main Course
    Cuisine: Halloween
    Calories: 450

    Ingredients
      

    • 2 cups all-purpose flour sifted
    • 1 ½ cups granulated sugar
    • ½ cup unsalted butter softened
    • 3 large eggs
    • 1 cup milk
    • 2 teaspoons vanilla extract
    • ½ cup powdered sugar for glaze
    • 1 tablespoon corn syrup
    • ¼ cup water
    • Black gel food coloring for web decoration

    Equipment

    • Mixing bowls
    • Stand mixer or hand whisk
    • 8-inch round cake pan
    • Cooling rack
    • Small saucepan
    • Piping bag
    • Fine tip piping nozzle
    • Spatula

    Method
     

    1. Preheat your oven to 350°F (175°C). Grease your cake pan and set it aside. In a mixing bowl, whisk together the sifted flour and granulated sugar until combined. Add the softened butter and mix until the batter is crumbly and resembles coarse crumbs.
    2. Beat the eggs one at a time into the batter, ensuring each is fully incorporated before adding the next. Pour in the milk and vanilla extract, then mix until smooth and well combined. The batter should be thick but pourable.
    3. Pour the batter into the prepared cake pan and smooth the top with a spatula. Bake in the preheated oven for about 35 minutes, or until a toothpick inserted into the center comes out clean. Let the cake cool in the pan for 10 minutes, then transfer to a cooling rack to cool completely.
    4. For the sugar glaze, combine the powdered sugar, corn syrup, and water in a small saucepan. Heat over low heat, stirring constantly until the mixture is smooth and glossy. Remove from heat and allow to cool slightly until it thickens just enough to spread but remains pourable.
    5. Drizzle the glaze over the cooled cake, allowing it to set into a shiny, smooth layer. As it cools, it will create a beautiful glossy surface that forms the web’s base.
    6. Prepare the web decoration by mixing a small amount of gel food coloring with a few spoonfuls of the remaining glaze or icing. Fill a piping bag fitted with a fine tip with the colored icing. Pipe concentric circles on the top of the cake to form the web, then pipe straight lines from the center outward to complete the web pattern, creating a spider web look.
    7. Allow the decorated web to set for a few minutes, ensuring the piping holds its shape. Add additional web lines or flourishes if desired for extra spooky detail.
    8. Once decorated, place the cake on a serving platter. Slice into wedges to reveal the moist, flavorful interior with the shiny web design on top. Serve and enjoy the eerie, beautiful dessert.
    In the end, decorating this Spider Web Cake is about having fun and making your Halloween extra memorable. It’s a chance to showcase your artistic side and indulge in some sweet, creepy delights. Plus, the slight mess and wonky webs only add to its charm.

    So gather your ingredients, embrace the spooky spirit, and enjoy the process of transforming a simple cake into a haunting fantasy. This project is all about the thrill of creation and the joy of sharing a terrifyingly tasty treat with loved ones.

  • Enchantingly Spooky: The Halloween Poison Apple Martini

    Enchantingly Spooky: The Halloween Poison Apple Martini

    As the air turns crisp and the leaves crunch underfoot, Halloween whispers its mischievous call. This year, I wanted to craft a cocktail that captures both the eerie charm and the playful chaos of haunted nights. Enter the Poison Apple Martini, a drink that looks deadly beautiful and tastes like a crisp, tart nightmare wrapped in a silky embrace.

    The secret lies in its vibrant green hue and the mysterious hints of apple, bathed in a shadowy liqueur. Stirred with just a touch of poison—okay, green crème de menthe—this potion is perfect for party magic and a little spookiness. It’s less about the liquor and more about the spectacle and whispers of danger in every sip.

    Poison Apple Martini

    The Poison Apple Martini is a vibrant green cocktail that features a vivid hue and a tart, crisp apple flavor. It is shaken with green crème de menthe to add a shadowy touch, resulting in a silky, visually striking drink with a smooth texture and an inviting glossy finish.
    Prep Time 5 minutes
    Total Time 5 minutes
    Servings: 1
    Course: Main Course
    Calories: 200

    Ingredients
      

    • 2 oz vodka high-quality preferred
    • 1 oz green apple schnapps for the tart apple flavor
    • 0.5 oz green crème de menthe for color and shadowy note
    • 0.5 oz fresh lemon juice adds tartness and balance
    • 0.25 oz simple syrup optional, for sweetness adjustments
    • Ice cubes ice for shaking and chilling

    Equipment

    • Cocktail shaker
    • Martini glass

    Method
     

    1. Fill a cocktail shaker halfway with ice cubes to ensure a good chill.
    2. Pour in the vodka, green apple schnapps, green crème de menthe, fresh lemon juice, and simple syrup into the shaker.
    3. Secure the lid tightly and shake vigorously for about 15 seconds until well chilled and the mixture turns slightly frothy.
    4. This helps the flavors blend and the drink achieve a smooth, icy texture.
    5. Remove the lid and carefully strain the cocktail into a chilled martini glass, using a fine mesh strainer if desired to catch small ice shards.
    6. Garnish with a small slice of green apple or a twist of lemon peel on the rim for an eye-catching finish.

    Notes

    For an extra spooky effect, consider adding dry ice for a smoky presentation, but handle with caution.

    With its striking color and chilling vibe, the Poison Apple Martini is a must-try for perched ghosts and ghouls. It turns any gathering into an enchanted, eerie affair, perfect for celebrating spooky season in style. Plus, the sleek glass and chilling aroma make it a visual and sensory delight that guests will talk about long after the night ends.

    As the season pulls us into a tapestry of shadow and delight, this cocktail plays right into the thrill of Halloween. It’s a little mischievous, a little mysterious, and wholly memorable—sipping on it feels like a spell cast for fun and fright alike.

  • Lazy Sunday Feast: The Irresistible Lasagna Soup Remix

    Lazy Sunday Feast: The Irresistible Lasagna Soup Remix

    Imagine comforting flavors packed into a single bowl, but with a twist that transforms your usual lasagna into a hearty soup. This recipe emerged during a lazy Sunday when I craved Italian warmth but lacked the energy for layered baking. As the aroma of bubbling cheese and seasoned broth filled my kitchen, I knew I had stumbled on something special.

    The beauty of this dish is how it balances richness and simplicity. It’s perfect for those who love the essence of lasagna but prefer a quicker, more spontaneous meal. Plus, it makes excellent leftovers, which only seem to improve overnight, soaking up all that savory goodness.

    Lasagna Soup

    Lasagna Soup is a hearty, brothy dish that combines the flavors of traditional lasagna using ground meat, crushed tomatoes, and ricotta, topped with melted cheese. The ingredients are simmered together to create a rich, flavorful broth with tender pasta, resulting in a comforting, bowl-worthy meal with a slightly chunky and inviting final appearance.
    Prep Time 10 minutes
    Cook Time 30 minutes
    Total Time 40 minutes
    Servings: 4
    Course: Main Course
    Cuisine: Italian
    Calories: 350

    Ingredients
      

    • 1 lb ground beef or Italian sausage for the meaty base
    • 1 medium onion diced
    • 3 cloves garlic minced
    • 28 oz crushed tomatoes canned
    • 4 cups chicken or vegetable broth
    • 8 oz small pasta (e.g., ditalini or broken lasagna noodles)
    • ½ cup ricotta cheese for topping
    • 1 cup shredded mozzarella cheese for melting on top
    • 1 tbsp olive oil for sautéing
    • to taste Salt and pepper

    Equipment

    • Large pot
    • Wooden spoon

    Method
     

    1. Heat olive oil in a large pot over medium heat and add the diced onion. Sauté until translucent and fragrant, about 3–4 minutes.
    2. Add the ground beef or Italian sausage to the pot and cook, breaking it apart with a wooden spoon, until browned and cooked through, about 5–7 minutes. Season with salt and pepper.
    3. Stir in the minced garlic and cook for another minute until it becomes fragrant, filling the kitchen with aroma.
    4. Add the crushed tomatoes and broth to the pot, stirring to combine everything well. Bring the mixture to a gentle simmer.
    5. Pour in the small pasta, stirring to distribute evenly. Cover the pot and cook for about 10 minutes or until the pasta is tender and the soup has thickened slightly.
    6. Uncover the pot and stir in the ricotta cheese, creating a creamy swirl through the broth, and ensure the pasta is coated and heated through.
    7. Sprinkle the shredded mozzarella cheese over the top and allow it to melt, about 2–3 minutes, until bubbly and golden.
    8. Give the soup one final stir, then taste and adjust seasoning with more salt or pepper as desired.
    9. Ladle the hot lasagna soup into bowls, ensuring each serving has plenty of pasta, meat, and melted cheese, ready to enjoy.

    Notes

    For extra flavor, add a pinch of red pepper flakes or fresh basil before serving. Leftovers can be stored in the refrigerator and reheat well the next day.
    This lasagna soup isn’t just a meal; it’s an experience of comfort and creativity in a bowl. It pairs beautifully with a crisp green salad or some warm crusty bread on the side. As the seasons shift, there’s something about a warm, cheesy soup that makes the day feel a little more settled.

    Whether you’re serving this up for a cozy family dinner or a casual gathering, it’s bound to satisfy. The magic lies in its ease and bold flavor, turning humble ingredients into a little feast. Here’s to many more lazy Sundays filled with this soul-warming recipe.