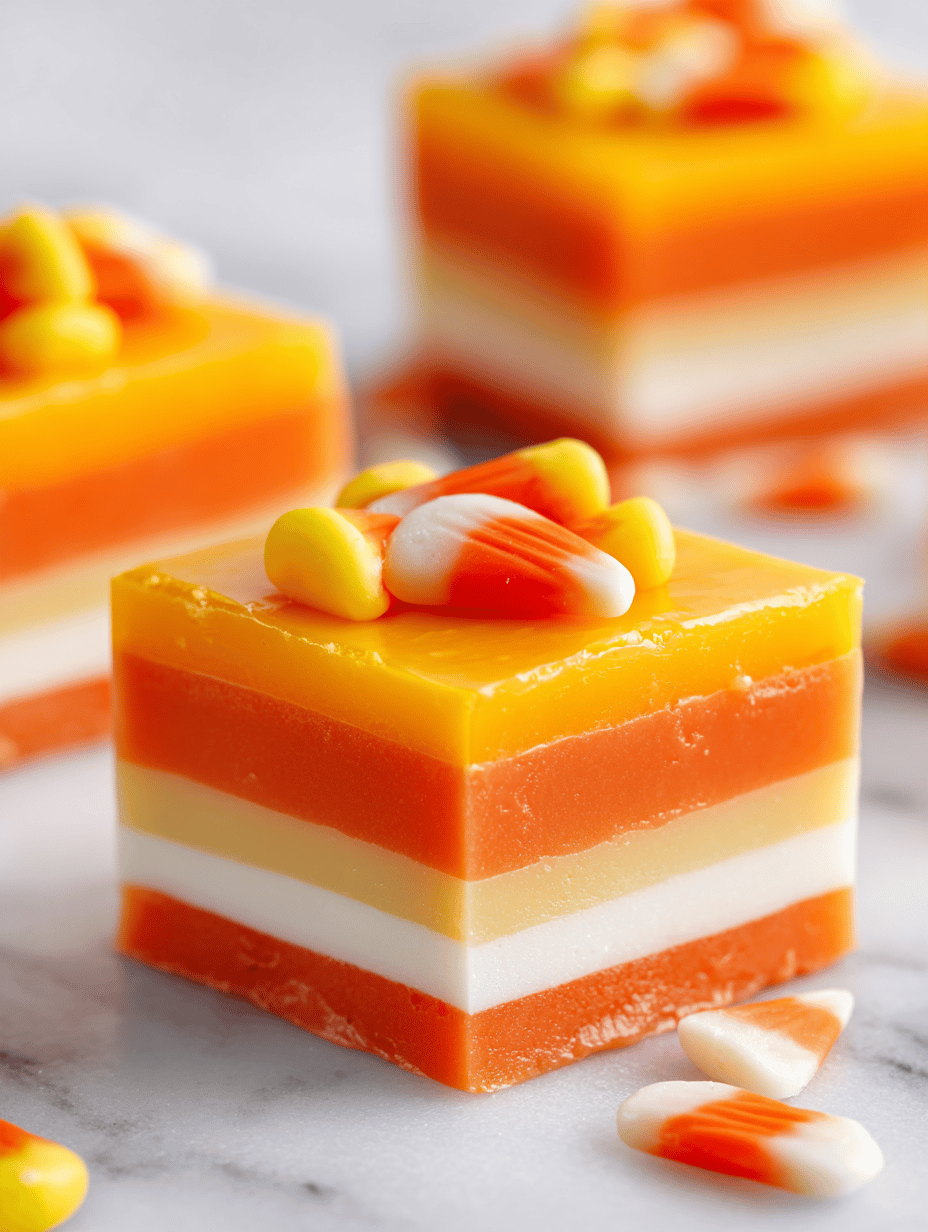
Blog

  • Unusual Charm: Halloween Sugar Cookies with a Spiced Twist

    Unusual Charm: Halloween Sugar Cookies with a Spiced Twist

    Halloween is the only time I embrace a little chaos in the kitchen. These sugar cookies are a playful way to channel that energy, with a punch of spices that remind me of autumn walks and pumpkin patches. They’re simple enough for kids to decorate and fancy enough to serve at your spooky gathering.

    Why I Keep Coming Back to These Cookies

    They capture the essence of autumn, with just enough spice to feel cozy but not overwhelming. Making them sparks a sense of nostalgia and chaos, in the best way. Plus, decorating these cookies is a messy, joyful reminder that perfection isn’t necessary. Every batch feels like a small celebration of the season.

    Breaking Down the Spiced Ingredient Lineup

    • Butter: I use unsalted, softened. It provides richness and helps the dough hold together. Swap with margarine for a dairy-free version.: Creamy, slightly sweet, melts in your mouth.
    • Sugar: Regular granulated sugar works, but brown sugar adds a caramel note. Adjust sweetness to taste.: Sweet, with a subtle molasses aroma.
    • Egg: Binds everything together and adds structure. Use a room temp egg for easier mixing.: Rich and slightly runny before mixing.
    • Flour: All-purpose is standard, but cake flour yields softer cookies. Sift for lightness.: Provides the base structure.
    • Spices: Cinnamon, nutmeg, and a hint of ginger bring warmth. Feel free to tweak quantities.: Oozy warmth and aromatic depth.

    Tools of the Trade for Spiced Halloween Cookies

    • Rolling pin: To roll out the dough evenly.
    • Cookie cutters: To shape the cookies into fun Halloween motifs.
    • Baking sheet: To hold the cookies during baking.
    • Parchment paper: To prevent sticking and make cleanup easier.
    • Cooling rack: To cool cookies evenly after baking.

    Crafting the Perfect Halloween Sugar Cookies

    Step 1: Preheat your oven to 180°C (350°F).

    Step 2: In a large bowl, cream together 1 cup softened butter and 1 cup sugar until light and fluffy.

    Step 3: Add 1 large egg and 1 teaspoon vanilla extract; mix until combined.

    Step 4: In a separate bowl, whisk together 2 ½ cups all-purpose flour, 1 teaspoon baking powder, ½ teaspoon ground cinnamon, and a pinch of nutmeg.

    Step 5: Gradually add the dry ingredients to the wet, mixing just until incorporated.

    Step 6: Divide dough into two halves, wrap in plastic, and chill for at least 1 hour.

    Key Tips to Nail Your Halloween Sugar Cookies

    • Ensure butter is softened but not melted for easy creaming.
    • Chill dough thoroughly to prevent spreading during baking.
    • Use a lightly floured surface for rolling to avoid sticking.
    • Watch baking time closely—edges should turn a light golden brown.

    Common Pitfalls and How to Avoid Them

    • Dough is too sticky to roll.? Use cold butter, not melted, for better dough consistency.
    • Cookies spread too much in the oven.? Chill dough longer if it’s too soft to work with.
    • Cookies are hard or burnt.? Keep an eye on baking time and remove when edges are lightly golden.

    Spiced Halloween Sugar Cookies

    These festive sugar cookies are flavored with warm autumn spices like cinnamon, nutmeg, and ginger, creating a cozy flavor profile. The dough is rolled out and cut into fun Halloween shapes, then baked until lightly golden with a crisp exterior and tender interior. Perfect for decorating and celebrating the spooky season with a joyful, mess-friendly activity.
    Prep Time 20 minutes
    Cook Time 10 minutes
    Total Time 1 hour 10 minutes
    Servings: 24
    Course: Main Course
    Cuisine: American
    Calories: 150

    Ingredients
      

    • 1 cup unsalted butter softened
    • 1 cup granulated sugar or brown sugar for richer flavor
    • 1 large egg room temperature
    • 1 teaspoon vanilla extract
    • 2 ½ cups all-purpose flour sifted
    • 1 teaspoon baking powder
    • ½ teaspoon ground cinnamon
    • ¼ teaspoon ground nutmeg

    Equipment

    • Rolling pin
    • Cookie cutters
    • Baking sheet
    • Parchment paper
    • Cooling rack

    Method
     

    1. In a large mixing bowl, beat together softened butter and sugar until the mixture is light, fluffy, and creamy, smelling sweet and buttery, about 2-3 minutes.
    2. Add the egg and vanilla extract to the creamed mixture, beating until fully incorporated and the mixture feels smooth and slightly glossy.
    3. In a separate bowl, whisk together the sifted flour, baking powder, cinnamon, and nutmeg until evenly combined.
    4. Gradually add the dry ingredients to the wet mixture, mixing on low speed or folding until just combined and the dough begins to come together, feeling firm but pliable.
    5. Divide the dough in half, shape each into a flat disc, wrap tightly in plastic wrap, and chill in the refrigerator for at least 1 hour to relax the gluten and make rolling easier.
    6. Preheat your oven to 180°C (350°F) and line a baking sheet with parchment paper to prevent sticking.
    7. Remove one chilled dough disc from the fridge and place it on a lightly floured surface. Roll it out to about ¼-inch thickness, ensuring an even layer without sticking.
    8. Use Halloween-themed cookie cutters to cut out shapes from the rolled dough, pressing firmly but gently to maintain clean edges.
    9. Carefully transfer the cut-out cookies to the prepared baking sheet, leaving space between each for expansion.
    10. Bake the cookies in the preheated oven for about 8-10 minutes, until the edges are just turning a light golden brown and the cookies feel set but still soft.
    11. Remove the cookies from the oven and let them cool on the baking sheet for a few minutes before transferring them to a cooling rack to cool completely and set their shape.

    Notes

    For best results, chill the dough thoroughly to prevent spreading and ensure crisp, clean shapes. Feel free to decorate with icing or sprinkles once cooled for added festive fun.
    These cookies are a canvas for your Halloween creativity, but they’re also a reminder that simple ingredients can turn into something nostalgic and fun. Don’t stress over perfect shapes—imperfect cookies are the most charming. Enjoy making them as much as eating them, especially with a cup of spiced cider on a chilly evening. Make these your own with unique decorations or a dash of extra spice.

  • Unusual Charm: Halloween Sugar Cookies with a Spiced Twist

    Unusual Charm: Halloween Sugar Cookies with a Spiced Twist

    Halloween is the only time I embrace a little chaos in the kitchen. These sugar cookies are a playful way to channel that energy, with a punch of spices that remind me of autumn walks and pumpkin patches. They’re simple enough for kids to decorate and fancy enough to serve at your spooky gathering.

    Why I Keep Coming Back to These Cookies

    They capture the essence of autumn, with just enough spice to feel cozy but not overwhelming. Making them sparks a sense of nostalgia and chaos, in the best way. Plus, decorating these cookies is a messy, joyful reminder that perfection isn’t necessary. Every batch feels like a small celebration of the season.

    Breaking Down the Spiced Ingredient Lineup

    • Butter: I use unsalted, softened. It provides richness and helps the dough hold together. Swap with margarine for a dairy-free version.: Creamy, slightly sweet, melts in your mouth.
    • Sugar: Regular granulated sugar works, but brown sugar adds a caramel note. Adjust sweetness to taste.: Sweet, with a subtle molasses aroma.
    • Egg: Binds everything together and adds structure. Use a room temp egg for easier mixing.: Rich and slightly runny before mixing.
    • Flour: All-purpose is standard, but cake flour yields softer cookies. Sift for lightness.: Provides the base structure.
    • Spices: Cinnamon, nutmeg, and a hint of ginger bring warmth. Feel free to tweak quantities.: Oozy warmth and aromatic depth.

    Tools of the Trade for Spiced Halloween Cookies

    • Rolling pin: To roll out the dough evenly.
    • Cookie cutters: To shape the cookies into fun Halloween motifs.
    • Baking sheet: To hold the cookies during baking.
    • Parchment paper: To prevent sticking and make cleanup easier.
    • Cooling rack: To cool cookies evenly after baking.

    Crafting the Perfect Halloween Sugar Cookies

    Step 1: Preheat your oven to 180°C (350°F).

    Step 2: In a large bowl, cream together 1 cup softened butter and 1 cup sugar until light and fluffy.

    Step 3: Add 1 large egg and 1 teaspoon vanilla extract; mix until combined.

    Step 4: In a separate bowl, whisk together 2 ½ cups all-purpose flour, 1 teaspoon baking powder, ½ teaspoon ground cinnamon, and a pinch of nutmeg.

    Step 5: Gradually add the dry ingredients to the wet, mixing just until incorporated.

    Step 6: Divide dough into two halves, wrap in plastic, and chill for at least 1 hour.

    Key Tips to Nail Your Halloween Sugar Cookies

    • Ensure butter is softened but not melted for easy creaming.
    • Chill dough thoroughly to prevent spreading during baking.
    • Use a lightly floured surface for rolling to avoid sticking.
    • Watch baking time closely—edges should turn a light golden brown.

    Common Pitfalls and How to Avoid Them

    • Dough is too sticky to roll.? Use cold butter, not melted, for better dough consistency.
    • Cookies spread too much in the oven.? Chill dough longer if it’s too soft to work with.
    • Cookies are hard or burnt.? Keep an eye on baking time and remove when edges are lightly golden.

    Halloween Spiced Sugar Cookies

    These sugar cookies are infused with warm autumn spices like cinnamon, nutmeg, and ginger, creating a cozy flavor perfect for Halloween. The dough is rolled out and cut into fun seasonal shapes, then baked until lightly golden, resulting in crisp edges and soft centers. They’re ideal for decorating and sharing at spooky gatherings or fall celebrations.
    Prep Time 20 minutes
    Cook Time 12 minutes
    Total Time 1 hour 20 minutes
    Servings: 24
    Course: Main Course
    Cuisine: American
    Calories: 120

    Ingredients
      

    • 1 cup unsalted butter, softened Ensure butter is soft but not melted
    • 1 cup granulated sugar Adjust to brown sugar for a caramel note
    • 1 large egg Room temperature for easier mixing
    • 1 teaspoon vanilla extract
    • 2 ½ cups all-purpose flour Sifted for lightness
    • 1 teaspoon baking powder
    • ½ teaspoon ground cinnamon
    • ¼ teaspoon ground nutmeg
    • ¼ teaspoon ground ginger

    Equipment

    • Rolling pin
    • Cookie cutters
    • Baking sheet
    • Parchment paper
    • Cooling rack

    Method
     

    1. In a large mixing bowl, beat together the softened butter and sugar until the mixture is light, fluffy, and smells slightly sweet—about 2-3 minutes.
    2. Add the egg and vanilla extract to the bowl, then beat until fully incorporated and the mixture is smooth.
    3. In a separate bowl, whisk together the sifted flour, baking powder, cinnamon, nutmeg, and ginger to evenly distribute the spices.
    4. Gradually add the dry ingredients to the wet mixture, mixing on low speed or folding gently until just combined and a soft dough forms.
    5. Divide the dough into two equal parts, shape into discs, wrap each in plastic wrap, and refrigerate for at least 1 hour to relax the dough.
    6. Preheat your oven to 180°C (350°F). Line a baking sheet with parchment paper and set aside.
    7. Remove one dough disc from the fridge, place on a lightly floured surface, and roll out to about ¼ inch thickness, ensuring an even layer.
    8. Use Halloween-themed cookie cutters to cut out shapes, pressing firmly and lifting carefully to keep shapes intact.
    9. Arrange the cut shapes on the prepared baking sheet, spacing them about 1 inch apart.
    10. Bake in the preheated oven for 10-12 minutes, or until the edges are just turning golden brown and the cookies feel firm around the edges.
    11. Once baked, transfer the cookies to a cooling rack and let them cool completely before decorating or serving.

    Notes

    Chill the dough thoroughly to prevent spreading. For extra festive flair, decorate with icing or sprinkles once cooled.
    These cookies are a canvas for your Halloween creativity, but they’re also a reminder that simple ingredients can turn into something nostalgic and fun. Don’t stress over perfect shapes—imperfect cookies are the most charming. Enjoy making them as much as eating them, especially with a cup of spiced cider on a chilly evening. Make these your own with unique decorations or a dash of extra spice.

  • Unusual Charm: Halloween Sugar Cookies with a Spiced Twist

    Unusual Charm: Halloween Sugar Cookies with a Spiced Twist

    Halloween is the only time I embrace a little chaos in the kitchen. These sugar cookies are a playful way to channel that energy, with a punch of spices that remind me of autumn walks and pumpkin patches. They’re simple enough for kids to decorate and fancy enough to serve at your spooky gathering.

    Why I Keep Coming Back to These Cookies

    They capture the essence of autumn, with just enough spice to feel cozy but not overwhelming. Making them sparks a sense of nostalgia and chaos, in the best way. Plus, decorating these cookies is a messy, joyful reminder that perfection isn’t necessary. Every batch feels like a small celebration of the season.

    Breaking Down the Spiced Ingredient Lineup

    • Butter: I use unsalted, softened. It provides richness and helps the dough hold together. Swap with margarine for a dairy-free version.: Creamy, slightly sweet, melts in your mouth.
    • Sugar: Regular granulated sugar works, but brown sugar adds a caramel note. Adjust sweetness to taste.: Sweet, with a subtle molasses aroma.
    • Egg: Binds everything together and adds structure. Use a room temp egg for easier mixing.: Rich and slightly runny before mixing.
    • Flour: All-purpose is standard, but cake flour yields softer cookies. Sift for lightness.: Provides the base structure.
    • Spices: Cinnamon, nutmeg, and a hint of ginger bring warmth. Feel free to tweak quantities.: Oozy warmth and aromatic depth.

    Tools of the Trade for Spiced Halloween Cookies

    • Rolling pin: To roll out the dough evenly.
    • Cookie cutters: To shape the cookies into fun Halloween motifs.
    • Baking sheet: To hold the cookies during baking.
    • Parchment paper: To prevent sticking and make cleanup easier.
    • Cooling rack: To cool cookies evenly after baking.

    Crafting the Perfect Halloween Sugar Cookies

    Step 1: Preheat your oven to 180°C (350°F).

    Step 2: In a large bowl, cream together 1 cup softened butter and 1 cup sugar until light and fluffy.

    Step 3: Add 1 large egg and 1 teaspoon vanilla extract; mix until combined.

    Step 4: In a separate bowl, whisk together 2 ½ cups all-purpose flour, 1 teaspoon baking powder, ½ teaspoon ground cinnamon, and a pinch of nutmeg.

    Step 5: Gradually add the dry ingredients to the wet, mixing just until incorporated.

    Step 6: Divide dough into two halves, wrap in plastic, and chill for at least 1 hour.

    Key Tips to Nail Your Halloween Sugar Cookies

    • Ensure butter is softened but not melted for easy creaming.
    • Chill dough thoroughly to prevent spreading during baking.
    • Use a lightly floured surface for rolling to avoid sticking.
    • Watch baking time closely—edges should turn a light golden brown.

    Common Pitfalls and How to Avoid Them

    • Dough is too sticky to roll.? Use cold butter, not melted, for better dough consistency.
    • Cookies spread too much in the oven.? Chill dough longer if it’s too soft to work with.
    • Cookies are hard or burnt.? Keep an eye on baking time and remove when edges are lightly golden.

    Spiced Halloween Sugar Cookies

    These festive sugar cookies are flavored with warm spices like cinnamon, nutmeg, and ginger, offering a cozy autumnal flavor. The dough is rolled out, cut into fun Halloween shapes, and baked until lightly golden, resulting in crisp edges and a tender center perfect for decorating or serving plain. Their cheerful, seasonally themed appearance makes them a delightful treat for spooky gatherings or festive celebrations.
    Prep Time 20 minutes
    Cook Time 10 minutes
    Total Time 2 hours 10 minutes
    Servings: 24
    Course: Main Course
    Cuisine: American
    Calories: 80

    Ingredients
      

    • 1 cup unsalted butter, softened Ensure butter is softened but not melted
    • 1 cup granulated sugar Can substitute with brown sugar for richer flavor
    • 1 large egg Room temperature for easier mixing
    • 1 teaspoon vanilla extract
    • 2 ½ cups all-purpose flour Sifted for lightness
    • 1 teaspoon baking powder
    • ½ teaspoon ground cinnamon
    • ¼ teaspoon ground nutmeg
    • ¼ teaspoon ground ginger

    Equipment

    • Mixing bowls
    • Electric mixer or whisk
    • Measuring cups and spoons
    • Sifter
    • Rolling pin
    • Halloween cookie cutters
    • Baking sheet
    • Parchment paper
    • Cooling rack

    Method
     

    1. In a large mixing bowl, beat together the softened butter and sugar using an electric mixer or whisk until the mixture is light, fluffy, and pale in color, about 2-3 minutes.
    2. Add the egg and vanilla extract to the creamed mixture, then beat until fully combined, about 1 minute.
    3. In a separate sifter or bowl, whisk together the flour, baking powder, cinnamon, nutmeg, and ginger.
    4. Gradually add the dry ingredients to the wet mixture, mixing on low speed or folding gently until the dough just comes together and looks uniform.
    5. Divide the dough in half, shape into disks, wrap each in plastic wrap, and chill in the refrigerator for at least 1 hour to relax the dough.
    6. Preheat your oven to 180°C (350°F). Line baking sheets with parchment paper.
    7. Remove one dough disk from the fridge and place on a lightly floured surface. Roll out the dough to about 1/4 inch thickness, ensuring an even surface.
    8. Use Halloween-themed cookie cutters to cut out shapes, pressing firmly to get clean edges. Transfer the cutouts to the prepared baking sheets.
    9. Bake in the preheated oven for 8-10 minutes, or until the edges are just starting to turn a light golden brown. Keep a close eye to prevent over-baking.
    10. Once baked, remove the cookies from the oven and let them cool on the baking sheet for a few minutes, then transfer them to a cooling rack to cool completely.
    11. Repeat the rolling, cutting, and baking process with the remaining dough. Decorate cookies as desired once completely cooled.

    Notes

    Chilling the dough helps prevent spreading and makes it easier to handle. Feel free to get creative with decorating—use icing, sprinkles, or edible markers to enhance the Halloween theme.
    These cookies are a canvas for your Halloween creativity, but they’re also a reminder that simple ingredients can turn into something nostalgic and fun. Don’t stress over perfect shapes—imperfect cookies are the most charming. Enjoy making them as much as eating them, especially with a cup of spiced cider on a chilly evening. Make these your own with unique decorations or a dash of extra spice.

  • Unusual Charm: Halloween Sugar Cookies with a Spiced Twist

    Unusual Charm: Halloween Sugar Cookies with a Spiced Twist

    Halloween is the only time I embrace a little chaos in the kitchen. These sugar cookies are a playful way to channel that energy, with a punch of spices that remind me of autumn walks and pumpkin patches. They’re simple enough for kids to decorate and fancy enough to serve at your spooky gathering.

    Why I Keep Coming Back to These Cookies

    They capture the essence of autumn, with just enough spice to feel cozy but not overwhelming. Making them sparks a sense of nostalgia and chaos, in the best way. Plus, decorating these cookies is a messy, joyful reminder that perfection isn’t necessary. Every batch feels like a small celebration of the season.

    Breaking Down the Spiced Ingredient Lineup

    • Butter: I use unsalted, softened. It provides richness and helps the dough hold together. Swap with margarine for a dairy-free version.: Creamy, slightly sweet, melts in your mouth.
    • Sugar: Regular granulated sugar works, but brown sugar adds a caramel note. Adjust sweetness to taste.: Sweet, with a subtle molasses aroma.
    • Egg: Binds everything together and adds structure. Use a room temp egg for easier mixing.: Rich and slightly runny before mixing.
    • Flour: All-purpose is standard, but cake flour yields softer cookies. Sift for lightness.: Provides the base structure.
    • Spices: Cinnamon, nutmeg, and a hint of ginger bring warmth. Feel free to tweak quantities.: Oozy warmth and aromatic depth.

    Tools of the Trade for Spiced Halloween Cookies

    • Rolling pin: To roll out the dough evenly.
    • Cookie cutters: To shape the cookies into fun Halloween motifs.
    • Baking sheet: To hold the cookies during baking.
    • Parchment paper: To prevent sticking and make cleanup easier.
    • Cooling rack: To cool cookies evenly after baking.

    Crafting the Perfect Halloween Sugar Cookies

    Step 1: Preheat your oven to 180°C (350°F).

    Step 2: In a large bowl, cream together 1 cup softened butter and 1 cup sugar until light and fluffy.

    Step 3: Add 1 large egg and 1 teaspoon vanilla extract; mix until combined.

    Step 4: In a separate bowl, whisk together 2 ½ cups all-purpose flour, 1 teaspoon baking powder, ½ teaspoon ground cinnamon, and a pinch of nutmeg.

    Step 5: Gradually add the dry ingredients to the wet, mixing just until incorporated.

    Step 6: Divide dough into two halves, wrap in plastic, and chill for at least 1 hour.

    Key Tips to Nail Your Halloween Sugar Cookies

    • Ensure butter is softened but not melted for easy creaming.
    • Chill dough thoroughly to prevent spreading during baking.
    • Use a lightly floured surface for rolling to avoid sticking.
    • Watch baking time closely—edges should turn a light golden brown.

    Common Pitfalls and How to Avoid Them

    • Dough is too sticky to roll.? Use cold butter, not melted, for better dough consistency.
    • Cookies spread too much in the oven.? Chill dough longer if it’s too soft to work with.
    • Cookies are hard or burnt.? Keep an eye on baking time and remove when edges are lightly golden.

    Spiced Halloween Sugar Cookies

    These festive sugar cookies are flavored with warm spices like cinnamon, nutmeg, and ginger, capturing the cozy essence of autumn. Made with simple ingredients, they are rolled out, cut into fun Halloween shapes, and baked to a golden edge with a soft, slightly chewy center. Perfect for decorating and sharing during spooky celebrations.
    Prep Time 20 minutes
    Cook Time 12 minutes
    Total Time 1 hour 20 minutes
    Servings: 24
    Course: Main Course
    Cuisine: American
    Calories: 150

    Ingredients
      

    • 1 cup unsalted butter softened
    • 1 cup granulated sugar or brown sugar for a caramel flavor
    • 1 large egg room temperature
    • 1 teaspoon vanilla extract
    • 2 ½ cups all-purpose flour sifted for lightness
    • 1 teaspoon baking powder
    • ½ teaspoon ground cinnamon
    • ¼ teaspoon ground nutmeg
    • ¼ teaspoon ground ginger

    Equipment

    • Mixing bowls
    • Rolling pin
    • Cookie cutters
    • Baking sheet
    • Parchment paper
    • Cooling rack

    Method
     

    1. In a large mixing bowl, combine the softened butter and sugar. Use a mixer to beat until the mixture is light, fluffy, and has a creamy texture, about 2-3 minutes.
    2. Add the egg and vanilla extract to the bowl. Mix well until the mixture is smooth, fragrant, and slightly airy.
    3. In a separate bowl, whisk together the sifted flour, baking powder, cinnamon, nutmeg, and ginger until evenly combined.
    4. Gradually add the dry ingredients to the wet mixture, mixing on low speed or folding until just combined and the dough begins to come together.
    5. Divide the dough in half, shape each into a flat disk, wrap tightly in plastic wrap, and refrigerate for at least 1 hour to relax the gluten and make rolling easier.
    6. Preheat your oven to 180°C (350°F). Line your baking sheet with parchment paper to prevent sticking.
    7. Remove one dough disk from the fridge. Lightly flour a clean surface and your rolling pin. Roll out the dough to about ¼ inch thickness, aiming for an even, smooth surface.
    8. Use Halloween cookie cutters to cut out fun shapes from the rolled dough. Transfer the cutouts carefully to the prepared baking sheet.
    9. Bake in the preheated oven for 10-12 minutes, or until the edges are just turning a light golden brown and the cookies are set.
    10. Once baked, remove the cookies from the oven and let them cool on the baking sheet for 5 minutes. Then transfer them to a cooling rack to cool completely and set their shape.
    11. Enjoy these beautifully spiced Halloween cookies decorated with icing or sprinkles, or serve them plain for a cozy autumn treat.

    Notes

    Chill the dough thoroughly to prevent spreading and ensure crisp, clean shapes. Feel free to get creative with decorating—use royal icing, sprinkles, or edible glitter for extra festive flair.
    These cookies are a canvas for your Halloween creativity, but they’re also a reminder that simple ingredients can turn into something nostalgic and fun. Don’t stress over perfect shapes—imperfect cookies are the most charming. Enjoy making them as much as eating them, especially with a cup of spiced cider on a chilly evening. Make these your own with unique decorations or a dash of extra spice.

  • Unusual Charm: Halloween Sugar Cookies with a Spiced Twist

    Unusual Charm: Halloween Sugar Cookies with a Spiced Twist

    Halloween is the only time I embrace a little chaos in the kitchen. These sugar cookies are a playful way to channel that energy, with a punch of spices that remind me of autumn walks and pumpkin patches. They’re simple enough for kids to decorate and fancy enough to serve at your spooky gathering.

    Why I Keep Coming Back to These Cookies

    They capture the essence of autumn, with just enough spice to feel cozy but not overwhelming. Making them sparks a sense of nostalgia and chaos, in the best way. Plus, decorating these cookies is a messy, joyful reminder that perfection isn’t necessary. Every batch feels like a small celebration of the season.

    Breaking Down the Spiced Ingredient Lineup

    • Butter: I use unsalted, softened. It provides richness and helps the dough hold together. Swap with margarine for a dairy-free version.: Creamy, slightly sweet, melts in your mouth.
    • Sugar: Regular granulated sugar works, but brown sugar adds a caramel note. Adjust sweetness to taste.: Sweet, with a subtle molasses aroma.
    • Egg: Binds everything together and adds structure. Use a room temp egg for easier mixing.: Rich and slightly runny before mixing.
    • Flour: All-purpose is standard, but cake flour yields softer cookies. Sift for lightness.: Provides the base structure.
    • Spices: Cinnamon, nutmeg, and a hint of ginger bring warmth. Feel free to tweak quantities.: Oozy warmth and aromatic depth.

    Tools of the Trade for Spiced Halloween Cookies

    • Rolling pin: To roll out the dough evenly.
    • Cookie cutters: To shape the cookies into fun Halloween motifs.
    • Baking sheet: To hold the cookies during baking.
    • Parchment paper: To prevent sticking and make cleanup easier.
    • Cooling rack: To cool cookies evenly after baking.

    Crafting the Perfect Halloween Sugar Cookies

    Step 1: Preheat your oven to 180°C (350°F).

    Step 2: In a large bowl, cream together 1 cup softened butter and 1 cup sugar until light and fluffy.

    Step 3: Add 1 large egg and 1 teaspoon vanilla extract; mix until combined.

    Step 4: In a separate bowl, whisk together 2 ½ cups all-purpose flour, 1 teaspoon baking powder, ½ teaspoon ground cinnamon, and a pinch of nutmeg.

    Step 5: Gradually add the dry ingredients to the wet, mixing just until incorporated.

    Step 6: Divide dough into two halves, wrap in plastic, and chill for at least 1 hour.

    Key Tips to Nail Your Halloween Sugar Cookies

    • Ensure butter is softened but not melted for easy creaming.
    • Chill dough thoroughly to prevent spreading during baking.
    • Use a lightly floured surface for rolling to avoid sticking.
    • Watch baking time closely—edges should turn a light golden brown.

    Common Pitfalls and How to Avoid Them

    • Dough is too sticky to roll.? Use cold butter, not melted, for better dough consistency.
    • Cookies spread too much in the oven.? Chill dough longer if it’s too soft to work with.
    • Cookies are hard or burnt.? Keep an eye on baking time and remove when edges are lightly golden.

    Spiced Halloween Sugar Cookies

    These festive sugar cookies are infused with warm spices like cinnamon, nutmeg, and ginger, giving them an autumnal flavor. They are rolled out, cut into fun Halloween shapes, and baked until golden, resulting in crisp edges and a tender center perfect for decorating. A playful and cozy treat for spooky gatherings or seasonal fun.
    Prep Time 20 minutes
    Cook Time 12 minutes
    Total Time 1 hour 20 minutes
    Servings: 24
    Course: Main Course
    Cuisine: American
    Calories: 150

    Ingredients
      

    • 1 cup unsalted butter softened
    • 1 cup granulated sugar
    • 1 large egg room temperature
    • 1 teaspoon vanilla extract
    • 2 ½ cups all-purpose flour sifted
    • 1 teaspoon baking powder
    • ½ teaspoon ground cinnamon
    • ¼ teaspoon ground nutmeg
    • ¼ teaspoon ground ginger

    Equipment

    • Rolling pin
    • Cookie cutters
    • Baking sheet
    • Parchment paper
    • Cooling rack

    Method
     

    1. In a large mixing bowl, beat together the softened butter and sugar until the mixture is light, fluffy, and pale in color. The sound should be a gentle whine, and the mixture will look creamy and smooth.
    2. Add the large egg and vanilla extract to the bowl, then mix until fully incorporated. You’ll notice the mixture thickening slightly and becoming glossy.
    3. In a separate bowl, whisk together the sifted flour, baking powder, cinnamon, nutmeg, and ginger. The dry ingredients will be evenly distributed and fragrant with warm spices.
    4. Gradually add the dry mixture into the wet ingredients, mixing just until the dough begins to come together and no streaks of flour remain. The dough will be soft but manageable.
    5. Divide the dough in half, shape each into a flat disk, wrap tightly with plastic wrap, and chill in the refrigerator for at least 1 hour. This helps the dough relax and makes it easier to roll out.
    6. Preheat your oven to 180°C (350°F). Line your baking sheets with parchment paper to prevent sticking.
    7. Remove one dough disk from the fridge, and on a lightly floured surface, roll it out to about ¼ inch thickness. Keep the remaining disk refrigerated until ready to use.
    8. Use Halloween-themed cookie cutters to cut out shapes from the rolled dough. Transfer the cutouts carefully to the prepared baking sheet.
    9. Bake the cookies in the preheated oven for 10-12 minutes, or until the edges are just lightly golden. The aroma of spices will fill the kitchen.
    10. Once baked, transfer the cookies to a cooling rack and let them cool completely. The cookies will be crisp around the edges but tender in the center, perfect for decorating.
    11. Decorate your spooky sugar cookies with icing, sprinkles, or edible glitter to complete the festive look. Enjoy these cozy, spicy treats during your Halloween celebration!

    Notes

    Chill the dough thoroughly for clean cuts. Watch the baking time closely to prevent overbaking. Decorate once cookies are completely cooled for best results.
    These cookies are a canvas for your Halloween creativity, but they’re also a reminder that simple ingredients can turn into something nostalgic and fun. Don’t stress over perfect shapes—imperfect cookies are the most charming. Enjoy making them as much as eating them, especially with a cup of spiced cider on a chilly evening. Make these your own with unique decorations or a dash of extra spice.

  • Unusual Charm: Halloween Sugar Cookies with a Spiced Twist

    Unusual Charm: Halloween Sugar Cookies with a Spiced Twist

    Halloween is the only time I embrace a little chaos in the kitchen. These sugar cookies are a playful way to channel that energy, with a punch of spices that remind me of autumn walks and pumpkin patches. They’re simple enough for kids to decorate and fancy enough to serve at your spooky gathering.

    Why I Keep Coming Back to These Cookies

    They capture the essence of autumn, with just enough spice to feel cozy but not overwhelming. Making them sparks a sense of nostalgia and chaos, in the best way. Plus, decorating these cookies is a messy, joyful reminder that perfection isn’t necessary. Every batch feels like a small celebration of the season.

    Breaking Down the Spiced Ingredient Lineup

    • Butter: I use unsalted, softened. It provides richness and helps the dough hold together. Swap with margarine for a dairy-free version.: Creamy, slightly sweet, melts in your mouth.
    • Sugar: Regular granulated sugar works, but brown sugar adds a caramel note. Adjust sweetness to taste.: Sweet, with a subtle molasses aroma.
    • Egg: Binds everything together and adds structure. Use a room temp egg for easier mixing.: Rich and slightly runny before mixing.
    • Flour: All-purpose is standard, but cake flour yields softer cookies. Sift for lightness.: Provides the base structure.
    • Spices: Cinnamon, nutmeg, and a hint of ginger bring warmth. Feel free to tweak quantities.: Oozy warmth and aromatic depth.

    Tools of the Trade for Spiced Halloween Cookies

    • Rolling pin: To roll out the dough evenly.
    • Cookie cutters: To shape the cookies into fun Halloween motifs.
    • Baking sheet: To hold the cookies during baking.
    • Parchment paper: To prevent sticking and make cleanup easier.
    • Cooling rack: To cool cookies evenly after baking.

    Crafting the Perfect Halloween Sugar Cookies

    Step 1: Preheat your oven to 180°C (350°F).

    Step 2: In a large bowl, cream together 1 cup softened butter and 1 cup sugar until light and fluffy.

    Step 3: Add 1 large egg and 1 teaspoon vanilla extract; mix until combined.

    Step 4: In a separate bowl, whisk together 2 ½ cups all-purpose flour, 1 teaspoon baking powder, ½ teaspoon ground cinnamon, and a pinch of nutmeg.

    Step 5: Gradually add the dry ingredients to the wet, mixing just until incorporated.

    Step 6: Divide dough into two halves, wrap in plastic, and chill for at least 1 hour.

    Key Tips to Nail Your Halloween Sugar Cookies

    • Ensure butter is softened but not melted for easy creaming.
    • Chill dough thoroughly to prevent spreading during baking.
    • Use a lightly floured surface for rolling to avoid sticking.
    • Watch baking time closely—edges should turn a light golden brown.

    Common Pitfalls and How to Avoid Them

    • Dough is too sticky to roll.? Use cold butter, not melted, for better dough consistency.
    • Cookies spread too much in the oven.? Chill dough longer if it’s too soft to work with.
    • Cookies are hard or burnt.? Keep an eye on baking time and remove when edges are lightly golden.

    Spiced Halloween Sugar Cookies

    These festive sugar cookies are infused with warm autumn spices like cinnamon, nutmeg, and ginger, creating a cozy flavor profile. The dough is rolled out and cut into Halloween shapes, then baked until lightly golden, resulting in crisp edges and tender centers perfect for decorating. They’re a fun, mess-friendly treat that captures the spirit of the season.
    Prep Time 20 minutes
    Cook Time 10 minutes
    Total Time 2 hours
    Servings: 24
    Course: Main Course
    Cuisine: American
    Calories: 150

    Ingredients
      

    • 1 cup unsalted butter softened
    • 1 cup granulated sugar
    • 1 large egg room temperature
    • 1 teaspoon vanilla extract
    • 2.5 cups all-purpose flour sifted
    • 1 teaspoon baking powder
    • 0.5 teaspoon ground cinnamon
    • 0.25 teaspoon ground nutmeg
    • 0.25 teaspoon ground ginger

    Equipment

    • Rolling pin
    • Cookie cutters
    • Baking sheet
    • Parchment paper
    • Cooling rack

    Method
     

    1. Cream together softened butter and sugar in a large bowl until the mixture is light, fluffy, and pale in color, with a gentle squeaking sound when you scrape the bowl.
    2. Add the large egg and vanilla extract to the creamed mixture, then beat until well combined and smooth.
    3. In a separate bowl, whisk together the sifted flour, baking powder, cinnamon, nutmeg, and ginger to evenly distribute the spices.
    4. Gradually add the dry ingredients to the wet mixture, mixing on low speed or folding until just combined and a soft dough forms.
    5. Divide the dough into two equal parts, shape each into a disc, wrap in plastic wrap, and chill in the refrigerator for at least 1 hour to relax the gluten and firm the dough.
    6. Preheat your oven to 180°C (350°F). Remove one dough disc from the fridge and let it sit at room temperature for a few minutes to soften slightly.
    7. Lightly flour a clean surface and your rolling pin; roll out the dough to about 1/4 inch thickness, ensuring an even layer for uniform cookies.
    8. Use Halloween-themed cookie cutters to cut out shapes from the rolled dough, pressing firmly but gently to get clean cuts.
    9. Line a baking sheet with parchment paper and carefully transfer the cut-out cookies onto it, spacing them about 1 inch apart.
    10. Bake in the preheated oven for 8-10 minutes, or until the edges are just turning a light golden brown and the cookies feel firm to the touch.
    11. Remove the cookies from the oven, let them cool on the baking sheet for a few minutes, then transfer to a cooling rack to cool completely and set.

    Notes

    Chill the dough thoroughly to prevent spreading. Use a variety of Halloween cookie cutters for fun shapes. Decorate with icing or sprinkles once completely cooled for a festive touch.
    These cookies are a canvas for your Halloween creativity, but they’re also a reminder that simple ingredients can turn into something nostalgic and fun. Don’t stress over perfect shapes—imperfect cookies are the most charming. Enjoy making them as much as eating them, especially with a cup of spiced cider on a chilly evening. Make these your own with unique decorations or a dash of extra spice.

  • Spiderweb Donuts: An Unusual Take on a Classic Treat

    Spiderweb Donuts: An Unusual Take on a Classic Treat

    I’ve always loved the idea of combining art and food in the kitchen, and these spiderweb donuts are my favorite example. They’re not just sweet treats, but little canvases for spooky designs that make the whole process more playful. What I love most is that even if your web isn’t perfect, it looks charming in its own quirky way. They’re a reminder that baking is about fun, not perfection.

    Why I keep making these spiderweb donuts

    They’re a reminder to enjoy the process, not just the outcome. The web design makes every batch feel unique, and the smell of fried dough with sweet chocolate is irresistible. Plus, they’re a hit at parties, sparking smiles and oohs every time. The messier, the better—because it’s all part of the fun.

    Breaking down the ingredients

    • Flour: Provides structure, should be all-purpose for the best elasticity.
    • Sugar: Sweetens and helps with browning; use fine granulated for even mixing.
    • Yeast: Leavens the dough; active dry yeast needs warm water to activate.
    • Milk: Adds richness and moisture; substitute with almond milk if dairy-free.
    • Butter: For flavor and tenderness; use unsalted for control over salt.
    • Chocolate and caramel: For web decoration; choose quality for better drizzles, or melt down your favorites.
    • Oil: Deep frying requires neutral oil like canola or vegetable, no extra flavor needed.

    Tools and equipment for perfect spiderweb donuts

    • Dough cutter or glass: To cut out perfect circles for the donuts.
    • Deep fryer or heavy-bottomed pot: For maintaining steady, even oil heat during frying.
    • Slotted spoon: To lift donuts out of hot oil safely.
    • Piping bag with fine tip: To drizzle the web pattern with melted chocolate and caramel.
    • Cooling rack: To drain excess oil and cool the donuts properly.

    Step-by-step to craft your spiderweb donuts

    Step 1: Mix flour, sugar, yeast, and salt in a large bowl. Add warm milk and melted butter.

    Step 2: Knead until dough is smooth and elastic, about 8-10 minutes.

    Step 3: Let dough rise in a warm place for 1 hour, or until doubled in size.

    Step 4: Roll out dough to about 1 cm thick on a floured surface.

    Step 5: Cut into circles with a donut cutter or a glass. Let rest for 10 minutes.

    Step 6: Heat oil in a deep fryer or large pot to 180°C (356°F).

    Step 7: Fry donuts in batches until golden brown, about 1-2 minutes per side.

    Step 8: Remove with slotted spoon, drain on paper towels.

    Step 9: While still warm, dip half of each donut into melted chocolate, then drizzle with caramel in a web pattern.

    Step 10: Let chocolate set for 10 minutes before serving.

    Cooking checkpoints and tips for spiderweb donuts

    • Dough should be soft but not sticky, test by if it pulls away cleanly from the bowl.
    • Oil temperature must stay steady at 180°C (356°F) for even frying.
    • Web drizzle should be quick; slow drizzling causes uneven web lines.
    • Don’t over-fry; donuts turn dark quickly, risking a bitter taste.

    Common mistakes and how to fix them

    • Oil too hot or too cold.? Use a candy thermometer to keep oil at 180°C (356°F).
    • Dough is sticky or tearing.? Knead dough until smooth and elastic.
    • Web pattern smudges or sinks.? Allow donuts to rest for 10 minutes before frying.
    • Web lines are uneven or smudged.? Dip web drizzle quickly in a steady motion.

    Spiderweb Donuts

    These playful spiderweb donuts are deep-fried to a golden crisp, with soft, tender centers. Decorated with melted chocolate and caramel to create web patterns, they combine a satisfying crunch with sweet, gooey toppings for a fun, spooky treat. Their quirky web design makes them perfect for parties or festive occasions.
    Prep Time 20 minutes
    Cook Time 10 minutes
    Total Time 30 minutes
    Servings: 8
    Course: Main Course
    Cuisine: American
    Calories: 250

    Ingredients
      

    • 2 ½ cups all-purpose flour for structure and elasticity
    • ½ cup granulated sugar for sweetness and browning
    • 2 ¼ teaspoons active dry yeast to leaven the dough
    • 1 teaspoon salt to enhance flavor
    • ¾ cup warm milk for moisture and richness
    • ¼ cup unsalted butter melted, adds tenderness
    • ½ cup chocolate melted for web decoration
    • ½ cup caramel melted for web decoration
    • neutral oil for frying canola or vegetable oil preferred

    Equipment

    • Dough cutter or glass
    • Deep fryer or heavy-bottomed pot
    • Slotted spoon
    • Piping bag with fine tip
    • Cooling rack

    Method
     

    1. Combine flour, sugar, yeast, and salt in a large bowl, mixing well to distribute evenly.
    2. Add warm milk and melted butter to the dry mixture, stirring until a shaggy dough forms.
    3. Knead the dough on a floured surface for about 8-10 minutes until it’s smooth, elastic, and slightly tacky.
    4. Place the dough in a greased bowl, cover with a damp cloth, and let it rise in a warm spot for 1 hour until doubled in size.
    5. Gently punch down the risen dough, then roll it out to about 1 cm thickness on a floured surface.
    6. Use a dough cutter or glass to cut out round donut shapes, then let them rest on a floured tray for 10 minutes to relax the dough.
    7. Heat oil in a deep fryer or heavy-bottomed pot to 180°C (356°F).
    8. Carefully fry the donuts in batches for 1-2 minutes per side until golden brown and crispy, listening for a gentle bubbling sound.
    9. Use a slotted spoon to remove the donuts, then drain on paper towels to remove excess oil.
    10. While the donuts are still warm, dip half of each donut into melted chocolate, then quickly drizzle with melted caramel to create web patterns using a piping bag.
    11. Allow the decorated donuts to sit for about 10 minutes so the web pattern sets before serving.

    Notes

    Ensure oil maintains steady temperature for even frying. For best web patterns, work quickly with melted chocolate and caramel. Resting the donuts before frying helps prevent tearing.
    These donuts are a playful twist, perfect for Halloween or any time you crave a bit of visual fun. The web pattern makes them feel special, more so when you see the glossy chocolate and caramel drizzle glisten. You don’t need to be a pro to get that imperfect, homemade charm. Enjoy making them, and don’t be surprised if they become a regular treat at your table.

  • Spiderweb Donuts: An Unusual Take on a Classic Treat

    Spiderweb Donuts: An Unusual Take on a Classic Treat

    I’ve always loved the idea of combining art and food in the kitchen, and these spiderweb donuts are my favorite example. They’re not just sweet treats, but little canvases for spooky designs that make the whole process more playful. What I love most is that even if your web isn’t perfect, it looks charming in its own quirky way. They’re a reminder that baking is about fun, not perfection.

    Why I keep making these spiderweb donuts

    They’re a reminder to enjoy the process, not just the outcome. The web design makes every batch feel unique, and the smell of fried dough with sweet chocolate is irresistible. Plus, they’re a hit at parties, sparking smiles and oohs every time. The messier, the better—because it’s all part of the fun.

    Breaking down the ingredients

    • Flour: Provides structure, should be all-purpose for the best elasticity.
    • Sugar: Sweetens and helps with browning; use fine granulated for even mixing.
    • Yeast: Leavens the dough; active dry yeast needs warm water to activate.
    • Milk: Adds richness and moisture; substitute with almond milk if dairy-free.
    • Butter: For flavor and tenderness; use unsalted for control over salt.
    • Chocolate and caramel: For web decoration; choose quality for better drizzles, or melt down your favorites.
    • Oil: Deep frying requires neutral oil like canola or vegetable, no extra flavor needed.

    Tools and equipment for perfect spiderweb donuts

    • Dough cutter or glass: To cut out perfect circles for the donuts.
    • Deep fryer or heavy-bottomed pot: For maintaining steady, even oil heat during frying.
    • Slotted spoon: To lift donuts out of hot oil safely.
    • Piping bag with fine tip: To drizzle the web pattern with melted chocolate and caramel.
    • Cooling rack: To drain excess oil and cool the donuts properly.

    Step-by-step to craft your spiderweb donuts

    Step 1: Mix flour, sugar, yeast, and salt in a large bowl. Add warm milk and melted butter.

    Step 2: Knead until dough is smooth and elastic, about 8-10 minutes.

    Step 3: Let dough rise in a warm place for 1 hour, or until doubled in size.

    Step 4: Roll out dough to about 1 cm thick on a floured surface.

    Step 5: Cut into circles with a donut cutter or a glass. Let rest for 10 minutes.

    Step 6: Heat oil in a deep fryer or large pot to 180°C (356°F).

    Step 7: Fry donuts in batches until golden brown, about 1-2 minutes per side.

    Step 8: Remove with slotted spoon, drain on paper towels.

    Step 9: While still warm, dip half of each donut into melted chocolate, then drizzle with caramel in a web pattern.

    Step 10: Let chocolate set for 10 minutes before serving.

    Cooking checkpoints and tips for spiderweb donuts

    • Dough should be soft but not sticky, test by if it pulls away cleanly from the bowl.
    • Oil temperature must stay steady at 180°C (356°F) for even frying.
    • Web drizzle should be quick; slow drizzling causes uneven web lines.
    • Don’t over-fry; donuts turn dark quickly, risking a bitter taste.

    Common mistakes and how to fix them

    • Oil too hot or too cold.? Use a candy thermometer to keep oil at 180°C (356°F).
    • Dough is sticky or tearing.? Knead dough until smooth and elastic.
    • Web pattern smudges or sinks.? Allow donuts to rest for 10 minutes before frying.
    • Web lines are uneven or smudged.? Dip web drizzle quickly in a steady motion.

    Spiderweb Donuts

    These playful spiderweb donuts are fried to golden perfection, with a soft, airy interior and a slightly crispy exterior. Decorated with melted chocolate and caramel to create intricate web patterns, they make a fun and charming treat perfect for parties or Halloween celebrations. The web design adds a whimsical touch, making each donut a little edible piece of art.
    Prep Time 30 minutes
    Cook Time 15 minutes
    Total Time 45 minutes
    Servings: 8
    Course: Main Course
    Cuisine: American
    Calories: 250

    Ingredients
      

    • 2 ½ cups all-purpose flour for structure and elasticity
    • ½ cup granulated sugar for sweetness and browning
    • 2 ¼ teaspoons active dry yeast to leaven the dough
    • ¾ cup warm milk for moisture and richness
    • 2 tablespoons unsalted butter melted, for flavor and tenderness
    • ½ teaspoon salt to balance flavors
    • ½ cup melted chocolate for web decoration
    • ¼ cup caramel sauce for web decoration
    • neutral oil for frying canola or vegetable oil recommended

    Equipment

    • Dough cutter or glass
    • Deep fryer or heavy-bottomed pot
    • Slotted spoon
    • Piping bag with fine tip
    • Cooling rack

    Method
     

    1. In a large mixing bowl, combine the flour, sugar, yeast, and salt. Pour in the warm milk and add the melted butter. Mix until the ingredients are just combined and a soft dough begins to form.
    2. Knead the dough on a floured surface for about 8-10 minutes until it becomes smooth, elastic, and slightly tacky. This develops the gluten structure for a tender donut.
    3. Place the dough in a lightly oiled bowl, cover it with a damp cloth or plastic wrap, and let it rise in a warm spot for about 1 hour or until it doubles in size.
    4. Turn the risen dough onto a floured surface and roll it out to about 1 cm thickness. Use a donut cutter or a glass to cut out rounds, then let the cut donuts rest for 10 minutes to relax the dough.
    5. Heat oil in a deep fryer or heavy-bottomed pot to 180°C (356°F). Use a thermometer to maintain a steady temperature for even cooking.
    6. Gently place donuts into the hot oil in batches, frying for 1-2 minutes per side until they turn golden brown and sound crispy.
    7. Use a slotted spoon to transfer the fried donuts onto a paper towel-lined rack, allowing excess oil to drain and the donuts to cool slightly.
    8. While the donuts are still warm, dip half of each donut into the melted chocolate. Then, using a piping bag fitted with a fine tip, drizzle caramel sauce over the chocolate web pattern, creating concentric circles and radiating lines.
    9. Allow the web pattern to set for about 10 minutes so the chocolate and caramel firm up, making the donuts ready to serve.
    10. Enjoy these whimsical, crispy-on-the-outside, soft-on-the-inside donuts, perfect for festive occasions or a fun treat!

    Notes

    Ensure oil temperature remains steady for perfect frying. Rest the donuts before frying to achieve the best texture and web pattern. Use quality melted chocolate and caramel for the best decorative effect.
    These donuts are a playful twist, perfect for Halloween or any time you crave a bit of visual fun. The web pattern makes them feel special, more so when you see the glossy chocolate and caramel drizzle glisten. You don’t need to be a pro to get that imperfect, homemade charm. Enjoy making them, and don’t be surprised if they become a regular treat at your table.

  • Spiderweb Donuts: An Unusual Take on a Classic Treat

    Spiderweb Donuts: An Unusual Take on a Classic Treat

    I’ve always loved the idea of combining art and food in the kitchen, and these spiderweb donuts are my favorite example. They’re not just sweet treats, but little canvases for spooky designs that make the whole process more playful. What I love most is that even if your web isn’t perfect, it looks charming in its own quirky way. They’re a reminder that baking is about fun, not perfection.

    Why I keep making these spiderweb donuts

    They’re a reminder to enjoy the process, not just the outcome. The web design makes every batch feel unique, and the smell of fried dough with sweet chocolate is irresistible. Plus, they’re a hit at parties, sparking smiles and oohs every time. The messier, the better—because it’s all part of the fun.

    Breaking down the ingredients

    • Flour: Provides structure, should be all-purpose for the best elasticity.
    • Sugar: Sweetens and helps with browning; use fine granulated for even mixing.
    • Yeast: Leavens the dough; active dry yeast needs warm water to activate.
    • Milk: Adds richness and moisture; substitute with almond milk if dairy-free.
    • Butter: For flavor and tenderness; use unsalted for control over salt.
    • Chocolate and caramel: For web decoration; choose quality for better drizzles, or melt down your favorites.
    • Oil: Deep frying requires neutral oil like canola or vegetable, no extra flavor needed.

    Tools and equipment for perfect spiderweb donuts

    • Dough cutter or glass: To cut out perfect circles for the donuts.
    • Deep fryer or heavy-bottomed pot: For maintaining steady, even oil heat during frying.
    • Slotted spoon: To lift donuts out of hot oil safely.
    • Piping bag with fine tip: To drizzle the web pattern with melted chocolate and caramel.
    • Cooling rack: To drain excess oil and cool the donuts properly.

    Step-by-step to craft your spiderweb donuts

    Step 1: Mix flour, sugar, yeast, and salt in a large bowl. Add warm milk and melted butter.

    Step 2: Knead until dough is smooth and elastic, about 8-10 minutes.

    Step 3: Let dough rise in a warm place for 1 hour, or until doubled in size.

    Step 4: Roll out dough to about 1 cm thick on a floured surface.

    Step 5: Cut into circles with a donut cutter or a glass. Let rest for 10 minutes.

    Step 6: Heat oil in a deep fryer or large pot to 180°C (356°F).

    Step 7: Fry donuts in batches until golden brown, about 1-2 minutes per side.

    Step 8: Remove with slotted spoon, drain on paper towels.

    Step 9: While still warm, dip half of each donut into melted chocolate, then drizzle with caramel in a web pattern.

    Step 10: Let chocolate set for 10 minutes before serving.

    Cooking checkpoints and tips for spiderweb donuts

    • Dough should be soft but not sticky, test by if it pulls away cleanly from the bowl.
    • Oil temperature must stay steady at 180°C (356°F) for even frying.
    • Web drizzle should be quick; slow drizzling causes uneven web lines.
    • Don’t over-fry; donuts turn dark quickly, risking a bitter taste.

    Common mistakes and how to fix them

    • Oil too hot or too cold.? Use a candy thermometer to keep oil at 180°C (356°F).
    • Dough is sticky or tearing.? Knead dough until smooth and elastic.
    • Web pattern smudges or sinks.? Allow donuts to rest for 10 minutes before frying.
    • Web lines are uneven or smudged.? Dip web drizzle quickly in a steady motion.

    Spiderweb Donuts

    These spiderweb donuts are soft, golden fried treats decorated with intricate web patterns made from melted chocolate and caramel. The dough is kneaded and fried to a tender, airy texture, while the web design adds a playful, spooky touch perfect for parties or festive occasions. Each bite combines crispy exterior with a sweet, melt-in-your-mouth interior, topped with charming web decorations.
    Prep Time 30 minutes
    Cook Time 15 minutes
    Total Time 45 minutes
    Servings: 8
    Course: Main Course
    Cuisine: American
    Calories: 250

    Ingredients
      

    • 2 cups all-purpose flour
    • 1/2 cup sugar
    • 2 1/4 teaspoons active dry yeast
    • 1/2 teaspoon salt
    • 3/4 cup warm milk about 110°F/43°C
    • 2 tablespoons unsalted butter melted
    • 1 cup vegetable oil for frying
    • 1/2 cup chocolate melting or melting chips
    • 1/4 cup caramel sauce for web pattern

    Equipment

    • Dough cutter or glass
    • Deep fryer or heavy-bottomed pot
    • Slotted spoon
    • Piping bag with fine tip
    • Cooling rack

    Method
     

    1. Combine the flour, sugar, yeast, and salt in a large mixing bowl, stirring until evenly mixed.
    2. Add the warm milk and melted butter to the dry mixture, then stir until a sticky dough forms.
    3. Knead the dough on a lightly floured surface for about 8-10 minutes until smooth and elastic, pressing and folding until it feels soft and slightly tacky.
    4. Place the dough in a greased bowl, cover with a damp cloth, and let it rise in a warm spot for about 1 hour, or until doubled in size and puffy.
    5. Gently punch down the risen dough, then roll it out on a floured surface to about 1 cm thickness.
    6. Use a dough cutter or glass to cut out circles approximately 3 inches in diameter. Let the cut donuts rest for 10 minutes to relax the dough.
    7. Heat vegetable oil in a deep fryer or heavy-bottomed pot to 180°C (356°F).
    8. Fry the donuts in batches, turning once, until golden brown and puffed, about 1-2 minutes per side. Use a slotted spoon to transfer them to a paper towel-lined rack to drain excess oil.
    9. While still warm, dip half of each donut into melted chocolate, then place on a cooling rack.
    10. Fill a piping bag with caramel sauce fitted with a fine tip. Quickly drizzle caramel in a web pattern over the chocolate-dipped donuts before the chocolate sets.
    11. Let the web pattern set for about 10 minutes, then serve these fun, spooky donuts with a delightful crunch and a sweet web decoration.

    Notes

    For best results, keep oil temperature steady at 180°C and work quickly when piping the web pattern. You can also customize web decorations with different sauces or edible colors.
    These donuts are a playful twist, perfect for Halloween or any time you crave a bit of visual fun. The web pattern makes them feel special, more so when you see the glossy chocolate and caramel drizzle glisten. You don’t need to be a pro to get that imperfect, homemade charm. Enjoy making them, and don’t be surprised if they become a regular treat at your table.

  • Uncanny Halloween Deviled Egg Eyeballs That Will Spook Your Guests

    Uncanny Halloween Deviled Egg Eyeballs That Will Spook Your Guests

    Imagine slices of hard-boiled eggs transformed into creepy, bloodshot eyeballs, perfect for Halloween. The sight alone gets the giggles and shivers from everyone around the table. These deviled egg eyeballs blend spooky fun with creamy, tangy flavors that make the holiday meal memorable.

    As a food blogger obsessed with holiday-themed treats, I love turning simple classics into festive spectacle. Halloween is a time of playful chaos, and these eyeballs fit right in. They’re easy to make, quick to assemble, and guaranteed to be the talk of your spooky spread.

    Deviled Egg Eyeballs for Halloween

    This spooky Halloween treat transforms classic hard-boiled eggs into creepy eyeballs by decorating halved eggs with red-colored fillings to resemble bloodshot pupils. The eggs are assembled with creamy, tangy deviled filling and finished with a realistic eyeball appearance, resulting in a fun and eerie appetizer with a firm yet smooth texture.
    Prep Time 15 minutes
    Cook Time 10 minutes
    Total Time 25 minutes
    Servings: 6
    Course: Main Course
    Cuisine: American
    Calories: 80

    Ingredients
      

    • 6 pieces large eggs for boiling and halving
    • 2 tablespoons mayonnaise for creamy filling
    • 1 teaspoon yellow mustard adds tang and color
    • to taste salt and pepper for seasoning
    • 1 drop red food coloring to create bloodshot effect
    • 1 small green olive or black olive to mimic pupil
    • a few small red bell pepper strips optional for added bloodshot effect

    Equipment

    • Saucepan
    • Mixing bowl
    • Piping bag or plastic sandwich bag
    • Small spoon or toothpick

    Method
     

    1. Place the eggs in a saucepan and cover with water. Bring to a boil over medium-high heat, then reduce to a gentle simmer and cook for 10 minutes. Remove from heat and transfer eggs to ice water to cool completely.
    2. Peel the cooled eggs carefully and slice each egg in half lengthwise. Gently scoop out the yolks into a mixing bowl, keeping the whites intact.
    3. Chew the yolks with a fork until crumbly, then add mayonnaise, yellow mustard, and a pinch of salt and pepper. Mix thoroughly until smooth and creamy.
    4. Add a drop of red food coloring into the filling and mix to achieve a bloodshot effect. To give the ‘pupil,’ place a small slice of olive or a whole olive onto the center of each egg white half.
    5. Fill a piping bag or plastic sandwich bag with the red-colored filling. Pipe the mixture onto each egg white, creating a flat, bloodshot-looking eyeball around the pupil.
    6. If desired, add small strips of red bell pepper or thin bloodshot lines around the eggs for extra spooky effect. Arrange the eyeballs on a serving platter.

    Notes

    For a more realistic bloodshot effect, gently drag a toothpick through the filling before piping to create irregular bloodshot lines.

    Making these eyeballs was an experiment that turned into a tradition in my house. They’re perfect for kids’ parties, spooky buffets, or even just a curious twist on your weekend brunch. Plus, the reactions they garner are priceless — a little fear, a lot of delight.

    This recipe’s charm lies in its simplicity and the playful creep factor. As October nights grow colder, a plate of creepy eyeballs adds just the right touch of seasonal fun to your table. Enjoy the holiday, and don’t forget to peek from behind your mask until dessert.