Category: Desserts

  • Spiderweb Cheesecake: A Tangy, Textured Twist on Classic Comfort

    Spiderweb Cheesecake: A Tangy, Textured Twist on Classic Comfort

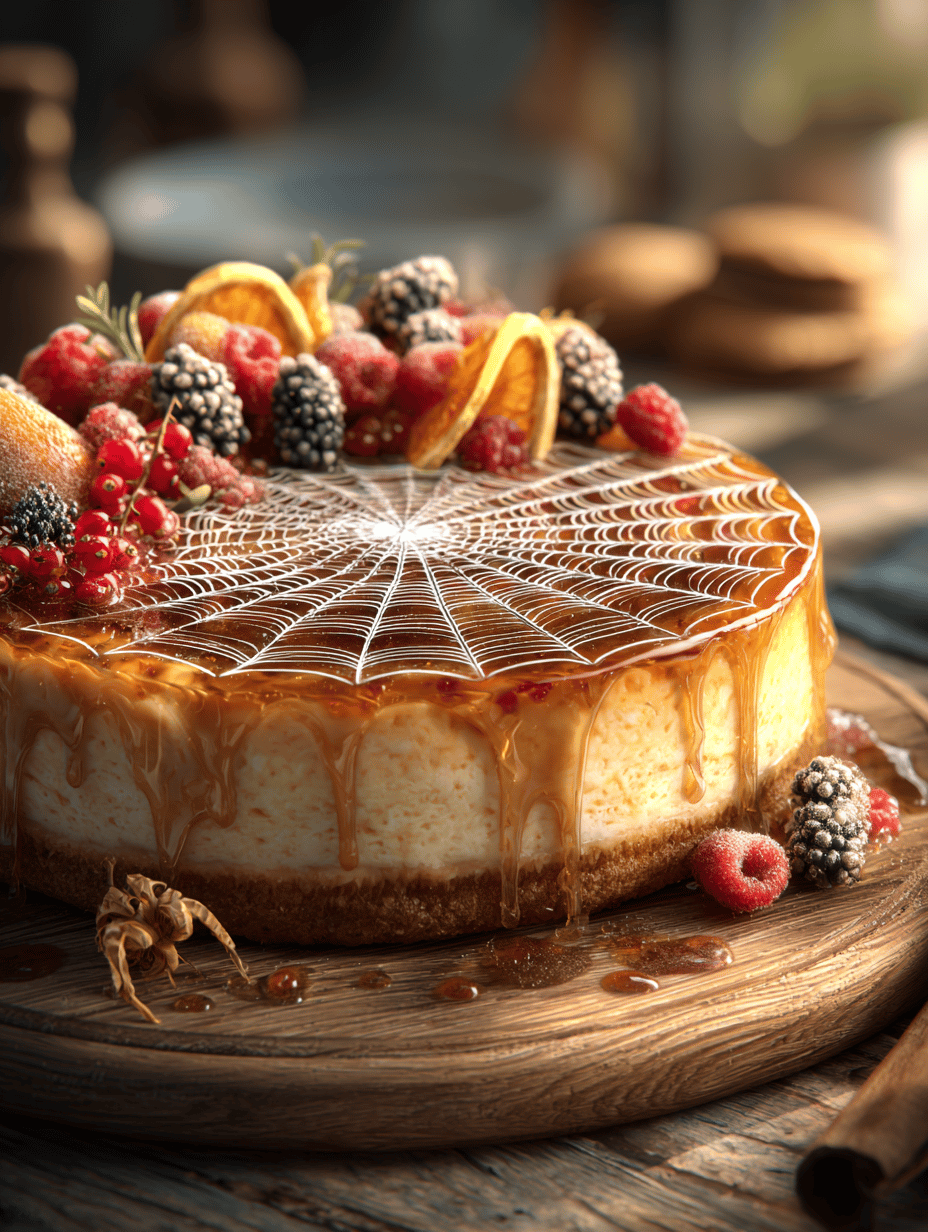
    I stumbled on this recipe while experimenting with unexpected flavor combos and textures. The idea of a cheesecake with a textured spiderweb swirl just clicked—something playful but still comforting. It’s a reminder that desserts can be both beautiful and a little bit chaotic, just like life sometimes. Plus, the tangy lemon twist cuts through the sweetness, making each bite lively.

    Why this spiderweb cheesecake keeps calling me back

    It’s the unexpected delight of creating a delicate web pattern. The tangy lemon keeps it lively, while the crunchy crust anchors the whole thing. Every time I make it, I remember how simple ingredients can turn into something visually stunning and delicious. It’s a little chaotic, a little messy—just like my kitchen, and I love that.

    Breaking down the ingredients that make it magic

    • Cream cheese: The creamy base that’s tangy and smooth. Use full-fat for richness.
    • Graham crackers or digestives: Crushed for a crunchy, buttery crust—substitute with digestive biscuits if needed.
    • Lemon zest and juice: Bright, zingy notes that cut through the richness—don’t skip zest for that aromatic punch.
    • Sugar: Sweetens and balances the tang—powdered or granulated, your choice.
    • Eggs: Bind everything together—room temp eggs blend more smoothly.
    • Sour cream or heavy cream: Adds a slight tang and creaminess—use sour cream for extra zing.
    • Butter: Melted to bind the crust—unsalted, unless you want a touch of saltiness.

    Tools of the trade for a perfect spiderweb cheesecake

    • Springform pan: To bake and easily release the cheesecake without damaging its delicate shape.
    • Mixing bowls: For combining the crust ingredients and the filling.
    • Electric mixer: To achieve a smooth, fluffy cream cheese mixture.
    • Toothpick or skewer: To swirl the spiderweb pattern into the filling.
    • Cooling rack: To cool the cheesecake evenly after baking.

    Step-by-step to a mesmerizing spiderweb cheesecake

    Step 1: Preheat your oven to 160°C (320°F).

    Step 2: Mix crushed biscuits and melted butter; press into a 20cm (8-inch) springform pan.

    Step 3: Bake the crust for 10 minutes until golden; set aside to cool.

    Step 4: Beat softened cream cheese with sugar until smooth; add eggs one at a time.

    Step 5: Fold in lemon zest and juice for that zesty punch.

    Step 6: Pour filling over the cooled crust; swirl with a toothpick to create spiderweb patterns.

    Step 7: Bake for 50-60 minutes, until the edges are set but the center jiggles slightly.

    Step 8: Let the cheesecake cool in the oven with the door ajar for an hour.

    Step 9: Chill in the fridge for at least 4 hours, preferably overnight.

    Step 10: Before serving, create spiderweb designs on top with whipped cream or sour cream.

    Cooking checkpoints to keep your spiderweb cheesecake perfect

    • Ensure the crust is evenly pressed and baked until golden for a sturdy base.
    • Watch the cheesecake edges; they should be lightly golden and slightly puffed.
    • The center should jiggle like jello but not be liquid—use gentle nudges to test.
    • Chill thoroughly; a well-rested cheesecake slices more cleanly and holds its shape.

    Common pitfalls and how to dodge them

    • Cream cheese is too cold, resulting in lumpy filling.? Use room temperature ingredients to avoid lumps in your batter.
    • Oven temperature too high causing cracks and over-baking.? Bake at the right temperature; too hot and the top cracks.
    • Not chilling long enough, leading to runny slices.? Chill thoroughly before slicing; a warm cheesecake will be messy.
    • Over-mixing the pattern, losing the web look.? Use a toothpick to create the web; don’t over-swirl, or the pattern blurs.

    Spiderweb Lemon Cheesecake

    This playful cheesecake features a creamy, tangy filling with a textured spiderweb swirl pattern on top. The crust is crunchy and buttery, providing a sturdy base, while lemon zest and juice add a lively brightness. The final appearance is a stunning, web-like design that combines visual fun with rich, smooth texture.
    Prep Time 20 minutes
    Cook Time 1 hour
    Total Time 1 hour 20 minutes
    Servings: 8
    Course: Main Course
    Cuisine: American
    Calories: 480

    Ingredients
      

    • 200 g Graham crackers or digestives crushed
    • 100 g Unsalted butter melted
    • 600 g Cream cheese softened
    • 150 g Granulated sugar
    • 3 large Eggs room temperature
    • 2 tsp Lemon zest
    • 1/4 cup Lemon juice
    • 200 g Sour cream or heavy cream for richness

    Equipment

    • Springform pan
    • Mixing bowls
    • Electric mixer
    • Toothpick or skewer
    • Cooling rack

    Method
     

    1. Preheat your oven to 160°C (320°F). Mix the crushed graham crackers with melted butter until well combined, then press the mixture evenly into the bottom of a 20cm (8-inch) springform pan. Bake the crust for 10 minutes until fragrant and golden, then set aside to cool.
    2. In a large mixing bowl, use an electric mixer to beat the softened cream cheese and sugar until smooth and creamy, about 3-4 minutes. This creates a silky base for your cheesecake filling.
    3. Add the eggs one at a time, mixing gently after each addition to incorporate fully without overmixing. You should have a fluffy, well-blended batter.
    4. Gently fold in lemon zest and lemon juice using a spatula or a spoon, just until evenly distributed. The mixture will smell bright and citrusy, with a smooth texture.
    5. Pour the lemon filling over the cooled crust, smoothing the top with a spatula. Tap the pan lightly on the counter to settle the batter and remove any air bubbles.
    6. Use a toothpick or skewer to gently swirl patterns into the batter, creating a web-like spiderweb design on the surface. Be careful not to over-swirl, so the pattern remains distinct.
    7. Bake the cheesecake for 50-60 minutes, until the edges are set and slightly golden, but the center still jiggles gently when nudged. You’ll see a slight puff in the middle.
    8. Turn off the oven and leave the cheesecake inside with the door slightly ajar for about an hour to prevent cracks and help it cool gradually.
    9. Remove the cheesecake from the oven and cool completely on a cooling rack. Then, refrigerate for at least 4 hours or overnight to set fully.
    10. Before serving, optionally decorate the top with whipped cream or additional sour cream, and create more web-like patterns if desired. Slice carefully with a sharp knife for clean pieces.

    Notes

    For an extra tangy flavor, add a splash of lemon extract to the filling. Keep an eye on the cheesecake during baking to prevent cracks, and refrigerate thoroughly for neat slices.
    This cheesecake isn’t just about the look—it’s the tangy creaminess paired with that crusty base that keeps drawing me back. The spiderweb pattern adds a bit of playful drama, perfect for a cozy night or a small gathering. I love how the lemon brightens every bite, cutting through the richness with a zing. Feel free to experiment with toppings or even add a drizzle of berry coulis for extra flair.

  • Candy Corn Fudge: A Nostalgic Twist on Fall Classics

    Candy Corn Fudge: A Nostalgic Twist on Fall Classics

    Candy corn fudge feels like a little edible time capsule for Halloween memories. It’s funny how the simple combination of marshmallows, white chocolate, and candy corn can evoke such a rush of nostalgia. This recipe is about capturing that fleeting joy of childhood treats, but with a grown-up, creamy twist.

    Why I keep making this fudge every fall

    It’s a nostalgic comfort that sparks childhood memories while satisfying grown-up sweet cravings. The process is simple, and the result is addictive — chewy, creamy, with bursts of candy corn crunch. It’s a perfect treat to share during Halloween gatherings or just to brighten a chilly day.

    Breaking down the ingredients

    • Butter: Gives rich flavor and helps smooth the melt. Swap with coconut oil for dairy-free.
    • Marshmallows: Creates that gooey, elastic base. Use vegan marshmallows if needed.
    • White chocolate: Adds sweetness and creaminess. Dark chocolate can be a bold alternative.
    • Candy corn: The star of fall, crunchy and sweet. Substitute with butterscotch chips for a different crunch.
    • Vanilla extract: Enhances sweetness with a fragrant touch. Lemon extract adds a zesty brightness.

    Tools and equipment for smooth fudge

    • 9-inch square pan: To hold and shape the fudge as it sets.
    • Silicone spatula: To stir and scrape the mixture smoothly.
    • Microwave-safe bowl or double boiler: To melt chocolate and marshmallows gently.
    • Parchment paper: To line the pan for easy removal and clean edges.

    Step-by-step to Silky, Chewy Candy Corn Fudge

    Step 1: Gather your ingredients and tools before you start. This fudge is quick to come together but demands your attention.

    Step 2: Melt the butter and marshmallows together over medium heat, stirring constantly until smooth. Watch for a shiny, oozy texture.

    Step 3: Pour in the white chocolate and stir until glossy and fully melted, then quickly fold in the candy corn. The mixture should be thick and fragrant with vanilla.

    Step 4: Scrape the mixture into a prepared pan, smoothing the top with a spatula. Let it set at room temperature for about 2 hours, or until firm.

    Step 5: Once set, cut into squares and enjoy the sweet, chewy bites that balance creamy fudge with crunchy candy corn.

    Cooking checkpoints and tips for perfect fudge

    • The melted marshmallow mixture should be smooth and shiny, not lumpy.
    • The fudge sets best at room temperature, so avoid refrigerating too soon.
    • When pouring, the mixture should flow easily but not be runny; it thickens as it cools.

    Common mistakes and how to fix them

    • Overcooked the mixture or cooled it too quickly.? Too thick and crumbly?
    • Mixture wasn’t hot enough to suspend the candies evenly.? Candy corn sinking?
    • Didn’t let it cool long enough or used too much butter.? Fudge too sticky?
    • Insufficient stirring or uneven melting.? Clumpy texture?

    Candy Corn Fudge

    Candy Corn Fudge is a nostalgic, creamy treat with a chewy texture and crunchy bursts of candy corn. Made by melting marshmallows, white chocolate, and butter together, then folding in candy corn, it sets into a firm, smooth square with festive fall colors and satisfying bite. Perfect for Halloween gatherings or cozy fall afternoons.
    Prep Time 10 minutes
    Cook Time 15 minutes
    Total Time 2 hours 5 minutes
    Servings: 12
    Course: Main Course
    Cuisine: American
    Calories: 250

    Ingredients
      

    • 4 tablespoons unsalted butter or coconut oil for dairy-free
    • 10 cups marshmallows use vegan marshmallows if needed
    • 10 oz white chocolate chopped into pieces for melting
    • 2 cups candy corn optional for substitution with butterscotch chips
    • 1 teaspoon vanilla extract adds fragrant sweetness

    Equipment

    • 9-inch square pan
    • Silicone spatula
    • Microwave-safe bowl or double boiler
    • Parchment paper

    Method
     

    1. Line the 9-inch pan with parchment paper and set aside.
    2. In a microwave-safe bowl or double boiler, melt the butter over medium heat until it’s fully melted and bubbly, releasing a rich aroma.
    3. Add the marshmallows to the melted butter and stir constantly over medium heat until they’re completely melted and the mixture is smooth and shiny.
    4. Pour in the chopped white chocolate and continue stirring until it’s fully melted and glossy, filling the air with a sweet, creamy scent.
    5. Remove from heat and fold in the vanilla extract, mixing until evenly incorporated.
    6. Quickly fold in the candy corn, distributing it evenly throughout the thick, fragrant mixture.
    7. Pour the mixture into your prepared pan and use a silicone spatula to smooth the top, pressing gently to ensure it’s evenly spread.
    8. Let the fudge cool at room temperature for about 2 hours, or until it’s firm and set.
    9. Once cooled, lift the fudge out of the pan using the parchment paper and cut into squares with a sharp knife.
    10. Arrange the squares on a serving platter and enjoy the chewy, creamy bites with crunchy candy corn bursts.
    This fudge isn’t just a sweet treat; it’s a nostalgic walk through childhood Halloweens. The way the candy corn melts into the creamy base makes every bite a little celebration of fall. Feel free to customize with a splash of sea salt or a dash of cinnamon for extra warmth. Pack it up for a festive gift or keep it in the fridge for a quick, satisfying snack.

  • Candy Corn Fudge: A Nostalgic Twist on Fall Classics

    Candy Corn Fudge: A Nostalgic Twist on Fall Classics

    Candy corn fudge feels like a little edible time capsule for Halloween memories. It’s funny how the simple combination of marshmallows, white chocolate, and candy corn can evoke such a rush of nostalgia. This recipe is about capturing that fleeting joy of childhood treats, but with a grown-up, creamy twist.

    Why I keep making this fudge every fall

    It’s a nostalgic comfort that sparks childhood memories while satisfying grown-up sweet cravings. The process is simple, and the result is addictive — chewy, creamy, with bursts of candy corn crunch. It’s a perfect treat to share during Halloween gatherings or just to brighten a chilly day.

    Breaking down the ingredients

    • Butter: Gives rich flavor and helps smooth the melt. Swap with coconut oil for dairy-free.
    • Marshmallows: Creates that gooey, elastic base. Use vegan marshmallows if needed.
    • White chocolate: Adds sweetness and creaminess. Dark chocolate can be a bold alternative.
    • Candy corn: The star of fall, crunchy and sweet. Substitute with butterscotch chips for a different crunch.
    • Vanilla extract: Enhances sweetness with a fragrant touch. Lemon extract adds a zesty brightness.

    Tools and equipment for smooth fudge

    • 9-inch square pan: To hold and shape the fudge as it sets.
    • Silicone spatula: To stir and scrape the mixture smoothly.
    • Microwave-safe bowl or double boiler: To melt chocolate and marshmallows gently.
    • Parchment paper: To line the pan for easy removal and clean edges.

    Step-by-step to Silky, Chewy Candy Corn Fudge

    Step 1: Gather your ingredients and tools before you start. This fudge is quick to come together but demands your attention.

    Step 2: Melt the butter and marshmallows together over medium heat, stirring constantly until smooth. Watch for a shiny, oozy texture.

    Step 3: Pour in the white chocolate and stir until glossy and fully melted, then quickly fold in the candy corn. The mixture should be thick and fragrant with vanilla.

    Step 4: Scrape the mixture into a prepared pan, smoothing the top with a spatula. Let it set at room temperature for about 2 hours, or until firm.

    Step 5: Once set, cut into squares and enjoy the sweet, chewy bites that balance creamy fudge with crunchy candy corn.

    Cooking checkpoints and tips for perfect fudge

    • The melted marshmallow mixture should be smooth and shiny, not lumpy.
    • The fudge sets best at room temperature, so avoid refrigerating too soon.
    • When pouring, the mixture should flow easily but not be runny; it thickens as it cools.

    Common mistakes and how to fix them

    • Overcooked the mixture or cooled it too quickly.? Too thick and crumbly?
    • Mixture wasn’t hot enough to suspend the candies evenly.? Candy corn sinking?
    • Didn’t let it cool long enough or used too much butter.? Fudge too sticky?
    • Insufficient stirring or uneven melting.? Clumpy texture?

    Candy Corn Fudge

    Candy corn fudge is a creamy, chewy treat that captures the nostalgic essence of Halloween. Made with melted marshmallows, white chocolate, butter, and crunchy candy corn, it results in a smooth yet textured dessert with bursts of crunch. Its vibrant appearance and satisfying bite make it perfect for sharing during festive gatherings or cozy autumn afternoons.
    Prep Time 10 minutes
    Cook Time 15 minutes
    Total Time 2 hours 5 minutes
    Servings: 16
    Course: Main Course
    Cuisine: American
    Calories: 150

    Ingredients
      

    • 4 tablespoons unsalted butter or coconut oil for dairy-free
    • 10 cups marshmallows preferably large or mini, vegan if needed
    • 12 oz white chocolate chopped into small pieces
    • 1 cup candy corn add more for extra crunch if desired
    • 1 teaspoon vanilla extract optional but enhances flavor

    Equipment

    • 9-inch square pan
    • Silicone spatula
    • Microwave-safe bowl or double boiler
    • Parchment paper

    Method
     

    1. Line your 9-inch square pan with parchment paper for easy removal later. Gather all your ingredients and tools within reach to streamline the process.
    2. In a microwave-safe bowl or using a double boiler, melt the butter over medium heat until it’s just bubbling and fragrant, about 1-2 minutes.
    3. Add the marshmallows to the melted butter and stir continuously until completely melted and smooth. You’ll hear a gentle bubbling and see the mixture turn shiny and elastic.
    4. Stir in the white chocolate pieces and continue to mix until the chocolate is fully melted and glossy. The mixture should be thick and fragrant, with a creamy texture.
    5. Quickly fold in the vanilla extract, then gently stir in the candy corn, ensuring they are evenly distributed throughout the mixture.
    6. Pour the thick mixture into your prepared pan and use a silicone spatula to spread it evenly, smoothing the top for a neat finish.
    7. Let the fudge cool at room temperature for about 2 hours until it’s set and firm. You can also refrigerate it for a quicker set, but room temperature preserves the ideal chewy texture.
    8. Once cooled and firm, lift the fudge out of the pan using the parchment paper and cut into squares with a sharp knife.
    9. Arrange the fudge squares on a serving platter, revealing their vibrant color and tempting chewy-crunchy texture. Enjoy these festive treats!

    Notes

    For extra flavor, sprinkle a little sea salt on top before setting. Store leftovers in an airtight container at room temperature for up to 3 days or refrigerate for longer freshness.
    This fudge isn’t just a sweet treat; it’s a nostalgic walk through childhood Halloweens. The way the candy corn melts into the creamy base makes every bite a little celebration of fall. Feel free to customize with a splash of sea salt or a dash of cinnamon for extra warmth. Pack it up for a festive gift or keep it in the fridge for a quick, satisfying snack.

  • Candy Corn Fudge: A Nostalgic Twist on Fall Classics

    Candy Corn Fudge: A Nostalgic Twist on Fall Classics

    Candy corn fudge feels like a little edible time capsule for Halloween memories. It’s funny how the simple combination of marshmallows, white chocolate, and candy corn can evoke such a rush of nostalgia. This recipe is about capturing that fleeting joy of childhood treats, but with a grown-up, creamy twist.

    Why I keep making this fudge every fall

    It’s a nostalgic comfort that sparks childhood memories while satisfying grown-up sweet cravings. The process is simple, and the result is addictive — chewy, creamy, with bursts of candy corn crunch. It’s a perfect treat to share during Halloween gatherings or just to brighten a chilly day.

    Breaking down the ingredients

    • Butter: Gives rich flavor and helps smooth the melt. Swap with coconut oil for dairy-free.
    • Marshmallows: Creates that gooey, elastic base. Use vegan marshmallows if needed.
    • White chocolate: Adds sweetness and creaminess. Dark chocolate can be a bold alternative.
    • Candy corn: The star of fall, crunchy and sweet. Substitute with butterscotch chips for a different crunch.
    • Vanilla extract: Enhances sweetness with a fragrant touch. Lemon extract adds a zesty brightness.

    Tools and equipment for smooth fudge

    • 9-inch square pan: To hold and shape the fudge as it sets.
    • Silicone spatula: To stir and scrape the mixture smoothly.
    • Microwave-safe bowl or double boiler: To melt chocolate and marshmallows gently.
    • Parchment paper: To line the pan for easy removal and clean edges.

    Step-by-step to Silky, Chewy Candy Corn Fudge

    Step 1: Gather your ingredients and tools before you start. This fudge is quick to come together but demands your attention.

    Step 2: Melt the butter and marshmallows together over medium heat, stirring constantly until smooth. Watch for a shiny, oozy texture.

    Step 3: Pour in the white chocolate and stir until glossy and fully melted, then quickly fold in the candy corn. The mixture should be thick and fragrant with vanilla.

    Step 4: Scrape the mixture into a prepared pan, smoothing the top with a spatula. Let it set at room temperature for about 2 hours, or until firm.

    Step 5: Once set, cut into squares and enjoy the sweet, chewy bites that balance creamy fudge with crunchy candy corn.

    Cooking checkpoints and tips for perfect fudge

    • The melted marshmallow mixture should be smooth and shiny, not lumpy.
    • The fudge sets best at room temperature, so avoid refrigerating too soon.
    • When pouring, the mixture should flow easily but not be runny; it thickens as it cools.

    Common mistakes and how to fix them

    • Overcooked the mixture or cooled it too quickly.? Too thick and crumbly?
    • Mixture wasn’t hot enough to suspend the candies evenly.? Candy corn sinking?
    • Didn’t let it cool long enough or used too much butter.? Fudge too sticky?
    • Insufficient stirring or uneven melting.? Clumpy texture?

    Candy Corn Fudge

    Candy Corn Fudge is a nostalgic, creamy treat that combines melted marshmallows, white chocolate, and crunchy candy corn to create a chewy, smooth fudge with delightful bursts of crunch. The process involves melting, mixing, and setting the ingredients to achieve a firm, sliceable final product that captures the festive spirit of Halloween.
    Prep Time 10 minutes
    Cook Time 15 minutes
    Total Time 2 hours 5 minutes
    Servings: 16
    Course: Main Course
    Cuisine: American
    Calories: 150

    Ingredients
      

    • 4 tablespoons butter or coconut oil for dairy-free
    • 10 cups marshmallows use vegan marshmallows if needed
    • 2 cups white chocolate chopped or in chips
    • 2 cups candy corn for crunch and sweetness
    • 1 teaspoon vanilla extract optional, for added aroma

    Equipment

    • 9-inch square pan
    • Silicone spatula
    • Microwave-safe bowl or double boiler
    • Parchment paper

    Method
     

    1. Line your 9-inch pan with parchment paper, leaving some overhang for easy removal.
    2. Combine butter and marshmallows in a microwave-safe bowl and microwave in 30-second bursts, stirring after each, until smooth and shiny. The mixture should be bubbling and fragrant.
    3. Pour in the white chocolate and stir vigorously until the mixture becomes glossy and fully melted, creating a smooth, thick paste.
    4. Fold in the vanilla extract for a fragrant touch, then quickly add the candy corn, stirring gently to distribute evenly without breaking the candies.
    5. Pour the thick mixture into your prepared pan, spreading it out evenly with a spatula and smoothing the surface.
    6. Let the fudge cool at room temperature for about 2 hours, or until it is firm and set. The surface should be matte and slightly firm to the touch.
    7. Once set, lift the fudge out of the pan using the parchment overhang and cut into squares or rectangles.
    8. Serve immediately or store in an airtight container at room temperature for up to a week. Enjoy the chewy, creamy texture with bursts of crunchy candy corn in every bite!

    Notes

    For a dairy-free version, substitute butter with coconut oil and use vegan marshmallows. To enhance flavor, try adding a pinch of sea salt or a splash of bourbon vanilla extract.
    This fudge isn’t just a sweet treat; it’s a nostalgic walk through childhood Halloweens. The way the candy corn melts into the creamy base makes every bite a little celebration of fall. Feel free to customize with a splash of sea salt or a dash of cinnamon for extra warmth. Pack it up for a festive gift or keep it in the fridge for a quick, satisfying snack.

  • Spooky-Sweet Halloween Bark: A Crispy, Colorful Concoction

    Spooky-Sweet Halloween Bark: A Crispy, Colorful Concoction

    This Halloween bark is the antidote to those fancy, overly complicated treats. It’s messy in the best way—colorful, crunchy, and downright fun to make. I love how it feels like a little rebellion in the kitchen, breaking rules, mixing textures, and making something spooky and sweet at the same time.

    Why I Keep Coming Back to This Halloween Bark

    It’s unpredictable, colorful chaos that always turns out pretty and delicious. There’s satisfaction in quickly transforming simple ingredients into something visually striking. Plus, it’s a perfect, no-fuss project for kids or a last-minute party treat. Every time, I find new topping combos, and that keeps it fresh and fun.

    Breaking Down the Ingredients for Halloween Bark

    • Chocolate (dark or milk): The base—melts smooth, provides that glossy charm, and a hint of richness.
    • Toppings (candy, cookies, sprinkles): Colorful, crunchy bits that make each piece festive and fun.
    • Edible glitter or shimmer powder: Adds a spooky sparkle, catching light and eye alike.
    • Sea salt flakes: A tiny pinch amplifies sweetness, balances flavors, and adds a little crunch.
    • Optional: White chocolate or contrasting drizzle: For decorative contrast—drizzle while still warm for a marbled, spooky effect.

    Tools of the Trade for Halloween Bark

    • Double boiler or microwave: Gently melts chocolate without scorching.
    • Spatula: Spreads melted chocolate evenly.
    • Baking sheet with parchment or silicone mat: Holds the chocolate and toppings during chilling.
    • Knife or breaker: Breaks the hardened bark into rustic pieces.

    Crafting the Perfect Halloween Bark in a Few Easy Steps

    Step 1: Line a baking sheet with parchment paper or silicone mat.

    Step 2: Melt your chocolate in a double boiler or microwave, stirring until smooth.

    Step 3: Pour melted chocolate onto the prepared sheet, spreading evenly with a spatula.

    Step 4: Add your spooky toppings—think crushed cookies, candy eyes, or edible glitter—while the chocolate is still warm.

    Step 5: Chill in the fridge for at least 30 minutes, until firm and crisp.

    Step 6: Break into irregular shards, revealing colorful, glossy surfaces.

    Step 7: Optional: drizzle with contrasting melted chocolate for extra visual punch.

    Key Tips to Nail Your Halloween Bark

    • Ensure chocolate is fully melted but not overheated to avoid blooming.
    • Spread the chocolate as evenly as possible for a uniform snap.
    • Add toppings quickly while the chocolate is still warm so they stick.
    • Check the fridge after 30 minutes; it should be firm and shiny.

    Oops Moments and How to Fix Them

    • Chocolate looks dull and streaky.? Melted chocolate blooms and gets dull → Stir in a tiny bit of vegetable oil to smooth.
    • Toppings falling off.? Toppings slide off → Press them in gently while the chocolate is still warm.
    • Bark is too brittle.? Chill too long and bark gets too hard → Let it sit at room temp for 5 minutes before breaking.
    • Chocolate becomes grainy.? Chocolate overheats and seizes → Add a splash of warm milk and stir gently.

    Halloween Bark

    This Halloween bark is a colorful, crunchy treat made by melting chocolate and decorating it with an array of festive toppings like candies, sprinkles, and edible glitter. It’s a fun, mess-friendly project that creates a glossy, irregularly broken sheet of candy with a spooky sparkle and satisfying crunch. Perfect for parties or a quick, striking homemade gift.
    Prep Time 10 minutes
    Cook Time 30 minutes
    Total Time 40 minutes
    Servings: 8
    Course: Main Course
    Cuisine: American
    Calories: 210

    Ingredients
      

    • 12 oz dark or milk chocolate chopped or in chips
    • 1 cup candy or colorful toppings sprinkles, crushed cookies, candies, edible glitter
    • 1 tsp edible shimmer powder for extra sparkle
    • a pinch sea salt flakes enhances sweetness and flavor
    • Optional white chocolate or contrasting drizzle for decorative marbling

    Equipment

    • Double boiler or microwave
    • Spatula
    • Baking sheet with parchment or silicone mat
    • Knife or breaker

    Method
     

    1. Line a baking sheet with parchment paper or a silicone mat to prepare for melting the chocolate.
    2. Gently melt the chocolate in a double boiler or microwave, stirring every 20 seconds until smooth and glossy, and the chocolate is fully melted.
    3. Pour the melted chocolate onto the prepared baking sheet, using a spatula to spread it out evenly into a thin, smooth layer.
    4. Add your colorful toppings—sprinkles, candies, crushed cookies, and edible glitter—while the chocolate is still warm, pressing them lightly into the surface so they adhere.
    5. Sprinkle a tiny pinch of sea salt flakes over the toppings for a flavor boost, and dust with edible shimmer powder for a sparkling effect.
    6. If desired, melt white chocolate and drizzle it over the surface in a zigzag pattern for a marbled, spooky look.
    7. Place the baking sheet in the fridge and chill for at least 30 minutes until the chocolate is firm and crisp to the touch.
    8. Once chilled, gently break the hardened bark into rustic, irregular shards using a knife or your hands.
    9. Arrange the broken pieces on a serving platter, showcasing the colorful toppings and glossy surface, ready to enjoy or share.

    Notes

    For more vibrant colors, layer toppings or add tiny candies for extra texture. Keep an eye on the chocolate to prevent blooming, and press toppings gently to ensure they stick. Store in an airtight container at room temperature or in the fridge for a few days.
    This bark isn’t just about the look; it’s about the crunch, the sweet contrast, and that satisfying snap. It’s flexible enough for kids to get involved or for a quick, festive treat to stash away. Plus, it’s almost impossible to mess up—just enjoy the chaos of mixing colors and flavors. Once you’ve made it a couple of times, it’s hard not to keep coming back.

  • Spooky-Sweet Halloween Bark: A Crispy, Colorful Concoction

    Spooky-Sweet Halloween Bark: A Crispy, Colorful Concoction

    This Halloween bark is the antidote to those fancy, overly complicated treats. It’s messy in the best way—colorful, crunchy, and downright fun to make. I love how it feels like a little rebellion in the kitchen, breaking rules, mixing textures, and making something spooky and sweet at the same time.

    Why I Keep Coming Back to This Halloween Bark

    It’s unpredictable, colorful chaos that always turns out pretty and delicious. There’s satisfaction in quickly transforming simple ingredients into something visually striking. Plus, it’s a perfect, no-fuss project for kids or a last-minute party treat. Every time, I find new topping combos, and that keeps it fresh and fun.

    Breaking Down the Ingredients for Halloween Bark

    • Chocolate (dark or milk): The base—melts smooth, provides that glossy charm, and a hint of richness.
    • Toppings (candy, cookies, sprinkles): Colorful, crunchy bits that make each piece festive and fun.
    • Edible glitter or shimmer powder: Adds a spooky sparkle, catching light and eye alike.
    • Sea salt flakes: A tiny pinch amplifies sweetness, balances flavors, and adds a little crunch.
    • Optional: White chocolate or contrasting drizzle: For decorative contrast—drizzle while still warm for a marbled, spooky effect.

    Tools of the Trade for Halloween Bark

    • Double boiler or microwave: Gently melts chocolate without scorching.
    • Spatula: Spreads melted chocolate evenly.
    • Baking sheet with parchment or silicone mat: Holds the chocolate and toppings during chilling.
    • Knife or breaker: Breaks the hardened bark into rustic pieces.

    Crafting the Perfect Halloween Bark in a Few Easy Steps

    Step 1: Line a baking sheet with parchment paper or silicone mat.

    Step 2: Melt your chocolate in a double boiler or microwave, stirring until smooth.

    Step 3: Pour melted chocolate onto the prepared sheet, spreading evenly with a spatula.

    Step 4: Add your spooky toppings—think crushed cookies, candy eyes, or edible glitter—while the chocolate is still warm.

    Step 5: Chill in the fridge for at least 30 minutes, until firm and crisp.

    Step 6: Break into irregular shards, revealing colorful, glossy surfaces.

    Step 7: Optional: drizzle with contrasting melted chocolate for extra visual punch.

    Key Tips to Nail Your Halloween Bark

    • Ensure chocolate is fully melted but not overheated to avoid blooming.
    • Spread the chocolate as evenly as possible for a uniform snap.
    • Add toppings quickly while the chocolate is still warm so they stick.
    • Check the fridge after 30 minutes; it should be firm and shiny.

    Oops Moments and How to Fix Them

    • Chocolate looks dull and streaky.? Melted chocolate blooms and gets dull → Stir in a tiny bit of vegetable oil to smooth.
    • Toppings falling off.? Toppings slide off → Press them in gently while the chocolate is still warm.
    • Bark is too brittle.? Chill too long and bark gets too hard → Let it sit at room temp for 5 minutes before breaking.
    • Chocolate becomes grainy.? Chocolate overheats and seizes → Add a splash of warm milk and stir gently.

    Halloween Bark

    This colorful Halloween bark is a fun, no-fuss treat that combines smooth melted chocolate with vibrant toppings and a touch of shimmer. Its irregular shards have a glossy, crunchy texture, making it a festive and visually striking dessert perfect for parties or a quick sweet fix.
    Prep Time 10 minutes
    Cook Time 30 minutes
    Total Time 40 minutes
    Servings: 8
    Course: Main Course
    Cuisine: American
    Calories: 250

    Ingredients
      

    • 200 g dark or milk chocolate chopped or in chips
    • assorted various candy, cookies, sprinkles colorful and crunchy toppings
    • as needed edible glitter or shimmer powder for spooky sparkle
    • a pinch sea salt flakes to enhance sweetness
    • optional for drizzle white chocolate or contrasting chocolate for decorative drizzle

    Equipment

    • Double boiler or microwave
    • Spatula
    • Baking sheet with parchment or silicone mat
    • Knife or breaker

    Method
     

    1. Line your baking sheet with parchment paper or a silicone mat to prepare for spreading the melted chocolate.
    2. Gently melt the chocolate using a double boiler or microwave, stirring frequently until smooth and glossy.
    3. Pour the melted chocolate onto the prepared sheet and use a spatula to spread it evenly into a thin layer, about 1/4 inch thick.
    4. While the chocolate is still warm, sprinkle your colorful toppings like crushed cookies, candies, and sprinkles generously over the surface.
    5. Sprinkle a light dusting of edible glitter or shimmer powder over the toppings for a spooky sparkle effect.
    6. Sprinkle a pinch of sea salt flakes over the surface to balance the sweetness and add a subtle crunch.
    7. Place the baking sheet in the fridge and chill for at least 30 minutes until the chocolate is fully set and crisp.
    8. Once firm, remove the sheet from the fridge and use a sharp knife or breaker to break the bark into rustic, irregular shards.
    9. If desired, melt some contrasting chocolate and drizzle it over the shards for extra visual appeal and flavor contrast.
    10. Allow the drizzle to set for a few minutes at room temperature, then enjoy your colorful, crunchy Halloween bark.

    Notes

    For best results, work quickly when adding toppings to ensure they stick well to the warm chocolate. Feel free to experiment with different toppings and drizzle patterns for a personalized touch.
    This bark isn’t just about the look; it’s about the crunch, the sweet contrast, and that satisfying snap. It’s flexible enough for kids to get involved or for a quick, festive treat to stash away. Plus, it’s almost impossible to mess up—just enjoy the chaos of mixing colors and flavors. Once you’ve made it a couple of times, it’s hard not to keep coming back.

  • Spooky-Sweet Halloween Bark: A Crispy, Colorful Concoction

    Spooky-Sweet Halloween Bark: A Crispy, Colorful Concoction

    This Halloween bark is the antidote to those fancy, overly complicated treats. It’s messy in the best way—colorful, crunchy, and downright fun to make. I love how it feels like a little rebellion in the kitchen, breaking rules, mixing textures, and making something spooky and sweet at the same time.

    Why I Keep Coming Back to This Halloween Bark

    It’s unpredictable, colorful chaos that always turns out pretty and delicious. There’s satisfaction in quickly transforming simple ingredients into something visually striking. Plus, it’s a perfect, no-fuss project for kids or a last-minute party treat. Every time, I find new topping combos, and that keeps it fresh and fun.

    Breaking Down the Ingredients for Halloween Bark

    • Chocolate (dark or milk): The base—melts smooth, provides that glossy charm, and a hint of richness.
    • Toppings (candy, cookies, sprinkles): Colorful, crunchy bits that make each piece festive and fun.
    • Edible glitter or shimmer powder: Adds a spooky sparkle, catching light and eye alike.
    • Sea salt flakes: A tiny pinch amplifies sweetness, balances flavors, and adds a little crunch.
    • Optional: White chocolate or contrasting drizzle: For decorative contrast—drizzle while still warm for a marbled, spooky effect.

    Tools of the Trade for Halloween Bark

    • Double boiler or microwave: Gently melts chocolate without scorching.
    • Spatula: Spreads melted chocolate evenly.
    • Baking sheet with parchment or silicone mat: Holds the chocolate and toppings during chilling.
    • Knife or breaker: Breaks the hardened bark into rustic pieces.

    Crafting the Perfect Halloween Bark in a Few Easy Steps

    Step 1: Line a baking sheet with parchment paper or silicone mat.

    Step 2: Melt your chocolate in a double boiler or microwave, stirring until smooth.

    Step 3: Pour melted chocolate onto the prepared sheet, spreading evenly with a spatula.

    Step 4: Add your spooky toppings—think crushed cookies, candy eyes, or edible glitter—while the chocolate is still warm.

    Step 5: Chill in the fridge for at least 30 minutes, until firm and crisp.

    Step 6: Break into irregular shards, revealing colorful, glossy surfaces.

    Step 7: Optional: drizzle with contrasting melted chocolate for extra visual punch.

    Key Tips to Nail Your Halloween Bark

    • Ensure chocolate is fully melted but not overheated to avoid blooming.
    • Spread the chocolate as evenly as possible for a uniform snap.
    • Add toppings quickly while the chocolate is still warm so they stick.
    • Check the fridge after 30 minutes; it should be firm and shiny.

    Oops Moments and How to Fix Them

    • Chocolate looks dull and streaky.? Melted chocolate blooms and gets dull → Stir in a tiny bit of vegetable oil to smooth.
    • Toppings falling off.? Toppings slide off → Press them in gently while the chocolate is still warm.
    • Bark is too brittle.? Chill too long and bark gets too hard → Let it sit at room temp for 5 minutes before breaking.
    • Chocolate becomes grainy.? Chocolate overheats and seizes → Add a splash of warm milk and stir gently.

    Halloween Bark

    This festive Halloween bark combines smooth melted chocolate with colorful toppings, creating a crunchy, glossy treat that’s as fun to look at as it is to eat. It’s a quick, no-fuss project that results in rustic, irregular shards perfect for sharing at parties or as a spooky snack. The final texture is crisp and crunchy with vibrant, decorative accents.
    Prep Time 10 minutes
    Cook Time 30 minutes
    Total Time 40 minutes
    Servings: 8
    Course: Main Course
    Cuisine: Halloween
    Calories: 150

    Ingredients
      

    • 12 oz dark or milk chocolate chopped for melting
    • 1 cup assorted toppings candy, cookies, sprinkles, edible glitter
    • 1 tsp edible shimmer powder for sparkle
    • 1 pinch sea salt flakes to enhance sweetness
    • Optional white chocolate for contrasting drizzle

    Equipment

    • Double boiler or microwave
    • Spatula
    • Baking sheet with parchment or silicone mat
    • Knife or breaker

    Method
     

    1. Line your baking sheet with parchment paper or a silicone mat to prepare for pouring the melted chocolate.
    2. Gently melt the chocolate in a double boiler or microwave, stirring until smooth and shiny, and the aroma is invitingly chocolaty.
    3. Pour the melted chocolate onto the prepared sheet, then spread it evenly with a spatula, aiming for a uniform thickness.
    4. Add your colorful toppings—crushed candies, sprinkles, edible glitter—while the chocolate is still warm and pliable, pressing them lightly into the surface.
    5. Sprinkle a tiny pinch of sea salt flakes over the toppings for a perfect flavor balance.
    6. If desired, melt some white chocolate and drizzle it in a zigzag pattern over the decorated bark for a spooky, marbled effect.
    7. Place the baking sheet in the fridge and chill for at least 30 minutes until the chocolate is firm and crisp.
    8. Once set, remove from the fridge and break the chocolate into rustic, irregular shards using a knife or your hands, revealing the colorful, glossy surface inside.
    9. Enjoy your spooky, crunchy Halloween bark—perfect for sharing or enjoying as a fun, festive treat.

    Notes

    For extra color, experiment with different toppings and drizzle patterns. Keep an eye on the chocolate as it melts to avoid blooming. Store in an airtight container at room temperature for up to a week.
    This bark isn’t just about the look; it’s about the crunch, the sweet contrast, and that satisfying snap. It’s flexible enough for kids to get involved or for a quick, festive treat to stash away. Plus, it’s almost impossible to mess up—just enjoy the chaos of mixing colors and flavors. Once you’ve made it a couple of times, it’s hard not to keep coming back.

  • Haunted House Cookies: A Spooky Treat with a Soulful Twist

    Haunted House Cookies: A Spooky Treat with a Soulful Twist

    There’s something oddly satisfying about baking cookies that look like haunted houses. Maybe it’s the thrill of turning simple ingredients into spooky, edible art that sparks the imagination. Or perhaps it’s the smoky aroma that fills the kitchen, promising a treat that’s both fun and comforting. Whatever the reason, these cookies bring a bit of playful chaos to baking, making every step a small adventure.

    Why I keep coming back to these haunted house cookies

    Their imperfect, cracked surfaces remind me of childhood Halloween nights. The smoky aroma is oddly nostalgic, stirring memories of cozy autumn evenings. Plus, decorating them is a chaotic joy—no two are ever the same. That unpredictable charm keeps me returning, especially when I need a little playful escape in the kitchen.

    Ingredients from the haunted pantry

    • Butter: Rich, creamy base that gives cookies their tender crumb. Swap with margarine if dairy-free.
    • Granulated sugar: Sweetens and helps with browning. Brown sugar adds a deeper caramel note.
    • Eggs: Bind everything together, giving structure and stability.
    • Vanilla extract: Adds warmth and depth. Use pure vanilla for a smoky, caramel aroma.
    • Flour: The skeletal framework of your cookies. All-purpose works best, but cake flour will make them lighter.
    • Chocolate for decoration: Melts into a glossy, dark drizzle, like spilled ink. Use white chocolate for a ghostly glow.
    • Spooky sprinkles: Add texture and color—think tiny bats, pumpkins, or stars.

    Tools of the spectral trade

    • Mixing bowls: Combine ingredients smoothly and efficiently.
    • Electric mixer: Cream butter and sugar with less effort.
    • Baking sheet: Provide the perfect base for baking.
    • Parchment paper: Prevent sticking and easy cleanup.
    • Decorating brushes: Apply melted chocolate or icing precisely.

    Step-by-step to spooky, delicious cookies

    Step 1: Preheat your oven to 175°C (350°F).

    Step 2: Line a baking sheet with parchment paper.

    Step 3: Cream together butter and sugar until light and fluffy, about 3 minutes.

    Step 4: Add eggs one at a time, mixing well after each.

    Step 5: Stir in vanilla extract and a pinch of salt.

    Step 6: Gradually mix in flour until just combined.

    Step 7: Using a tablespoon, scoop dough onto the prepared baking sheet, spacing evenly.

    Step 8: Bake for 12-15 minutes, until edges are golden and creepy cracks appear.

    Step 9: Let cookies cool on the sheet for 5 minutes, then transfer to a wire rack.

    Step 10: Decorate with melted chocolate and spooky sprinkles once cooled.

    Cooking checkpoints to keep your spirits high

    • Cookies should be golden around the edges and slightly cracked on top.
    • If edges darken too quickly, lower oven temperature slightly.
    • The cookies should feel firm but not hard when you gently press the center.
    • Chocolate decorations should melt smoothly without burning—keep the oven door closed while decorating.

    Beware the spectral pitfalls: mistakes and fixes

    • Cookies stuck to the sheet.? Use parchment paper to prevent sticking.
    • Burnt edges before cookies set.? Lower oven temp if edges darken fast.
    • Tough cookies from overworked dough.? Don’t overmix the dough.
    • Difficult shaping due to sticky dough.? Add a pinch more flour if dough is too sticky.

    Haunted House Cookies

    These spooky cookies are crafted using basic baking techniques like creaming, mixing, and decorating to create cracked, golden treats that resemble haunted houses. Made with butter, sugar, eggs, and flour, they develop a tender crumb and charmingly imperfect tops. Decorating with melted chocolate and sprinkles adds a playful, eerie touch perfect for Halloween festivities.
    Prep Time 20 minutes
    Cook Time 15 minutes
    Total Time 35 minutes
    Servings: 12
    Course: Main Course
    Cuisine: American
    Calories: 150

    Ingredients
      

    • 1 cup unsalted butter softened
    • 1 cup granulated sugar
    • 2 large eggs
    • 1 teaspoon vanilla extract
    • 2 1/2 cups all-purpose flour
    • 1 cup chocolate for decoration melted
    • spooky sprinkles spooky sprinkles optional for decorating

    Equipment

    • Mixing bowls
    • Electric mixer
    • Baking sheet
    • Parchment paper
    • Decorating brushes

    Method
     

    1. Preheat your oven to 175°C (350°F) and line a baking sheet with parchment paper — this helps the cookies bake evenly and prevents sticking.
    2. In a large mixing bowl, use an electric mixer to cream the softened butter and sugar together until the mixture is light, fluffy, and fragrant — about 3 minutes. You’ll notice it turns pale and slightly increased in volume.
    3. Add the eggs one at a time, mixing well after each addition. The mixture should become smooth and slightly thicker, with a glossy appearance.
    4. Stir in the vanilla extract and a pinch of salt, combining thoroughly until you smell a warm, inviting aroma.
    5. Gradually add the flour to the mixture, mixing on low speed just until the dough comes together — it should be soft but manageable, not sticky.
    6. Using a tablespoon or cookie scoop, portion out the dough onto the prepared baking sheet, spacing each dollop about 2 inches apart to allow for spreading.
    7. Bake the cookies for 12-15 minutes, or until they are golden around the edges and develop charming cracks on top, which resemble haunted house roofs.
    8. Remove the cookies from the oven and let them cool on the baking sheet for about 5 minutes — this helps them firm up and makes decorating easier.
    9. Transfer the cookies to a wire rack to cool completely. Once cooled, use a decorating brush to apply melted chocolate carefully over the cookies, creating spooky, dripping effects.
    10. Sprinkle spooky decorations like tiny bats, pumpkins, or stars on the chocolate before it sets — this adds texture and playful Halloween flair.
    11. Let the decorated cookies sit until the chocolate is firm and glossy, then enjoy these charming haunted house treats with a glass of your favorite autumn drink.

    Notes

    For extra spooky effects, use white chocolate for ghostly accents or add edible glitter. Keep a close eye on baking time to prevent over-browning, and have fun decorating each unique haunted house!
    These haunted house cookies are perfect for getting into the spooky spirit without fuss. Their cracked surface and rich chocolate accents make them irresistible for any ghostly gathering or quiet night alone. Feel free to tweak the decorations—add some edible glitter or a drizzle of caramel for extra enchantment. Most importantly, enjoy the process and the sweet, smoky aroma that fills your kitchen.

  • Haunted House Cookies: A Spooky Treat with a Soulful Twist

    Haunted House Cookies: A Spooky Treat with a Soulful Twist

    There’s something oddly satisfying about baking cookies that look like haunted houses. Maybe it’s the thrill of turning simple ingredients into spooky, edible art that sparks the imagination. Or perhaps it’s the smoky aroma that fills the kitchen, promising a treat that’s both fun and comforting. Whatever the reason, these cookies bring a bit of playful chaos to baking, making every step a small adventure.

    Why I keep coming back to these haunted house cookies

    Their imperfect, cracked surfaces remind me of childhood Halloween nights. The smoky aroma is oddly nostalgic, stirring memories of cozy autumn evenings. Plus, decorating them is a chaotic joy—no two are ever the same. That unpredictable charm keeps me returning, especially when I need a little playful escape in the kitchen.

    Ingredients from the haunted pantry

    • Butter: Rich, creamy base that gives cookies their tender crumb. Swap with margarine if dairy-free.
    • Granulated sugar: Sweetens and helps with browning. Brown sugar adds a deeper caramel note.
    • Eggs: Bind everything together, giving structure and stability.
    • Vanilla extract: Adds warmth and depth. Use pure vanilla for a smoky, caramel aroma.
    • Flour: The skeletal framework of your cookies. All-purpose works best, but cake flour will make them lighter.
    • Chocolate for decoration: Melts into a glossy, dark drizzle, like spilled ink. Use white chocolate for a ghostly glow.
    • Spooky sprinkles: Add texture and color—think tiny bats, pumpkins, or stars.

    Tools of the spectral trade

    • Mixing bowls: Combine ingredients smoothly and efficiently.
    • Electric mixer: Cream butter and sugar with less effort.
    • Baking sheet: Provide the perfect base for baking.
    • Parchment paper: Prevent sticking and easy cleanup.
    • Decorating brushes: Apply melted chocolate or icing precisely.

    Step-by-step to spooky, delicious cookies

    Step 1: Preheat your oven to 175°C (350°F).

    Step 2: Line a baking sheet with parchment paper.

    Step 3: Cream together butter and sugar until light and fluffy, about 3 minutes.

    Step 4: Add eggs one at a time, mixing well after each.

    Step 5: Stir in vanilla extract and a pinch of salt.

    Step 6: Gradually mix in flour until just combined.

    Step 7: Using a tablespoon, scoop dough onto the prepared baking sheet, spacing evenly.

    Step 8: Bake for 12-15 minutes, until edges are golden and creepy cracks appear.

    Step 9: Let cookies cool on the sheet for 5 minutes, then transfer to a wire rack.

    Step 10: Decorate with melted chocolate and spooky sprinkles once cooled.

    Cooking checkpoints to keep your spirits high

    • Cookies should be golden around the edges and slightly cracked on top.
    • If edges darken too quickly, lower oven temperature slightly.
    • The cookies should feel firm but not hard when you gently press the center.
    • Chocolate decorations should melt smoothly without burning—keep the oven door closed while decorating.

    Beware the spectral pitfalls: mistakes and fixes

    • Cookies stuck to the sheet.? Use parchment paper to prevent sticking.
    • Burnt edges before cookies set.? Lower oven temp if edges darken fast.
    • Tough cookies from overworked dough.? Don’t overmix the dough.
    • Difficult shaping due to sticky dough.? Add a pinch more flour if dough is too sticky.

    Haunted House Cookies

    These spooky cookies are made using simple baking techniques with butter, sugar, eggs, and flour, resulting in cracked, golden treats with a tender crumb. Once cooled, they are decorated with melted chocolate and spooky sprinkles to resemble haunted houses, offering a playful and nostalgic Halloween dessert with a slightly smoky aroma and charming imperfections.
    Prep Time 20 minutes
    Cook Time 15 minutes
    Total Time 35 minutes
    Servings: 12
    Course: Main Course
    Cuisine: Halloween
    Calories: 180

    Ingredients
      

    • 1 cup unsalted butter softened
    • 1 cup granulated sugar
    • 2 eggs large
    • 1 teaspoon vanilla extract
    • 2 ½ cups all-purpose flour
    • ½ cup chocolate for decoration melting, dark or white
    • as needed spooky sprinkles tiny bats, pumpkins, stars

    Equipment

    • Mixing bowls
    • Electric mixer
    • Baking sheet
    • Parchment paper
    • Decorating brushes

    Method
     

    1. Preheat your oven to 175°C (350°F) and line a baking sheet with parchment paper, setting it aside.
    2. In a mixing bowl, combine softened butter and granulated sugar. Use an electric mixer to beat until the mixture is light and fluffy, about 3 minutes, filling your kitchen with a sweet, creamy aroma.
    3. Add eggs one at a time, mixing well after each addition. The mixture should become smooth and slightly glossy.
    4. Stir in vanilla extract, then gradually add the flour, mixing just until combined. The dough will be soft but manageable, with a slightly sticky texture.
    5. Using a tablespoon, scoop dough onto the prepared baking sheet, spacing each dollop evenly to allow for spreading. Gently press down the dough if needed to shape it into a rough house silhouette.
    6. Bake the cookies for 12-15 minutes, until edges are golden brown and cracks appear on the surface, giving them a haunted, weathered look. The smell should be warm and inviting, with a hint of caramel.
    7. Remove the cookies from the oven and allow them to cool on the sheet for about 5 minutes, which helps them set and prevents breaking.
    8. Transfer the cookies to a wire rack to cool completely. Once cooled, melt the chocolate in a microwave or double boiler until smooth and glossy.
    9. Use a decorating brush or spoon to drizzle melted chocolate over the cooled cookies, creating streaks that mimic spooky cracks and windows.
    10. Add spooky sprinkles on top while the chocolate is still soft, pressing gently to make sure they stick, and creating a festive haunted house scene.
    11. Allow the decorated cookies to sit until the chocolate is set, then enjoy these charming, spooky treats that are perfect for Halloween celebrations.
    These haunted house cookies are perfect for getting into the spooky spirit without fuss. Their cracked surface and rich chocolate accents make them irresistible for any ghostly gathering or quiet night alone. Feel free to tweak the decorations—add some edible glitter or a drizzle of caramel for extra enchantment. Most importantly, enjoy the process and the sweet, smoky aroma that fills your kitchen.

  • Pumpkin Spice Cookies: A Cozy Fall Favorite with a Twist

    Pumpkin Spice Cookies: A Cozy Fall Favorite with a Twist

    Pumpkin spice cookies aren’t just for fall anymore. They’re a reminder that even simple ingredients—canned pumpkin, sugar, spices—can come together in a comforting, nostalgic way. I like to think of these as a culinary hug, especially when days get colder and the air smells like woodsmoke and falling leaves.

    Why I keep making these cookies every fall

    They remind me of my grandmother’s kitchen, the warm glow of the oven, and the smell of fresh-baked treats. Each batch feels like a small celebration of cozy, fleeting moments. Plus, they’re simple enough to whip up during busy mornings but special enough to serve guests.

    What’s in these cookies and why

    • Canned pumpkin: Adds moisture and a subtle earthy sweetness. Swap with sweet potato puree if needed.
    • Pumpkin pie spice: A blend of cinnamon, nutmeg, and clove—brings that warm, familiar aroma.
    • Brown sugar: Gives a rich, molasses note and helps cookies stay soft.
    • Butter: For richness and tender crumb. Use salted or unsalted, adjust salt accordingly.
    • Flour: The structure builder. Whole wheat works for a nuttier flavor.
    • Egg: Binder that helps hold everything together. For a vegan version, try flaxseed meal.
    • Baking soda: Leavening that helps cookies rise just enough.

    Tools of the trade for pumpkin spice cookies

    • Mixing bowls: To combine wet and dry ingredients smoothly.
    • Whisk and spatula: Getting the batter uniform and folding in ingredients.
    • Baking sheet and parchment paper: Ensuring even baking and easy cleanup.
    • Cooling rack: Preventing sogginess and helping cookies set perfectly.

    Step-by-step for the perfect pumpkin spice cookie

    Step 1: Preheat your oven to 175°C (350°F). Line a baking sheet with parchment paper.

    Step 2: In a large bowl, whisk together 1 1/2 cups flour, 1 teaspoon baking soda, 1/2 teaspoon salt, and 2 teaspoons pumpkin pie spice.

    Step 3: In another bowl, cream 1/2 cup softened butter with 3/4 cup brown sugar until light and fluffy, about 2 minutes.

    Step 4: Add 1 large egg and 1/2 cup canned pumpkin to the butter mixture, mix well.

    Step 5: Gradually fold in the dry ingredients, just until combined. Don’t overmix.

    Step 6: Scoop dough by tablespoons onto prepared baking sheet, leaving space for spreading.

    Step 7: Bake for 12-14 minutes, until the edges are golden and the centers look just set.

    Step 8: Cool on the sheet for 5 minutes, then transfer to a wire rack to cool completely.

    Cooking checkpoints and tips to get it just right

    • Edges should be golden brown, with centers slightly soft but not wet.
    • The smell should be warm and spicy, with hints of cinnamon and nutmeg filling the kitchen.
    • Cookies should feel firm but give a little when gently pressed, not crackling like dry biscuits.

    Avoid these common pitfalls when baking pumpkin spice cookies

    • Tough cookies from too much gluten development. Fix by mixing just until ingredients are combined.? OVER-MIXING THE DOUGH
    • Burnt edges or undercooked centers. Fix by double-checking your oven temperature.? BAKING AT THE WRONG TEMP
    • Spreading too much or losing shape. Fix by chilling dough for 30 minutes before baking.? NOT CHILLING THE DOUGH
    • Cookies baked unevenly. Fix by using a cookie scoop for uniform size.? INCONSISTENT SIZING

    Pumpkin Spice Cookies

    These soft, chewy pumpkin spice cookies combine canned pumpkin, warm spices, and brown sugar to create a comforting treat reminiscent of fall flavors. They are baked until golden with slightly soft centers, offering a cozy, nostalgic texture and aroma. Perfect for sharing or enjoying with a cup of tea during chilly days.
    Prep Time 15 minutes
    Cook Time 14 minutes
    Total Time 29 minutes
    Servings: 12
    Course: Main Course
    Cuisine: American
    Calories: 150

    Ingredients
      

    • 1 1/2 cups all-purpose flour
    • 1 teaspoon baking soda
    • 1/2 teaspoon salt
    • 2 teaspoons pumpkin pie spice
    • 1/2 cup unsalted butter softened
    • 3/4 cup brown sugar
    • 1 large egg
    • 1/2 cup canned pumpkin

    Equipment

    • Mixing bowls
    • Whisk
    • Spatula
    • Baking sheet
    • Parchment paper
    • Cooling rack

    Method
     

    1. Preheat your oven to 175°C (350°F) and line a baking sheet with parchment paper.
    2. In a large mixing bowl, whisk together the flour, baking soda, salt, and pumpkin pie spice until evenly combined. This creates the dry foundation for your cookies.
    3. In a separate bowl, cream the softened butter and brown sugar together using a whisk or spatula until the mixture is light, fluffy, and slightly pale, about 2 minutes. This develops a rich, smooth base.
    4. Add the egg to the butter mixture and beat until well incorporated. Then, mix in the canned pumpkin until the batter is smooth and slightly thickened, filling your kitchen with warm, spicy aromas.
    5. Gradually fold the dry ingredients into the wet mixture using a spatula, just until everything is combined. Be careful not to overmix, as this can make the cookies tough.
    6. Using a tablespoon or cookie scoop, drop rounded mounds of dough onto the prepared baking sheet, spacing them about 2 inches apart to allow for spreading.
    7. Bake the cookies in the preheated oven for 12 to 14 minutes, until the edges turn a lovely golden brown and the centers look just set with a slight softness.
    8. Remove the baking sheet from the oven and let the cookies cool on it for about 5 minutes. This helps them set and prevents breaking.
    9. Transfer the cookies to a wire rack and let them cool completely, allowing their flavors to meld and their texture to firm up slightly.
    10. Once cooled, enjoy these cozy, spice-scented cookies with a glass of milk or a warm beverage, savoring the taste of fall in every bite.

    Notes

    Chill the dough for 30 minutes if you want cookies that spread less during baking. For a vegan version, substitute the egg with flaxseed meal mixed with water and use vegan butter.
    These cookies are a slice of crisp fall air and sweet spice. They’re forgiving—kind of like the season itself—so don’t stress if they look a little rustic. Just make sure you taste-test the dough, and adjust the spices if you want a bolder hit of cinnamon or clove. Enjoy these warm with a cup of tea, or stash a few for later—their cozy aroma stays with you.