Cassava often gets overlooked as just a starchy filler, but I’ve always been drawn to its earthy, almost smoky flavor that shines through when baked properly. This recipe is my way of highlighting that natural sweetness and smokiness, turning simple chips into something more than just a snack—almost a little culinary experiment in every crunch.
Baking instead of frying keeps these chips light, crisp, and way more forgiving. Plus, the process is straightforward, no hot oil splatters, no grease residue—just clean, honest baking that brings out cassava’s best qualities. It’s a treat that feels both rustic and refined, perfect for when you want something familiar but with a little twist.
Focusing on the overlooked flavor potential of cassava’s natural earthiness, this recipe explores how baking enhances its subtle sweetness and smoky undertones, transforming humble chips into a surprisingly sophisticated snack.
The story behind this recipe
- I first tried baking cassava chips during a weekend getaway at a rustic cabin. The smell of roasted roots filled the air, reminding me of childhood snacks but with a more sophisticated twist. Since then, I’ve been experimenting with ways to bring out cassava’s hidden depth, especially through simple baking techniques that keep the natural earthiness front and center.
- There’s something satisfying about transforming humble ingredients into a snack that tastes both nostalgic and novel. This recipe came about when I wanted a healthier crunch without losing that smoky, slightly sweet flavor cassava naturally offers. It’s become a go-to for when I crave something crispy and grounding—no fuss, just honest, good food.
- heading
- story_type
Ingredient breakdown: key components
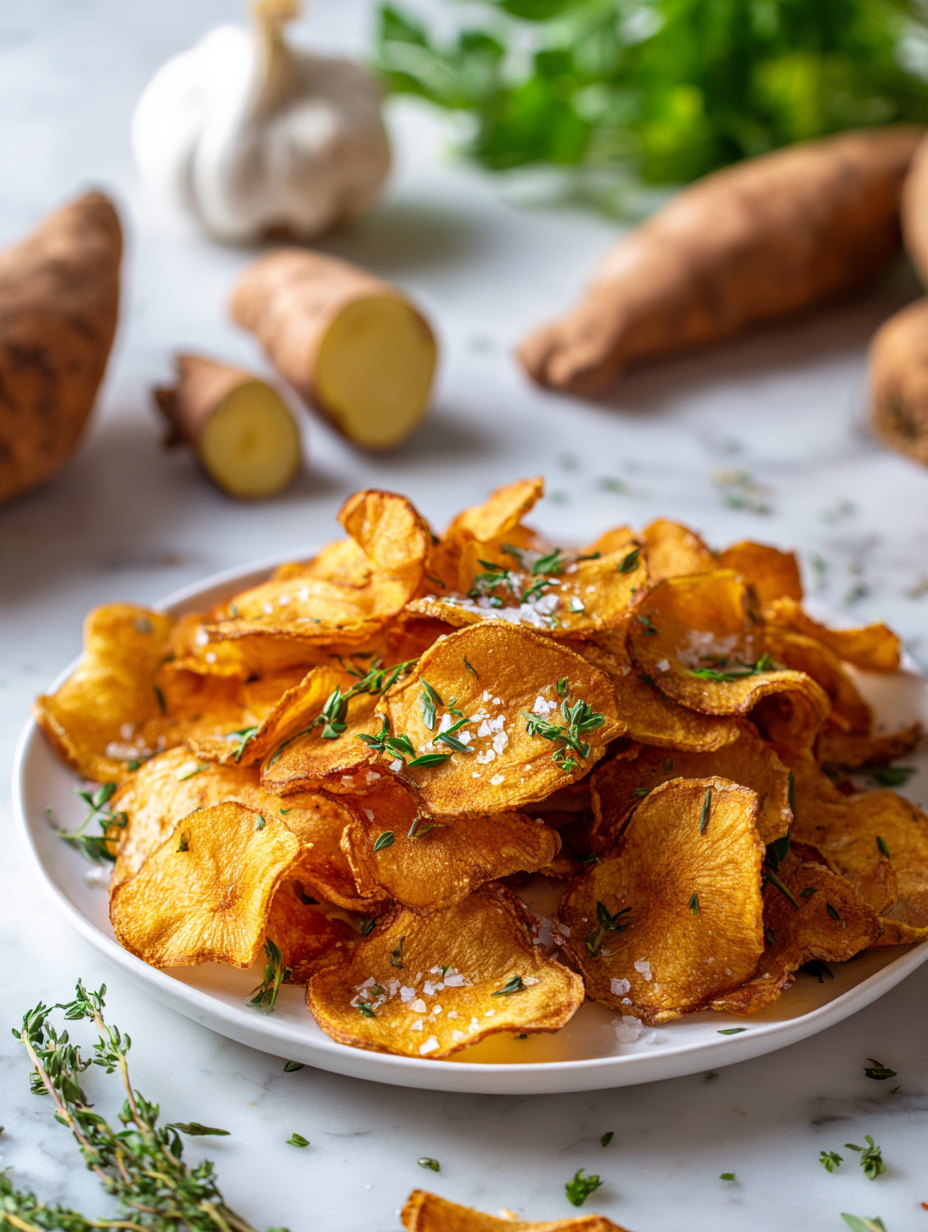
- Cassava: I love the natural earthiness and slight sweetness it offers; slice thin for maximum crispness, and don’t forget to soak the slices to remove excess starch—this keeps them light and crunchy.
- Olive oil: I prefer a good extra virgin for its smoky, fruity notes that complement cassava’s flavor; use just enough to coat evenly—too much will weigh down the chips and make them greasy.
- Sea salt: I like adding a pinch of flaky sea salt after baking; it enhances the natural flavors and adds a satisfying crunch—don’t skip this step for that final burst of flavor.
- Optional spices: A sprinkle of smoked paprika or chili powder can add warmth and depth—start sparingly and adjust to taste, especially if you like a smoky kick or heat.
- Lemon juice: A tiny splash before baking brightens the flavor and balances earthiness; use fresh lemon and go easy—overdoing it can make the chips soggy.
- Parchment paper: I always line my baking sheet; it prevents sticking and makes clean-up easier, plus helps the chips bake evenly without burning.
- Baking sheet: Use a large, flat one so the slices don’t overlap—overcrowding leads to uneven crisping, and you want a crisp, not chewy, texture.
Spotlight on key ingredients
Cassava:
- I love its earthy, slightly sweet flavor that deepens with roasting; slice thin for crispness, and soak to reduce starch, keeping chips light and crunchy.
- Cassava’s natural moisture and starch levels influence how crispy they become during baking, so uniform slicing and thorough drying are crucial.
Olive oil:
- I prefer extra virgin for its smoky, fruity notes that enhance cassava’s natural flavor; use sparingly to avoid greasiness, and coat slices evenly for crisp results.
- The oil’s quality and amount directly affect the crunch and flavor—too much makes them greasy, too little leaves them bland.
Notes for ingredient swaps
- Dairy-Free: Use coconut oil instead of olive oil for a subtle tropical aroma and slightly richer flavor.
- Vegan: Swap honey with maple syrup or agave nectar for a touch of sweetness without animal products.
- Gluten-Free: Ensure your baking powder (if using) is labeled gluten-free, or skip it altogether for a simpler chip.
- Spice Variations: Replace smoked paprika with cumin or coriander for different smoky or earthy notes.
- Salt Alternatives: Use sea salt, Himalayan pink salt, or seasoned salt blends to customize the flavor punch.
- Lemon Brightness: Add a splash of lime juice instead of lemon for a different citrus zing that’s equally fresh.
- Oil Options: Try avocado oil for a neutral, high-smoke point fat that crisps up beautifully without overpowering cassava’s natural taste.
Equipment & Tools
- Mandoline or sharp knife: To slice cassava uniformly thin for even crisping.
- Large baking sheet: To hold slices in a single layer for even baking.
- Parchment paper: Prevents sticking and makes cleanup easier.
- Mixing bowl: To toss slices with oil and seasonings evenly.
- Kitchen towel or paper towels: To dry the soaked cassava slices thoroughly.
Step-by-step guide to baked cassava chips
- Preheat your oven to 180°C (350°F). Line a large baking sheet with parchment paper for easy cleanup and even baking.
- Peel the cassava using a vegetable peeler, then slice it as thin as possible—about 1 mm thick—using a mandoline or sharp knife. Uniform slices ensure even crisping.
- Place the sliced cassava in a bowl of cold water. Let soak for 10 minutes to remove excess starch, which helps keep the chips light and crispy.
- Drain the slices and pat them very dry with a clean kitchen towel or paper towels. Removing moisture is key to avoiding soggy chips.
- In a mixing bowl, toss the dried cassava slices with 1-2 tablespoons of olive oil until evenly coated. Add a pinch of sea salt and any optional spices like smoked paprika or chili powder at this stage.
- Arrange the slices in a single layer on the prepared baking sheet. Avoid overcrowding; overlap causes uneven baking and soggy spots.
- Bake for 15-20 minutes. Check at 15-minute mark—look for golden edges and a crispy texture. If they’re still soft or pale, continue baking, checking every 2 minutes.
- Once done, turn off the oven and let the chips cool on the baking sheet for 5 minutes. They will crisp up further as they cool.
- Remove from the oven, sprinkle with a little extra sea salt if desired, and transfer to a wire rack or plate. Let sit for another 5 minutes to finish crisping.
- Serve immediately or store in an airtight container for up to 2 days. Reheat in a 180°C (350°F) oven for 3-5 minutes if they lose crunch.
Let the chips cool on the baking sheet for 5 minutes before transferring to a plate. Serve immediately for maximum crispness, or store in an airtight container for up to 2 days. Reheat in a 180°C (350°F) oven for 3-5 minutes to regain crunch.
How to Know It’s Done
- Color: Edges should be golden brown and crispy.
- Texture: Chips should snap easily when broken, not bend or feel chewy.
- Appearance: Evenly browned slices with no burnt edges or pale spots.
Baked Cassava Chips
Ingredients
Equipment
Method
- Peel the cassava using a vegetable peeler until smooth. Slice it into thin, uniform pieces about 1 mm thick using a mandoline or sharp knife. This ensures even baking and maximum crispness.
- Place the sliced cassava in a bowl of cold water and let soak for 10 minutes. This step helps remove excess starch, making the chips lighter and crisper.
- Drain the soaked slices and pat them thoroughly dry with a kitchen towel or paper towels. Removing moisture is key to achieving crisp chips.
- In a mixing bowl, toss the dried cassava slices with olive oil until evenly coated. Squeeze in fresh lemon juice for brightness, and sprinkle with smoked paprika if using. Mix gently to distribute evenly.
- Line a large baking sheet with parchment paper. Arrange the slices in a single layer without overlapping, ensuring they have space to crisp up evenly.
- Bake in a preheated oven at 180°C (350°F) for 15-20 minutes. Check around 15 minutes; the edges should turn golden brown and crispy when they’re done.
- Halfway through baking, carefully flip the slices over with tongs or a spatula to promote even browning and crisping.
- Once golden and crispy, remove the chips from the oven and let them cool on the baking sheet for about 5 minutes. They will crisp further as they cool.
- Transfer the cooled chips to a plate, sprinkle with a little extra sea salt if desired, and serve immediately for the best crunch and flavor.
Notes
Pro tips for perfect cassava chips
- Bolded mini-head: Thin slices are key → Aim for about 1 mm thickness for maximum crispness and even baking.
- Bolded mini-head: Soak to reduce starch → Soaking cassava slices in cold water for 10 minutes prevents sogginess and promotes crunch.
- Bolded mini-head: Dry thoroughly → Pat slices dry with a towel to eliminate moisture, ensuring crispy chips.
- Bolded mini-head: Watch for even coloring → Check at 15 minutes; golden edges mean perfect doneness, avoid overbaking to prevent burnt bits.
- Bolded mini-head: Use parchment for even bake → Lining your sheet helps prevent sticking and promotes uniform crisping.
- Bolded mini-head: Flip halfway → Turn chips to ensure even color and avoid uneven burning or soft spots.
- Bolded mini-head: Cool before storing → Let chips rest 5 minutes after baking; they crisp further as they cool down.
Common mistakes and how to fix them
- FORGOT to dry cassava slices → They turn soggy; pat dry thoroughly before baking.
- DUMPED oil or seasoning → Use just enough for even coating, avoid excess that causes greasiness.
- OVER-TORCHED edges → Reduce baking time or lower temperature to prevent burning and bitterness.
- MISSED flipping or rotating → Turn chips halfway through for even crispiness and color.
Quick fixes and pantry swaps
- When chips are soggy, splash with a little lemon juice to brighten and crisp up.
- If edges burn, patch with a sprinkle of sea salt to mask bitterness.
- When chips stick, shield with a quick spray of oil and return to oven.
- Dumped too much oil? Rescue with paper towels and a quick re-bake to absorb excess.
- When lacking parchment, swap with a silicone baking mat for even crisping.
Prep, store, and reheat tips
- You can slice and soak the cassava a few hours ahead; keep it submerged in cold water in the fridge to prevent browning.
- Store dried, sliced cassava in an airtight container at room temperature for up to 24 hours to maintain crispness.
- Cooked chips are best enjoyed fresh but can be kept in an airtight container at room temperature for 1-2 days; reheat in a 180°C (350°F) oven for 3-5 minutes until crisp and fragrant.
- Overnight storage may cause chips to lose some crunch; re-crisp in the oven to restore texture and bring back that smoky aroma.
- Avoid storing chips in the fridge, as moisture will make them soggy and dull their crunch.
Top questions about cassava chips
1. How thin should I slice the cassava?
Slice cassava as thin as possible, about 1 mm, for maximum crunch and even baking.
2. Should I soak the cassava slices before baking?
Soaking slices in cold water for 10 minutes helps remove excess starch, making chips crispier.
3. What temperature and time work best for baking?
Bake at 180°C (350°F) for 15-20 minutes, checking for a golden, crispy look around 15 minutes.
4. Do I need to line my baking sheet?
Use parchment paper to prevent sticking and promote even crisping during baking.
5. Can I skip drying the cassava slices?
Dry thoroughly after soaking to prevent sogginess; pat slices dry with a towel or paper towels.
6. When should I season the chips?
Add a pinch of sea salt and optional spices like smoked paprika after baking for flavor enhancement.
7. How do I store and reheat leftovers?
Store in an airtight container for up to 2 days; reheat in a 180°C (350°F) oven for crispness.
8. What if my chips lose their crunch?
If chips are soggy, re-crisp in the oven at 180°C (350°F) for a few minutes and let cool.
9. How can I get even slices?
Use a mandoline for uniform slices, ensuring all chips cook evenly and crisp up nicely.
10. Why are my chips uneven or soft?
Avoid overcrowding the baking sheet; leave space between slices to crisp evenly and prevent soft spots.
Baked cassava chips remind me how simple ingredients can surprise us with their depth. Each crispy crunch carries a whisper of smoky earthiness that feels both comforting and a little adventurous.
In a world of fast snacks and fried favorites, these chips bring a grounded, honest option that’s as satisfying as it is straightforward. They’re a reminder that sometimes, less is more—and flavor really does shine through simple baking.

Welcome to Exploreing New Tastes. I’m really glad you found your way here. I’m a food blogger driven by curiosity more than perfection. I think about flavors constantly, how they change across cultures, how a small tweak can completely shift a dish, and how food tells stories long before anyone sits down to eat. This blog is where I document that curiosity, one recipe and one experience at a time.